Action Approval for GlobalAutomation Setup
This node is only available for GlobalAction in the Cloud.
The Action Approval node makes it easy to incorporate single or multi-level approvals into any business process. Effortlessly route approvals based on criteria such as department or amount, notify users of pending approvals via email, and send automated reminders to ensure timely action. If no action is taken, the node can escalate the request to keep your process moving forward seamlessly.

Acton Approval Node
This process allows for any combination of:
Single or Multi Level approval processes.
Dollar driven approval processes.
Department based approval processes.
End User Interactions
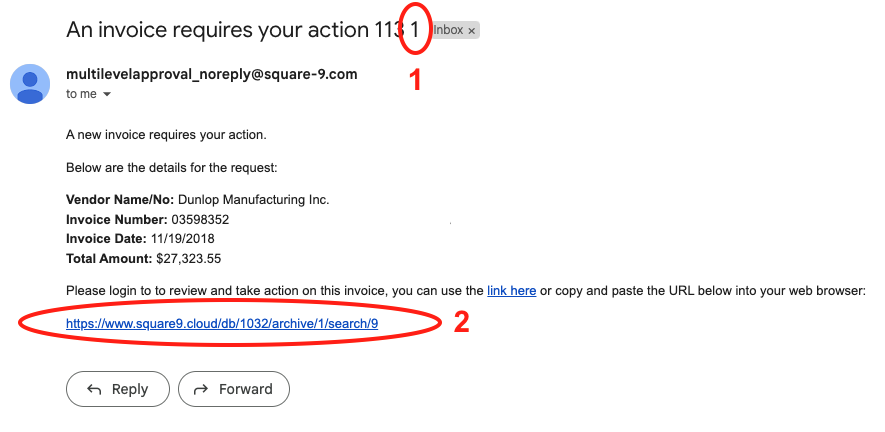
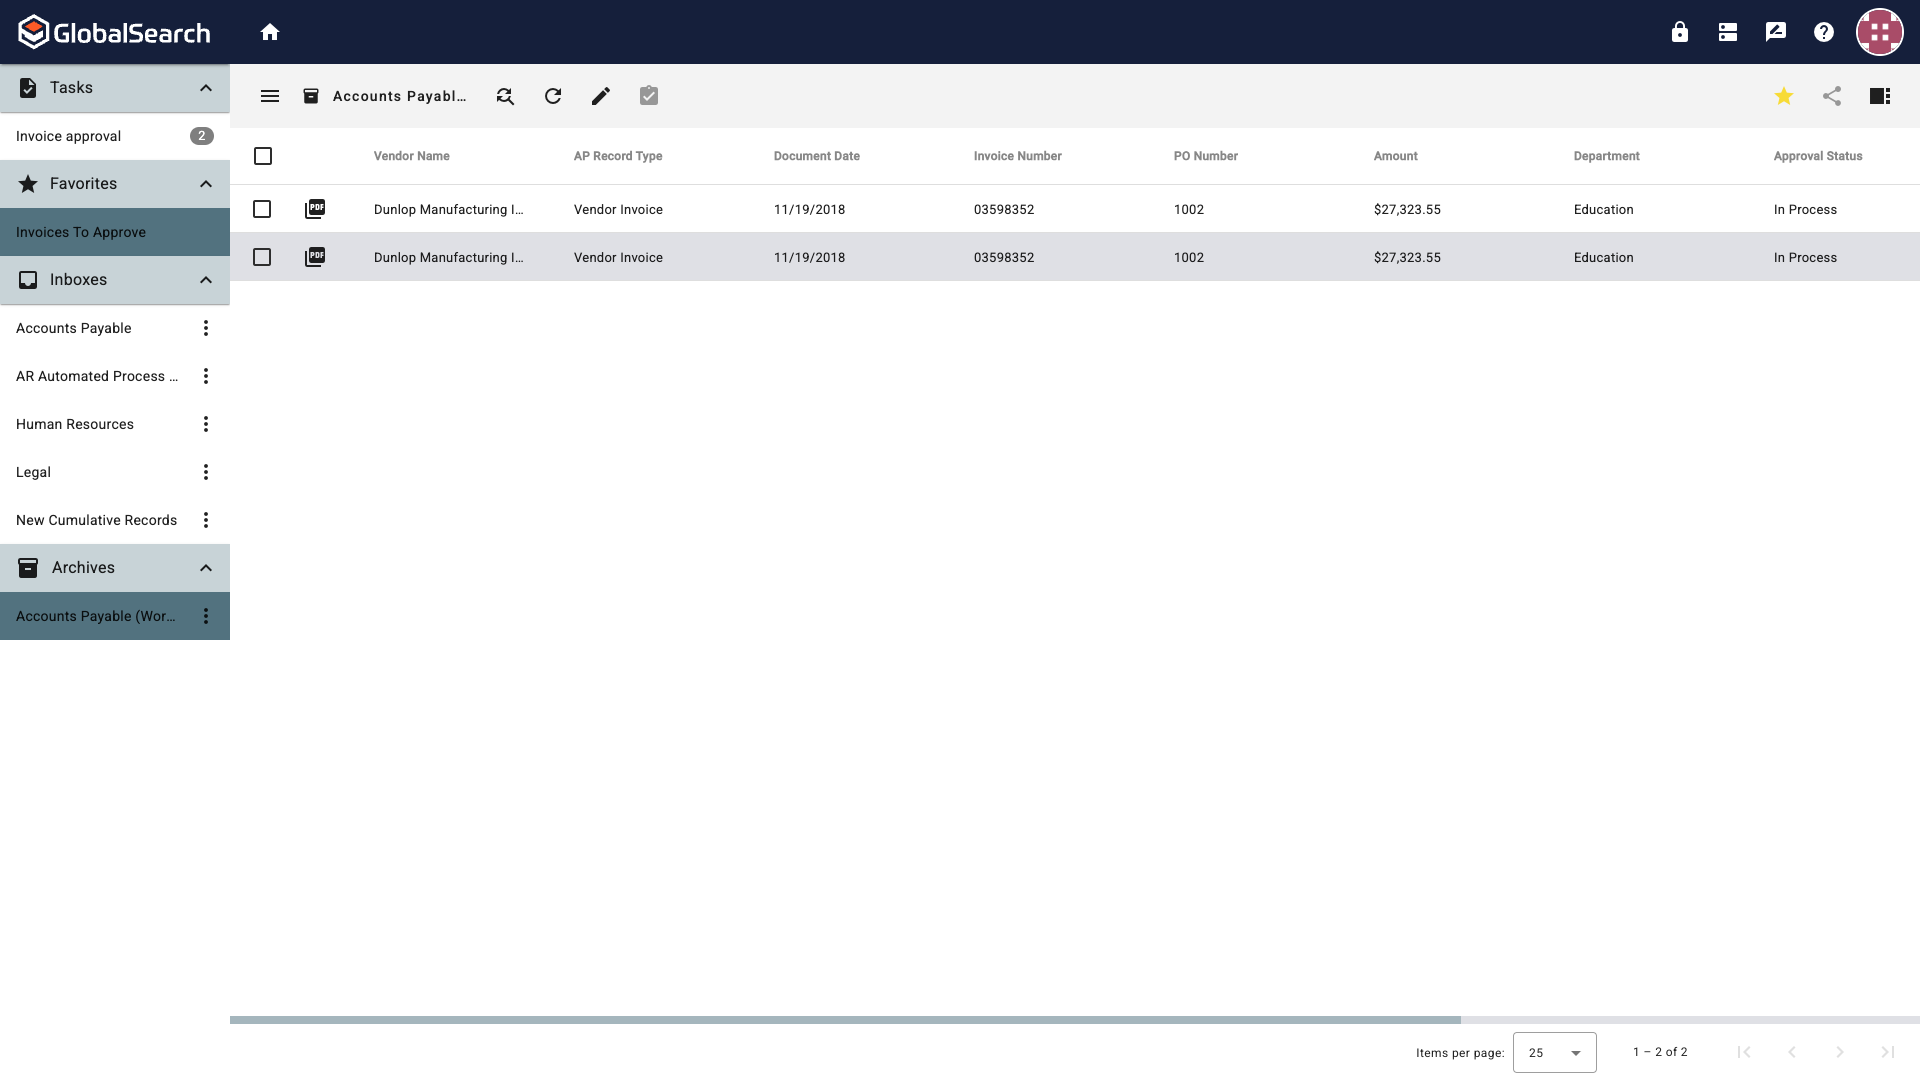
If enabled by the system admin, end users receive notifications when documents have arrived needing approval and can set up a Favorites search to quickly see a list of all invoices awaiting their approval. Each document is then opened in the Document Viewer and action can be taken.
Email Notification
Email notifications are managed by your system administrator. If you're not receiving notifications for documents requiring approval, please reach out to your system administrator.
Anytime a document enters the Invoice Approval queue, reenters the Invoice Approval queue when no action is taken, or the approval cannot be bypassed, you will receive an email notification of the waiting document with a link to a search to display all documents awaiting your action.
Workflow Email
Reminder Count - Each time the notification is sent for the document, this number in increments. This is the number of reminders sent. The number of reminders sent before the invoice is automatically escalated is determined by your system administrator.
Documents Awaiting Action
Search URL - Direct link to the search that will display all documents awaiting your action in the GlobalSearch Go Search Results View.
Approval Actions
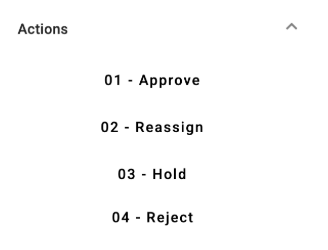
The following actions are available for all documents in the Invoice Approval queue:
Approval Actions
Approve - Moves the document forward in the process.
If you are the Final Approver, the document will exit the approval portion of the workflow with the Approval Status set to Approved.
If you are not the Final Approver, the document will continue in the approval portion of the workflow routing to the next approver.
Reassign - Exits the approval portion of the workflow with an Approval Status of Reassigned. What happens next is determined by your system administrator.
Hold - Keep the document in the current approval state with an Approval Status of On Hold. No further notifications will be sent. The document will remain in the Invoice Approval queue until a manual action is taken.
Reject - Exits the approval portion of the workflow with an Approval Status of Rejected. What happens next is determined by your system administrator.
Your system administrator may have added additional actions. Consult your system administrator for the purpose of any actions not listed above.
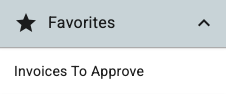
Favorites
Add the Invoice to Approve search to your Favorites pane in the Navigation Panel to quickly view a list of documents awaiting your action.
Favorites Pane in the GlobalSearch Navigation Panel
If you do not have access to the Invoices to Approve search, consult your system administrator.
Configuring the Multi-Level Approval Process
When deploying the multi-level approval process, each step is dependent on the previous step so the steps MUST be completed in the correct order to ensure the process functions as intended.
Step 1: GlobalSearch Configuration
You must be configured to use GlobalSearch Go. For Cloud customer, you should already be configured for GlobalSearch Go. Learn how to access GlobalSearch Go here. For Premise customers, learn how to configure your local instance for GlobalSearch Go.
Preconfigured Archive
It is recommended you deploy the GlobalAutomation Accounts Payable archive from the Square 9 Solutions Delivery Network to use in conjunction with the Action Approval node. This archive is preconfigured with the needed fields and searches.
The Department index field is pre-populated with some common values. Modify the Departments list in the Field Catalog to meet your needs. This list should match the list of Approval Groups you will configure in GlobalForms later in this process.
Using your Own Archive
If you are choosing to use your own Accounts Payable archive, it MUST contain specific fields and searches.
Index Fields
The following fields are required in addition to any other fields you would like your archive to include.
Index Field Name | Data Type | Additional Notes |
|---|---|---|
Amount | Decimal | Adding a Format of C will display the value in USD. |
AP Record Type | Character | This should be a list and one value in the list MUST be Vendor Invoice. |
Approval Status | Character | This should be a list and MUST contain: Approved, Approver Error, In Process, On Hold, Pending, Reassigned, Rejected. |
Current Approver | Character | |
Department | Character | This should be a list that matches the list of departments entered into the GlobalForms Approval Group resource. |
Vendor Name | Character |
Searches
There are 3 searches that are needed:
GlobalAction - Invoice Approval
This search is configured to find documents need to enter the approval queue. This search will be used to ingest documents into the approval process.
Name: GlobalAction - Invoice Approval
Search Conditions:
Approval Status equals {Pending}
AP Record Type equals {Vendor Invoice}
No Advanced configurations are needed.
You can modify this search as needed to ingest the documents you would like to enter the approval process workflow.

GlobalAction - Invoice Approval
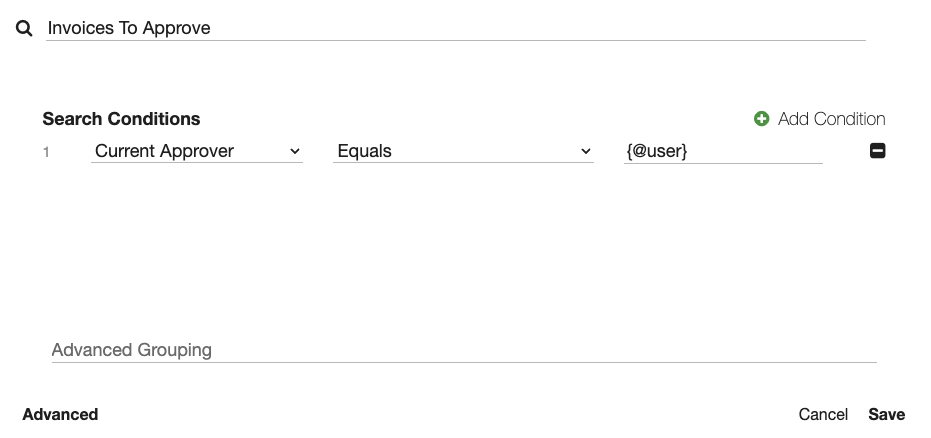
Invoices To Approve
This search is required for the search link found in the notification email and must be constructed exactly as shown.
This search is configured to find any document waiting in the Approval Queue for the user currently logged into GlobalSearch.
Name: Invoices To Approve
Search Conditions:
Current Approver Equals {@user}
No Advanced configurations are needed.
Invoices to Approve Search Configuration
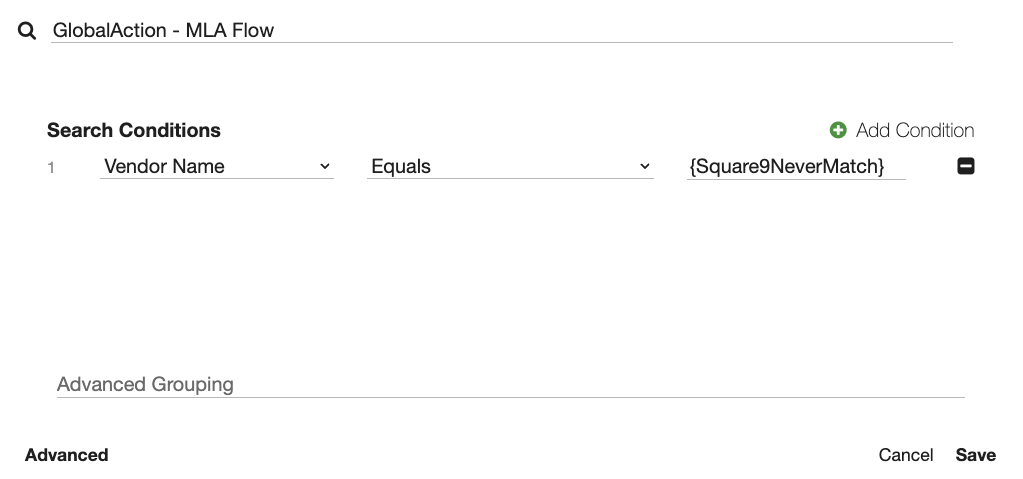
GlobalAction - MLA Flow
This search is required for documents to be ingested into the Approval portion of the workflow and must be constructed exactly shown.
This search is used to ingest documents in the Action Approval node.
Name: GlobalAction - MLA Flow
Search Conditions:
Vendor Name equals {Square9NeverMatch}
No Advanced configurations are needed.
GlobalAction - MLA Flow
Users
There is no binding between the User Account assigned in the Approver Rules in GlobalForms and the user in GlobalSearch. To take action on documents, the user MUST:
Exist in GlobalSearch with the same User Account (email address) name.
Have a License allocated.
Be secured to the appropriate archive (Accounts Payable (Workflow)) and the search referenced in the email (Invoices to Approve).
Be secured to one of the following groups:
Bills - Accounts Payable
Bills - Approvers
The included groups are Square 9 groups and only accept Square 9 users.
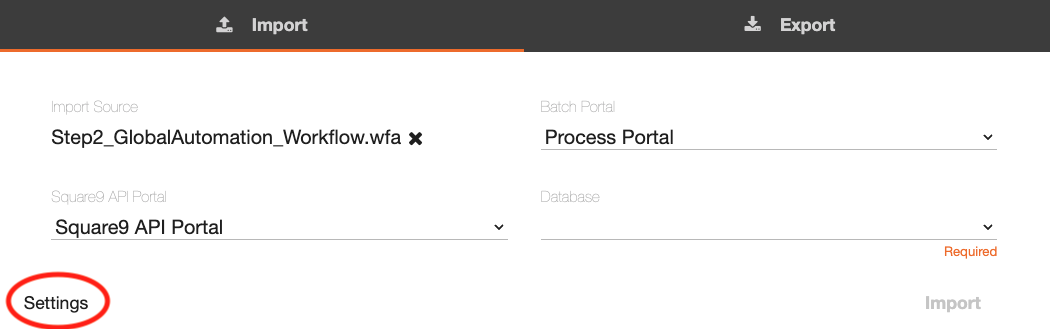
Step 2: Workflow Import
Download the Square 9 GlobalAutomation GlobalAction workflow from the Square 9 Solutions Delivery Network - This will import:
Square 9 Multi Level Approval GlobalAction workflow
Action Approval Node
When importing the workflow, ensure you disable the Clear Email Options.
Access Import Settings
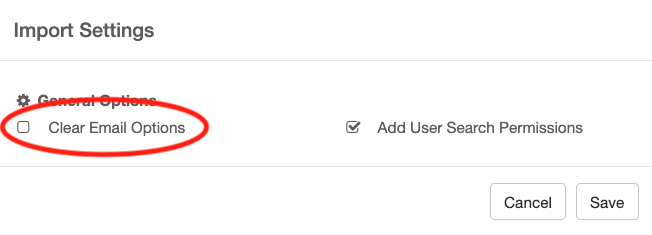
Import Settings
If you imported this workflow without changing this setting, a conflict will arise. To resolve this conflict correctly, enter {p_approverUserAccount} in the To field for the Email node.
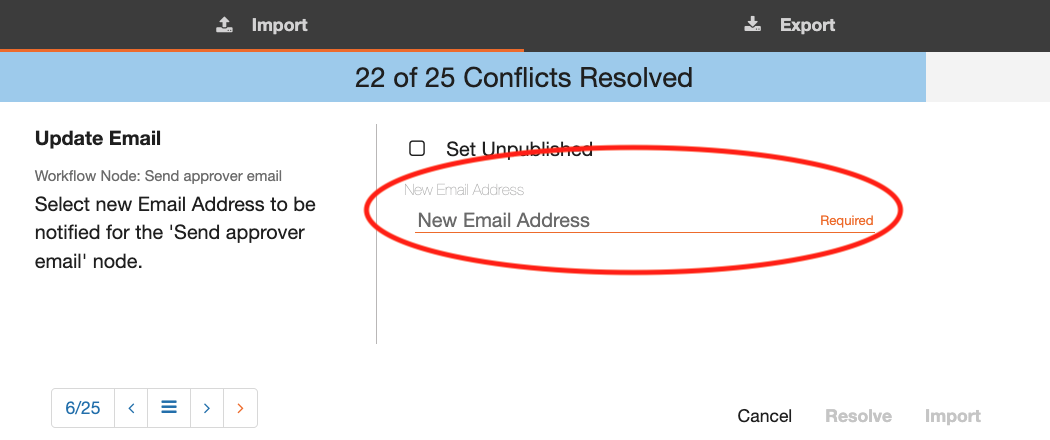
Email Conflict Resolution
Step 3: Import the Required GlobalForms
The Multi-Level Approval process requires the following resources and forms.
Amount Based Approval Resource
Department Approval Resource
Multi Level Approval Dashboard

GlobalForms Multi-Level Approval Resources and Forms
Import the resources before you import the dashboard.
Download the resources Action Approval GlobalForms and Resources.zip
Import the Amount Based Approval Resource into GlobalForms. This will import the two necessary resources (Amount Based Approval and Department Approval) for the process.
Import the Multi Level Approval Dashboard form into GlobalForms.
Step 4: Approval Process Configuration
Creating and Managing Approval Groups and Rules
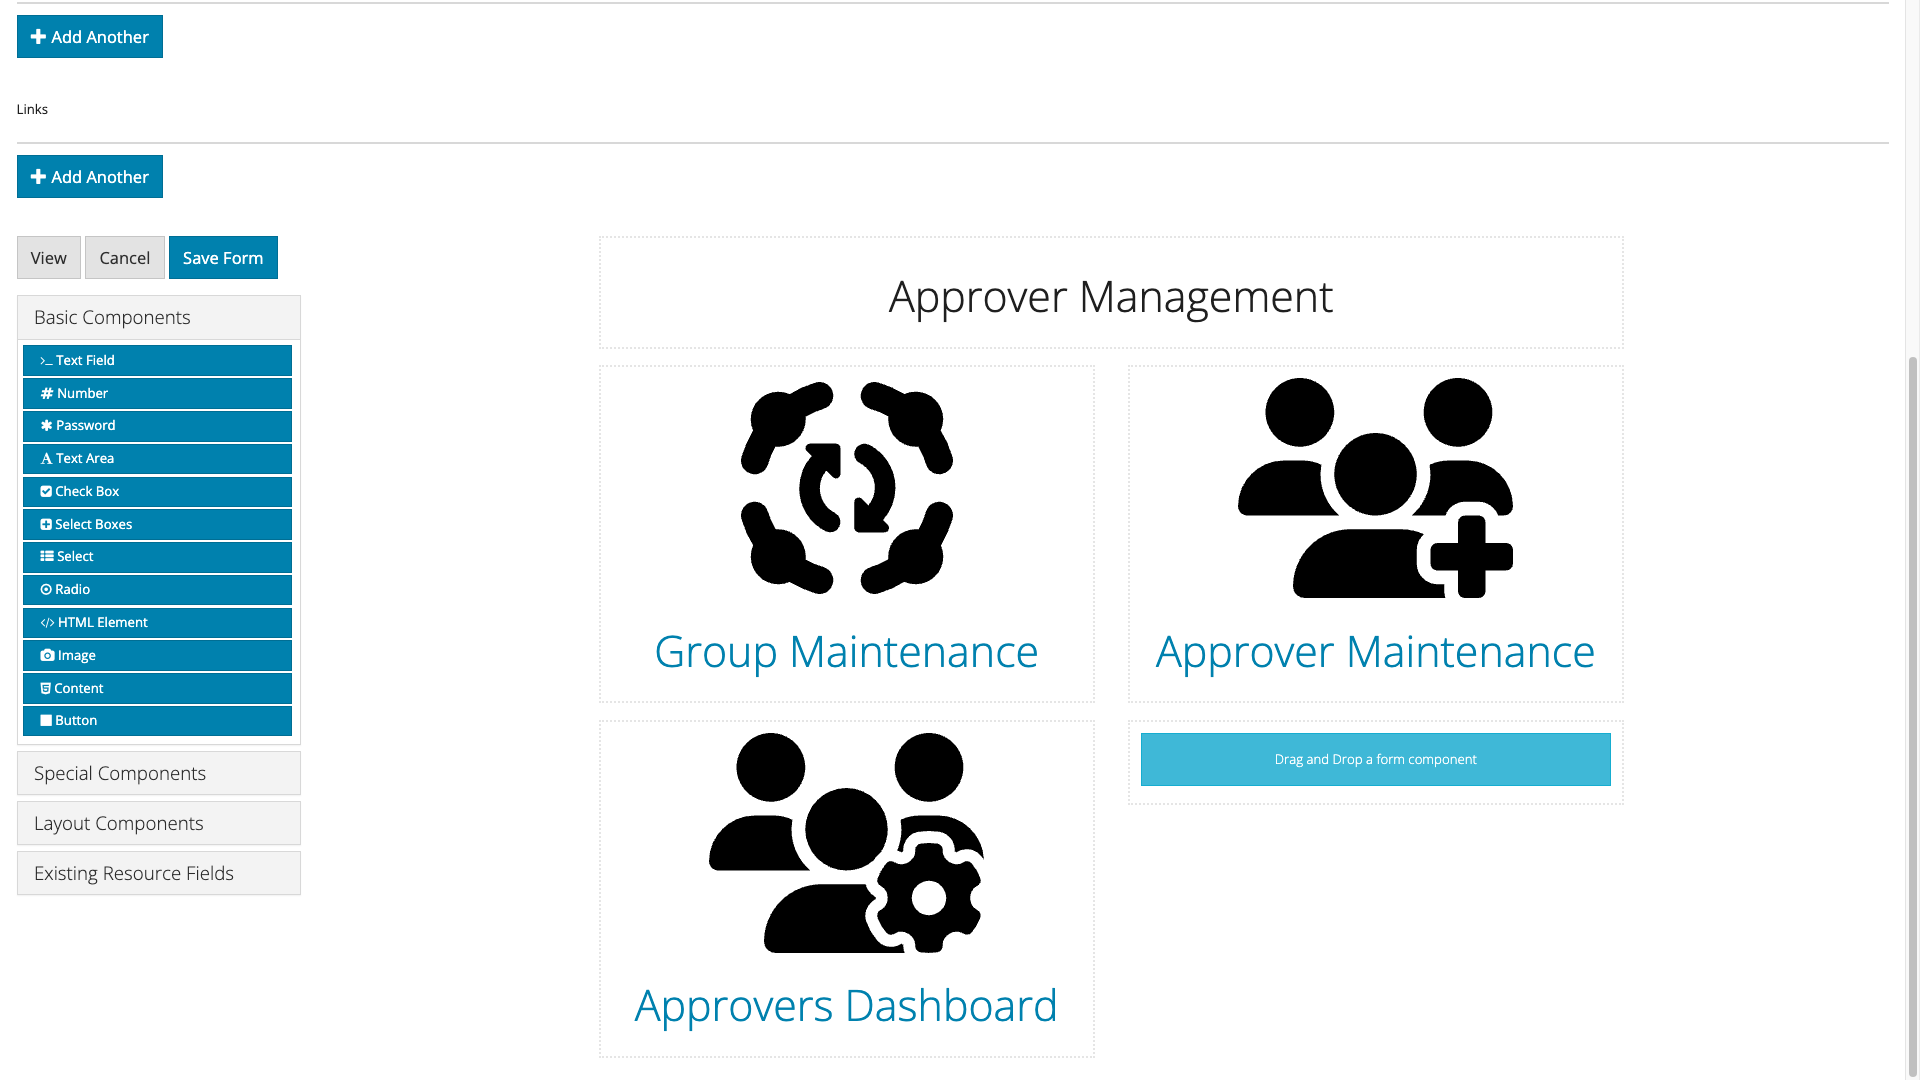
Creating and managing Approval Groups and Approval Rules is entirely done from the Approver Management dashboard.
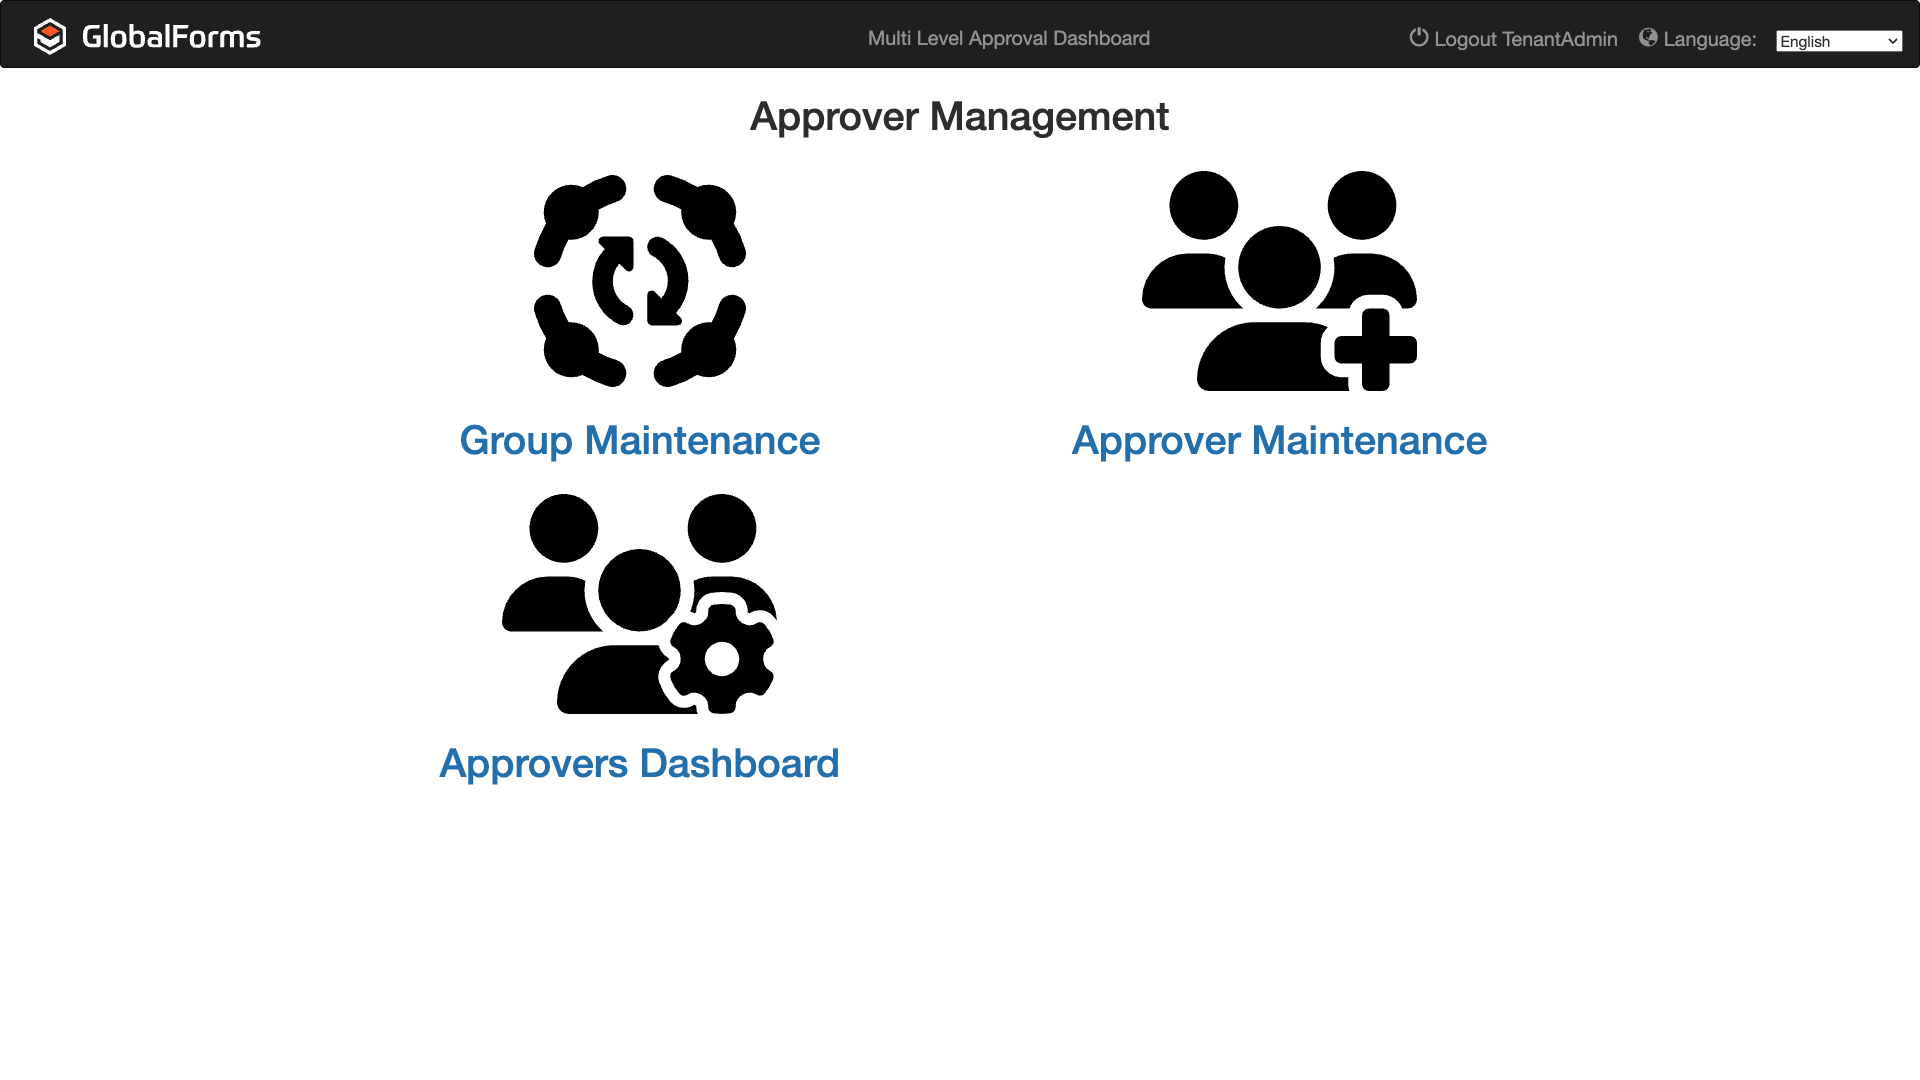
Multi Level Approval Dashboard
You can access the Approver Management dashboard using the following link:
https://forms-myinstancename.mysquare9.com:5454/view/#!/multilevelapprovaldashboard
Just replace myinstancename with the name of your GlobalForms instance. If you are unsure of the name of your instance, you can login to GlobalForms and get it from the URL.

GlobalForms Instance Name
Approval Groups
Using Group Maintenance, create a list of any Approval Groups that will be part of the approval process. Approval Groups can be added to, removed from, or modified at any time. Your Approval Groups may be a list of Departments, Teams, or any other way you organize your approval processes.
This list should match identically to the list of Departments in your GlobalSearch instance. You can view the items in your list by opening a document in GlobalSearch and viewing the list or by navigating to the List tab in the Field Catalog.
Login to Approver Management dashboard and select Group Maintenance.
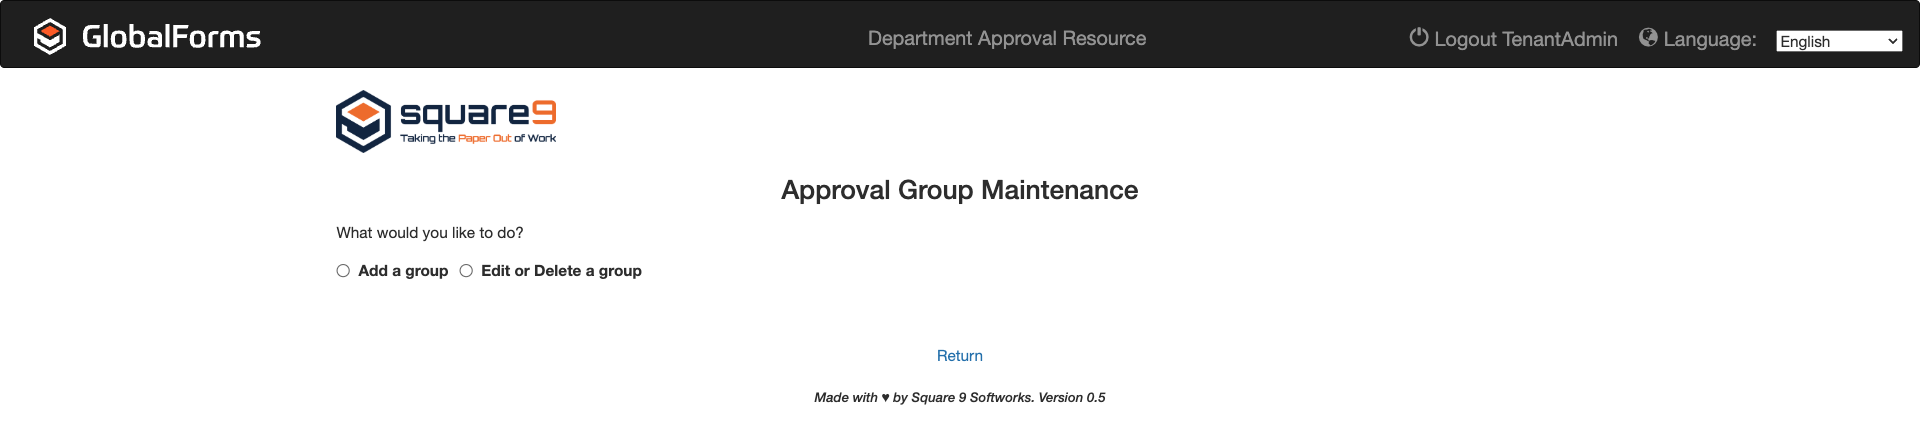
Approval Group Maintenance
Adding A Group
Select Add a Group.
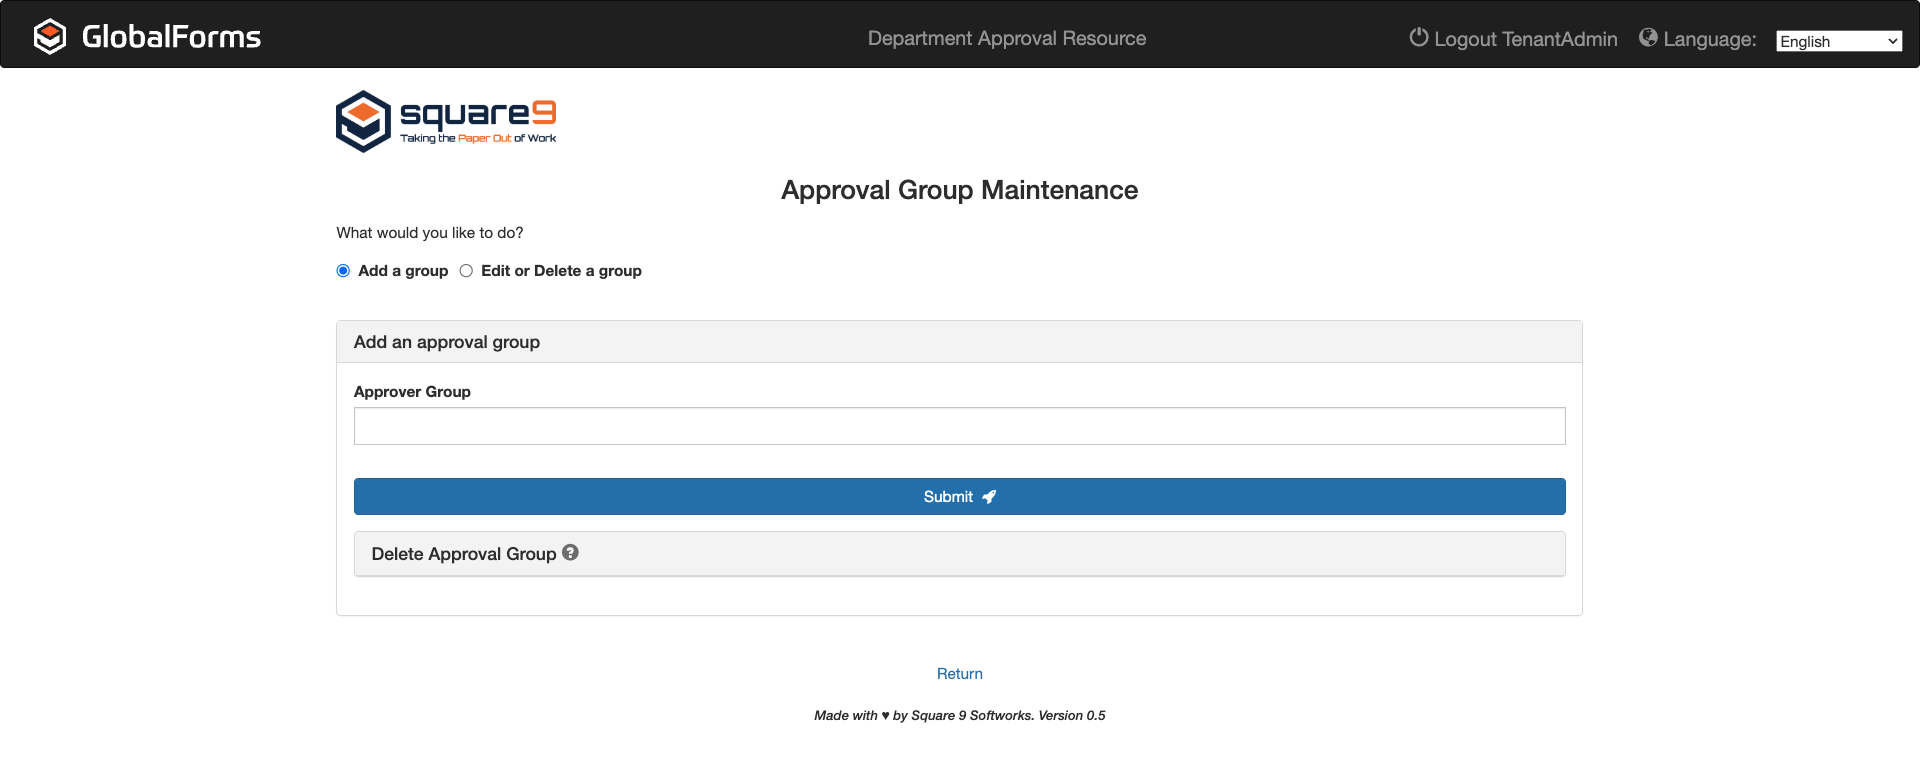
Adding an Approval Group
Enter the Approver Group name and click Submit.
Repeat step 3 to add additional Departments.
When finished click Return to return to the Approver Management dashboard or select Edit or Delete a Group to modify or remove existing Approver Groups.
Modifying or Deleting Approver Groups
Editing or removal of existing approval groups that are actively assigned to documents in the workflow can cause unexpected results. It is advisable to ensure any groups being maintained are no longer a part of any active document approvals.
Select Edit or Delete a Group.
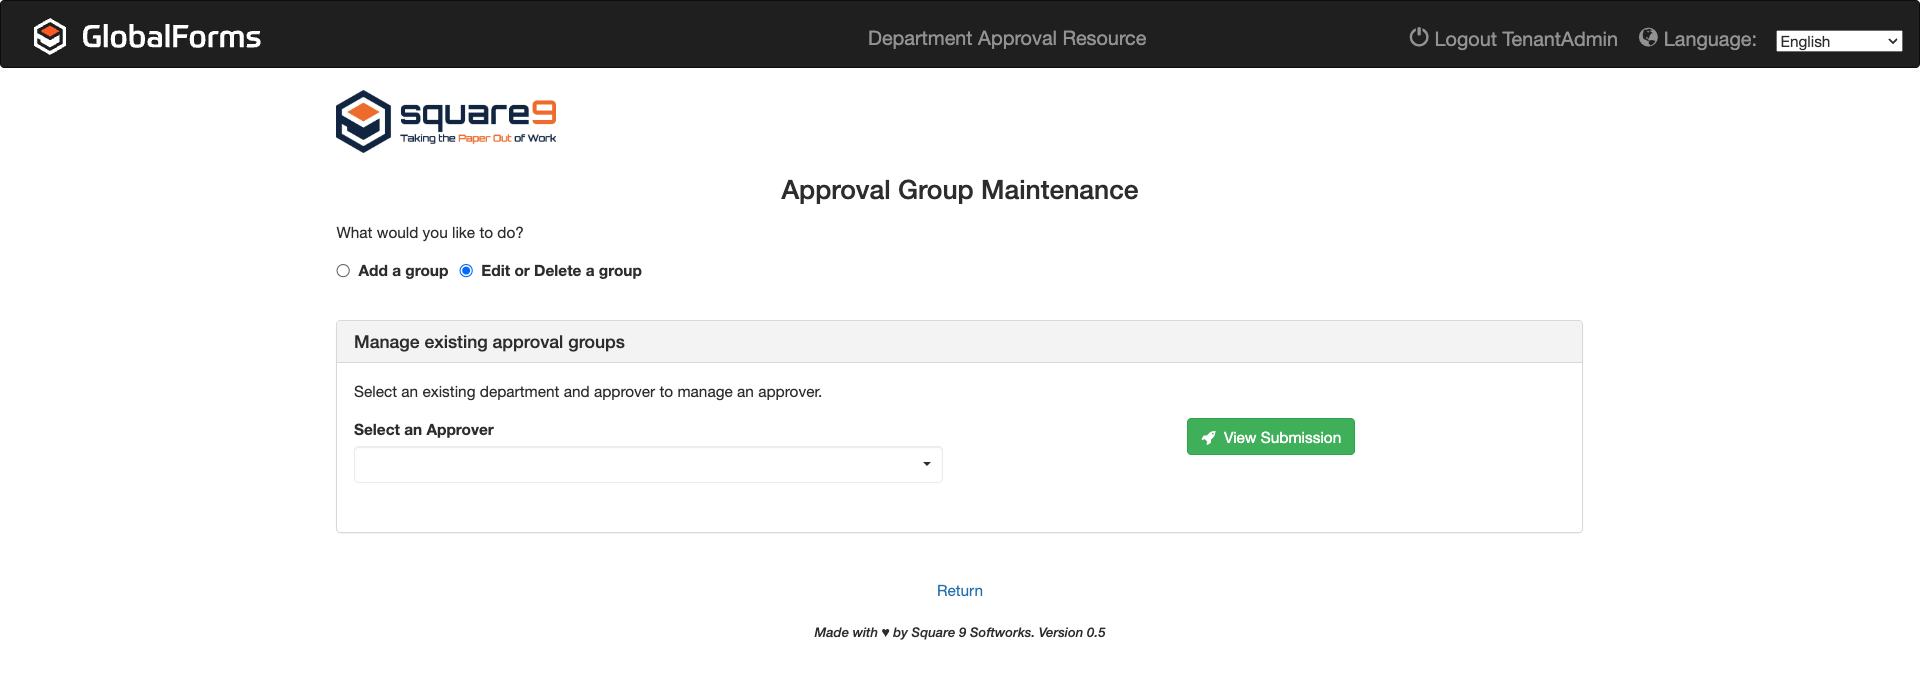
Edit or Delete A Group
Use Select an Approver to select an Approver Group to delete or modify.
Click View Submission.
Modifying Approver Groups
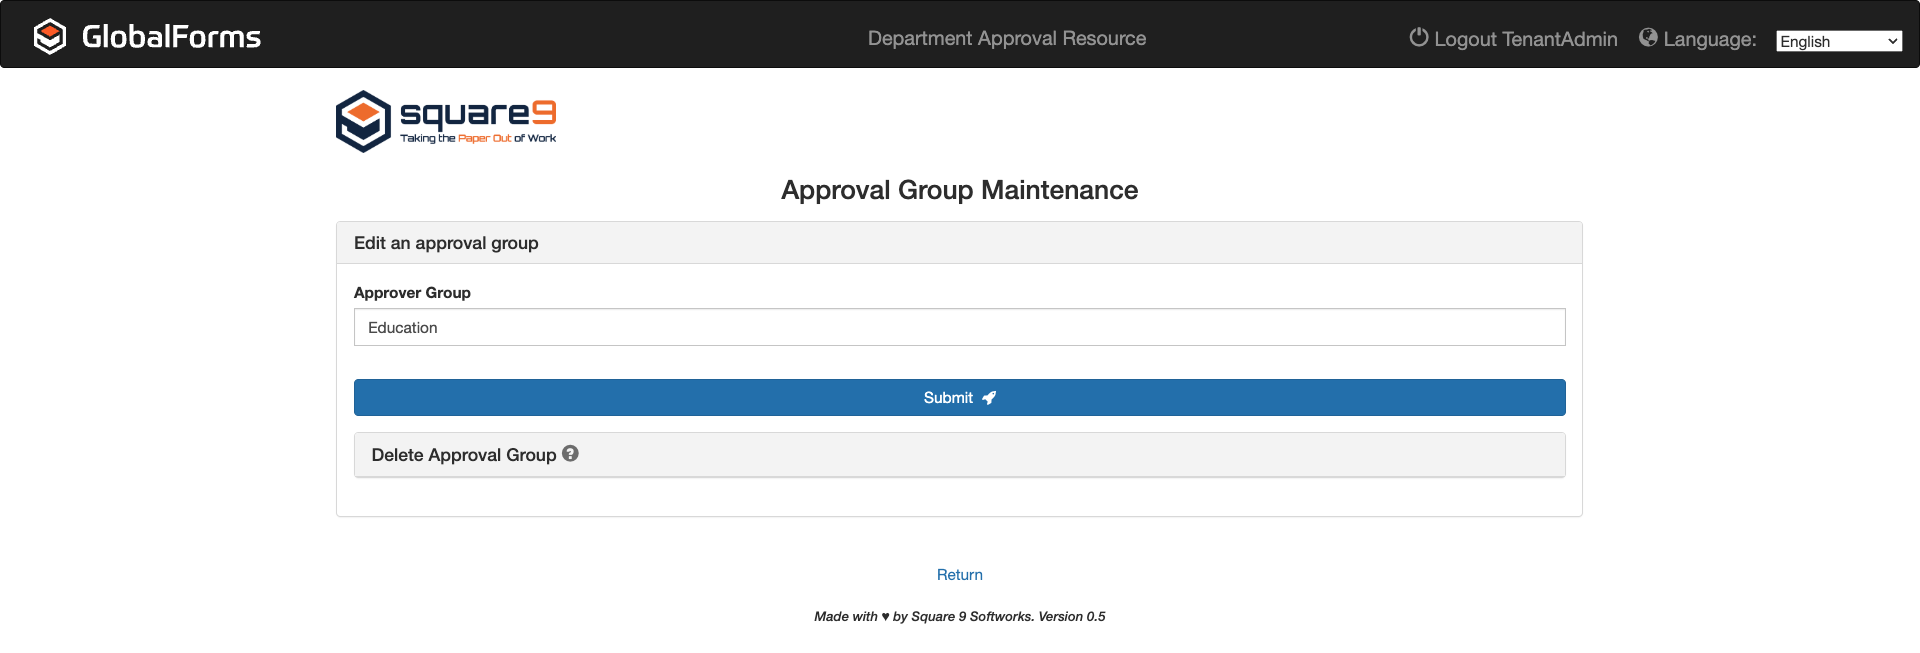
Edit an Approver Group
Make desired changes to the Approver Group and click Submit.
Deleting Approver Groups
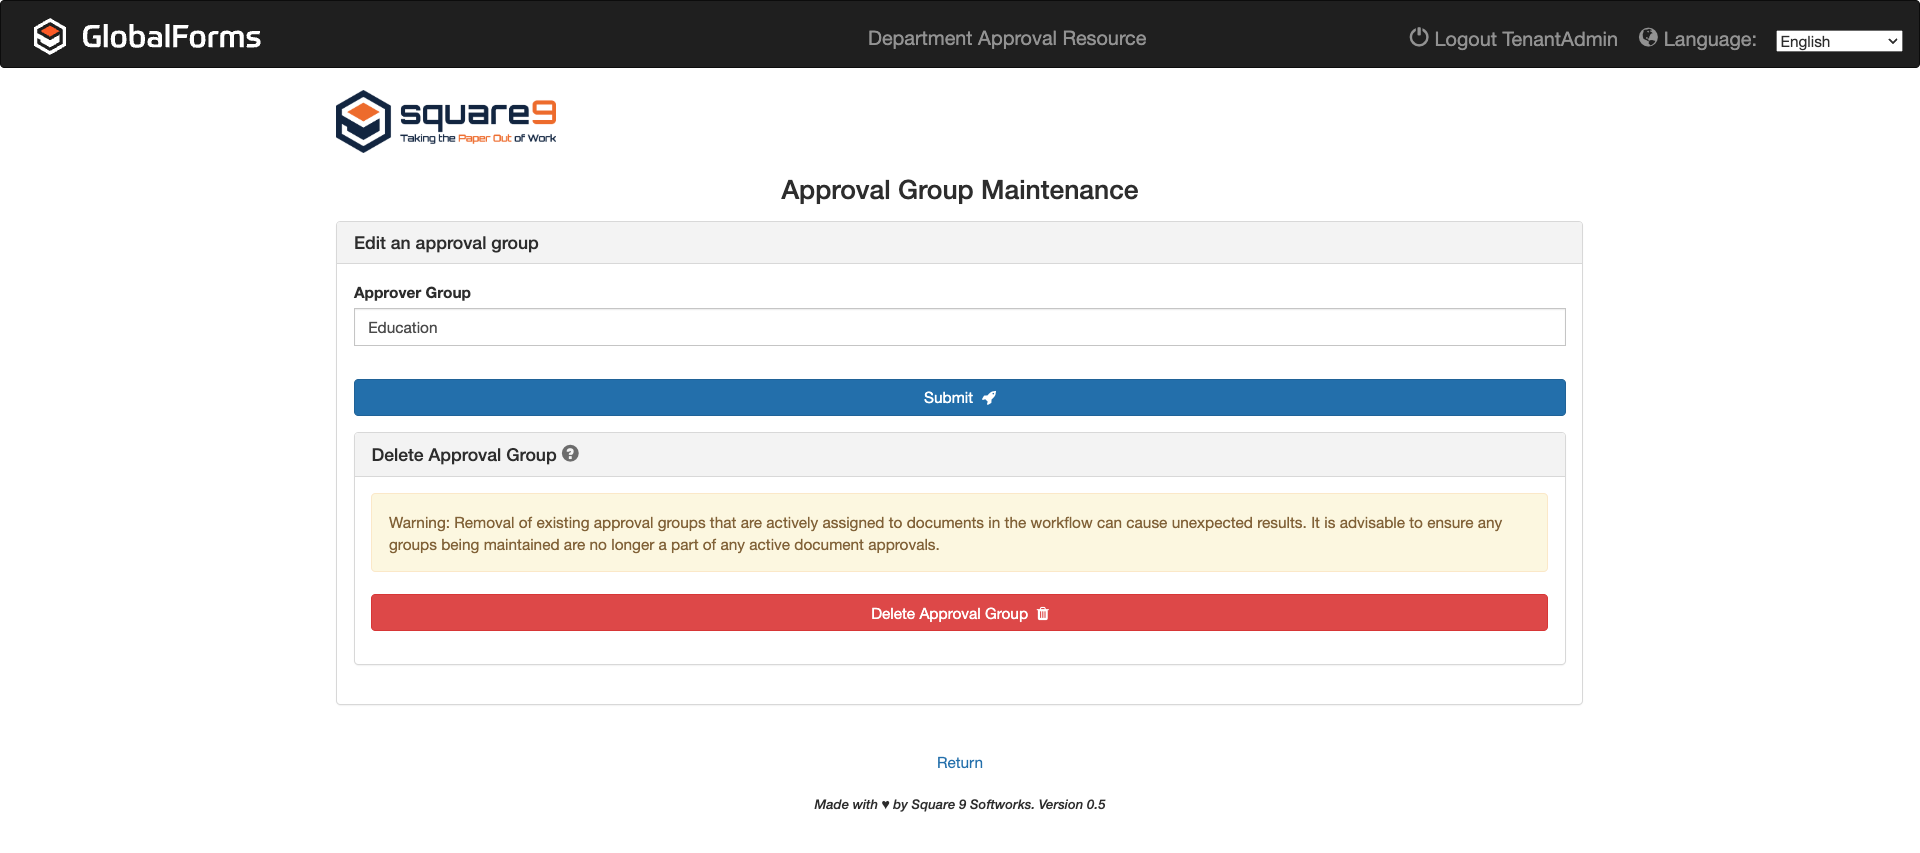
Delete Approver Group
Expand the Delete Approval Group.
Click Delete Approval Group.
A popup asking if your are sure appears, select Ok.
When finished click Return to return to the Approver Management dashboard, select Add a Group to add a new Approver Group, or select Edit or Delete a Group to modify or remove existing Approver Groups.
Creating Approval Rules
Each approver needs an email address for their Username.
The workflow will set the Approval Status to Approver Error and exit the document from the Action Approval portion of the workflow if:
A document is submitted to a Department without an Approver.
The Department in GlobalSearch exists but no corresponding Department exists in the Approval Rules.
There is no approver with a high enough approval Amount to cover the invoice.
Using Approver Maintenance, define your approval rules. Approval rules have 4 components:
Username - Who is responsible for this approval?
Group - What group or department does this rule apply to?
Amount - What is the maximum amount of the document to which this rule is applied?
Final Approver - Is this the last person that needs to approve the document before returning continuing on in the workflow?
Username | Department | Amount | Final Approver | Explanation |
|---|---|---|---|---|
a.blank@thgttg.unv | Marketing | $500 | No | Any Marketing document with an amount of $500 or less will route to a.blank@thgttg.unv for approval. Since he is NOT the Final Approver, after he approves, another rule will be applied. |
t.mcmillian@thgttg.unv | Education | $1000 | Yes | Any Education document with an amount of $1000 or less will route to t.mcmillian@thgttg.unv. Since she is the Final Approver, after she approves, the document will leave the approval process and resume the original workflow. |
Login to Approver Management dashboard and select Approver Maintenance.
Approver Maintenance
Adding Approval Rules
Select Add an Approver.
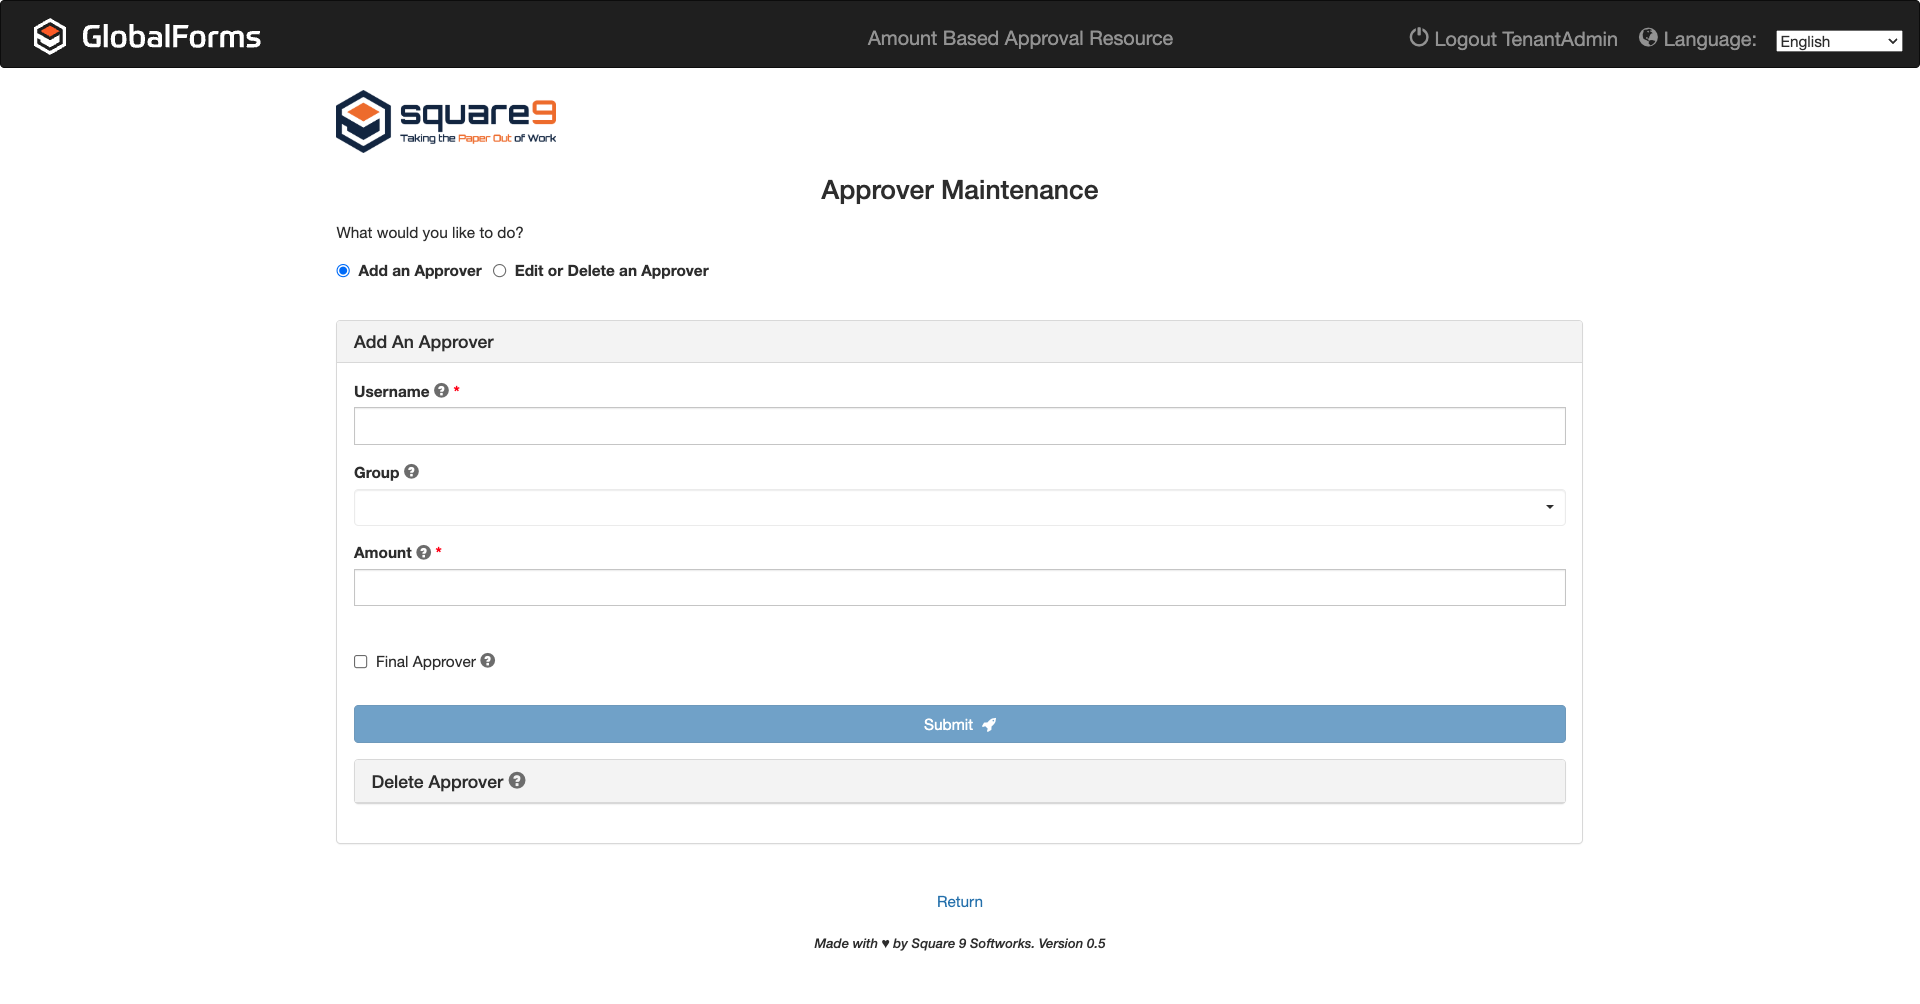
Add an Approver
Enter the Username. This MUST be an email address for the person who is responsible for this approval, select the Group from the dropdown list, and enter the MAXIMUM Amount of the document to which this rule applies.
If no further approvals are needed once this rule has been applied, enable Final Approver. If another level of approval is needed, leave Final Approver disabled.
Click Submit.
Repeat to add additional Rules.
When finished click Return to return to the Approver Management dashboard or select Edit or Delete an Approver to modify or remove existing Approval Rules.
Modifying and Deleting Approval Rules
Editing or removal of existing approvers that are actively assigned to documents in the workflow can cause unexpected results. It is advisable to ensure any users being maintained are no longer a part of any active document approvals.
Select Edit or Delete an Approver.
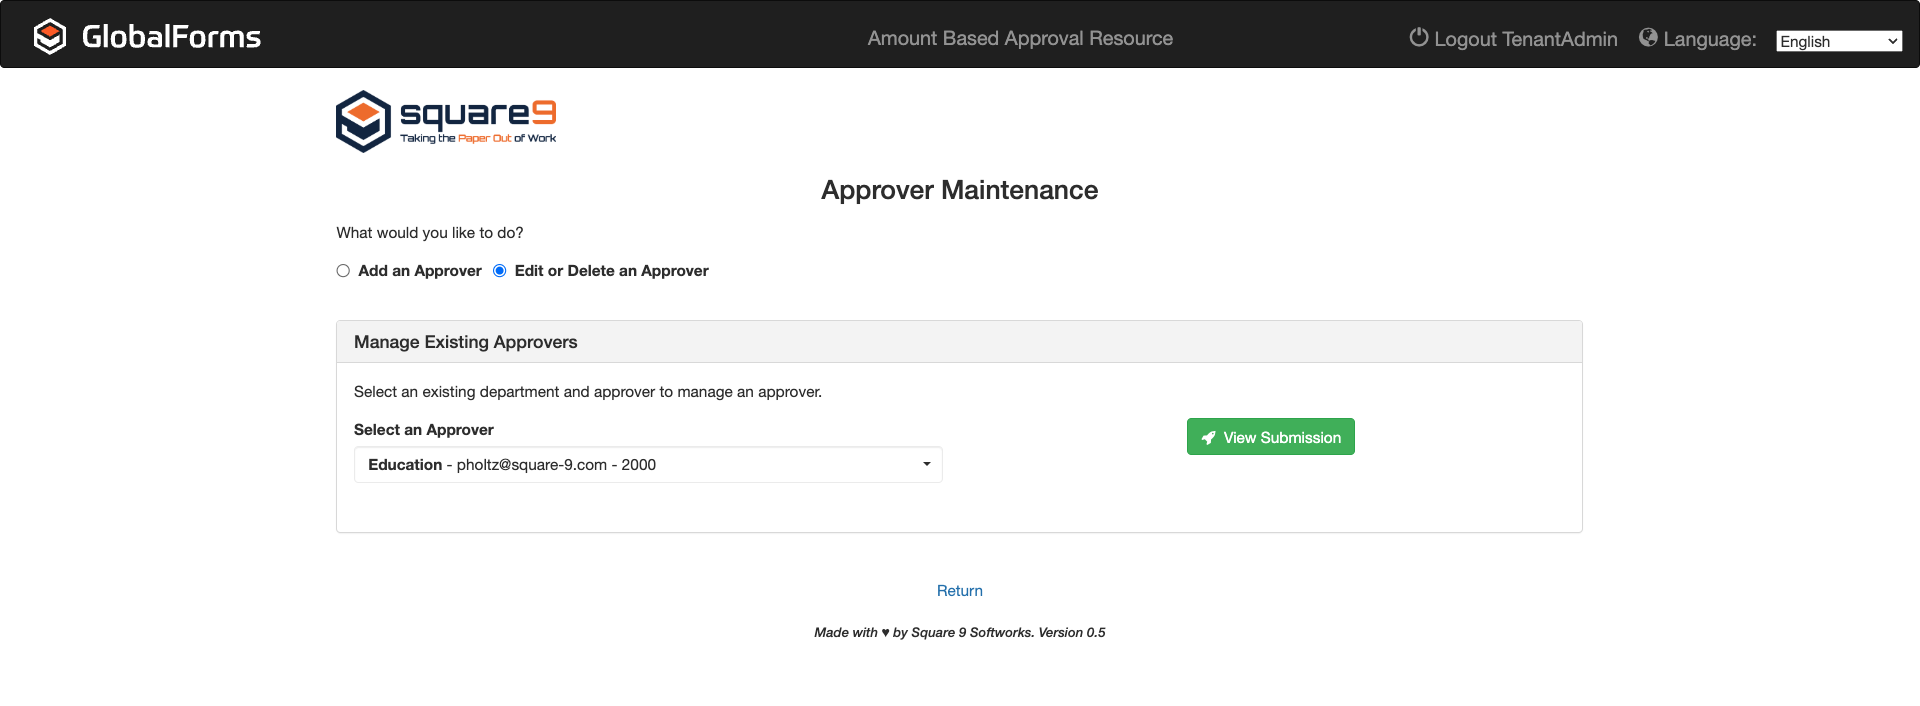
Edit or Delete an Approver
From the Select an Approver dropdown list, select the rule to modify. The data is presented: Department - Username - Amount.
Select View Submission.
Modify an Approval Rule
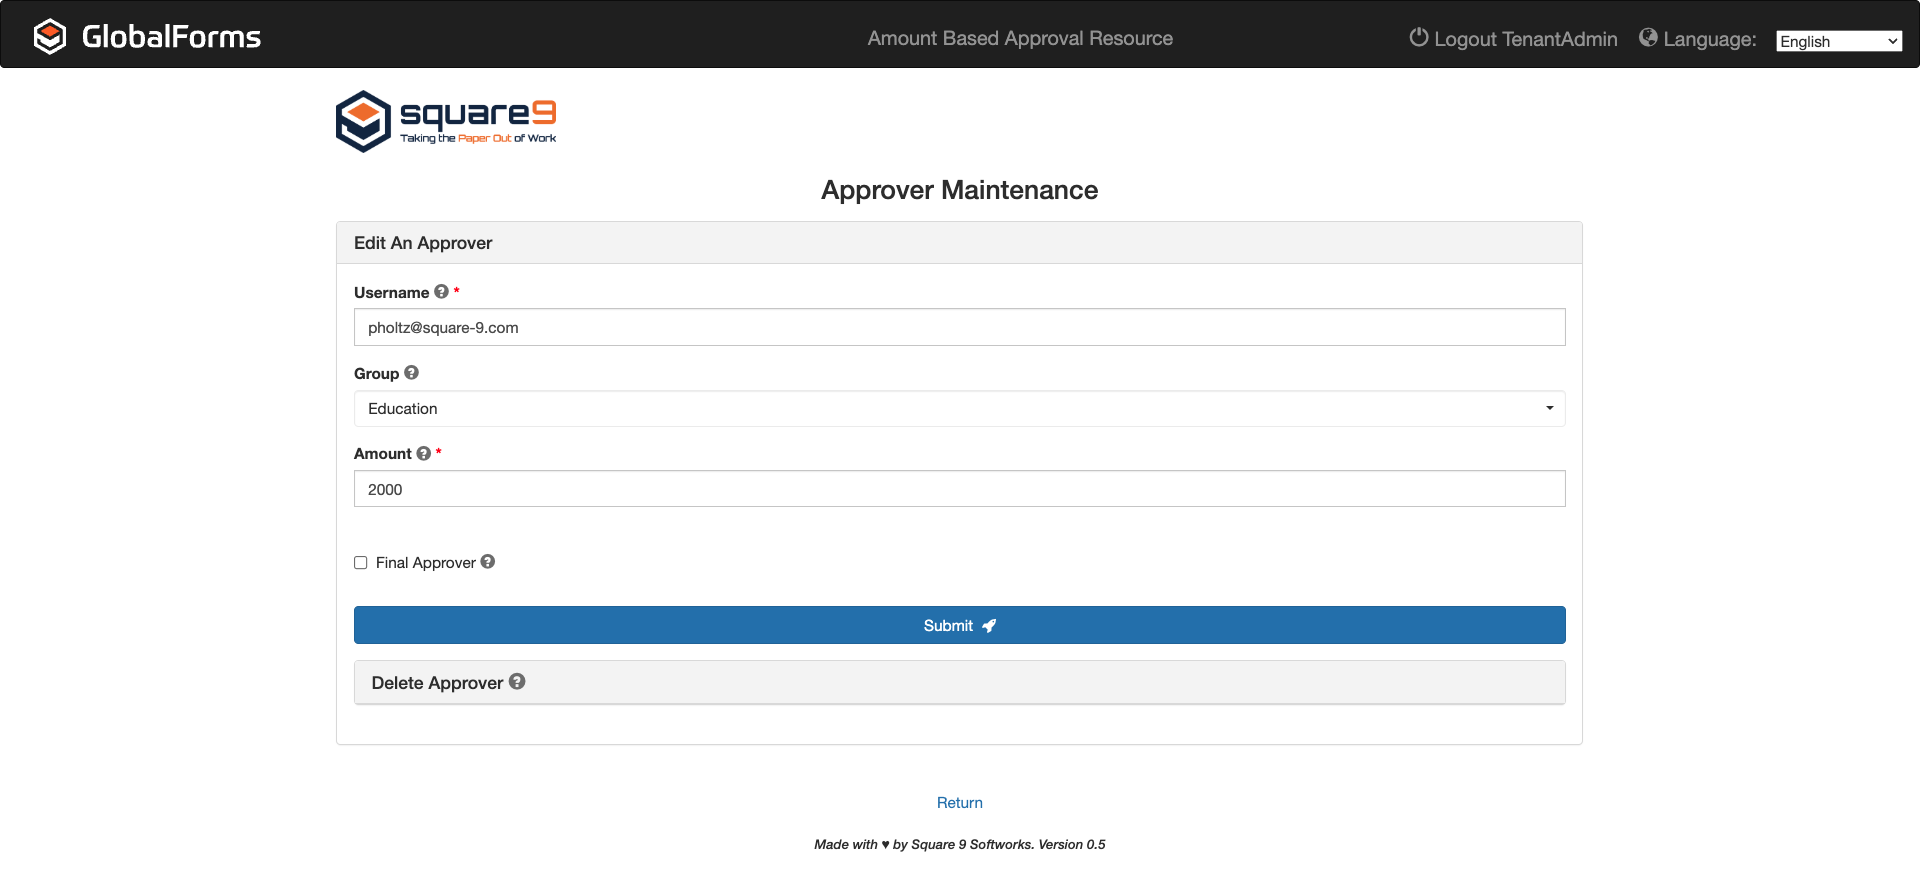
Modifying an Approval Rule
Make desired changes to your rule and click Submit.
Delete an Approval Rule
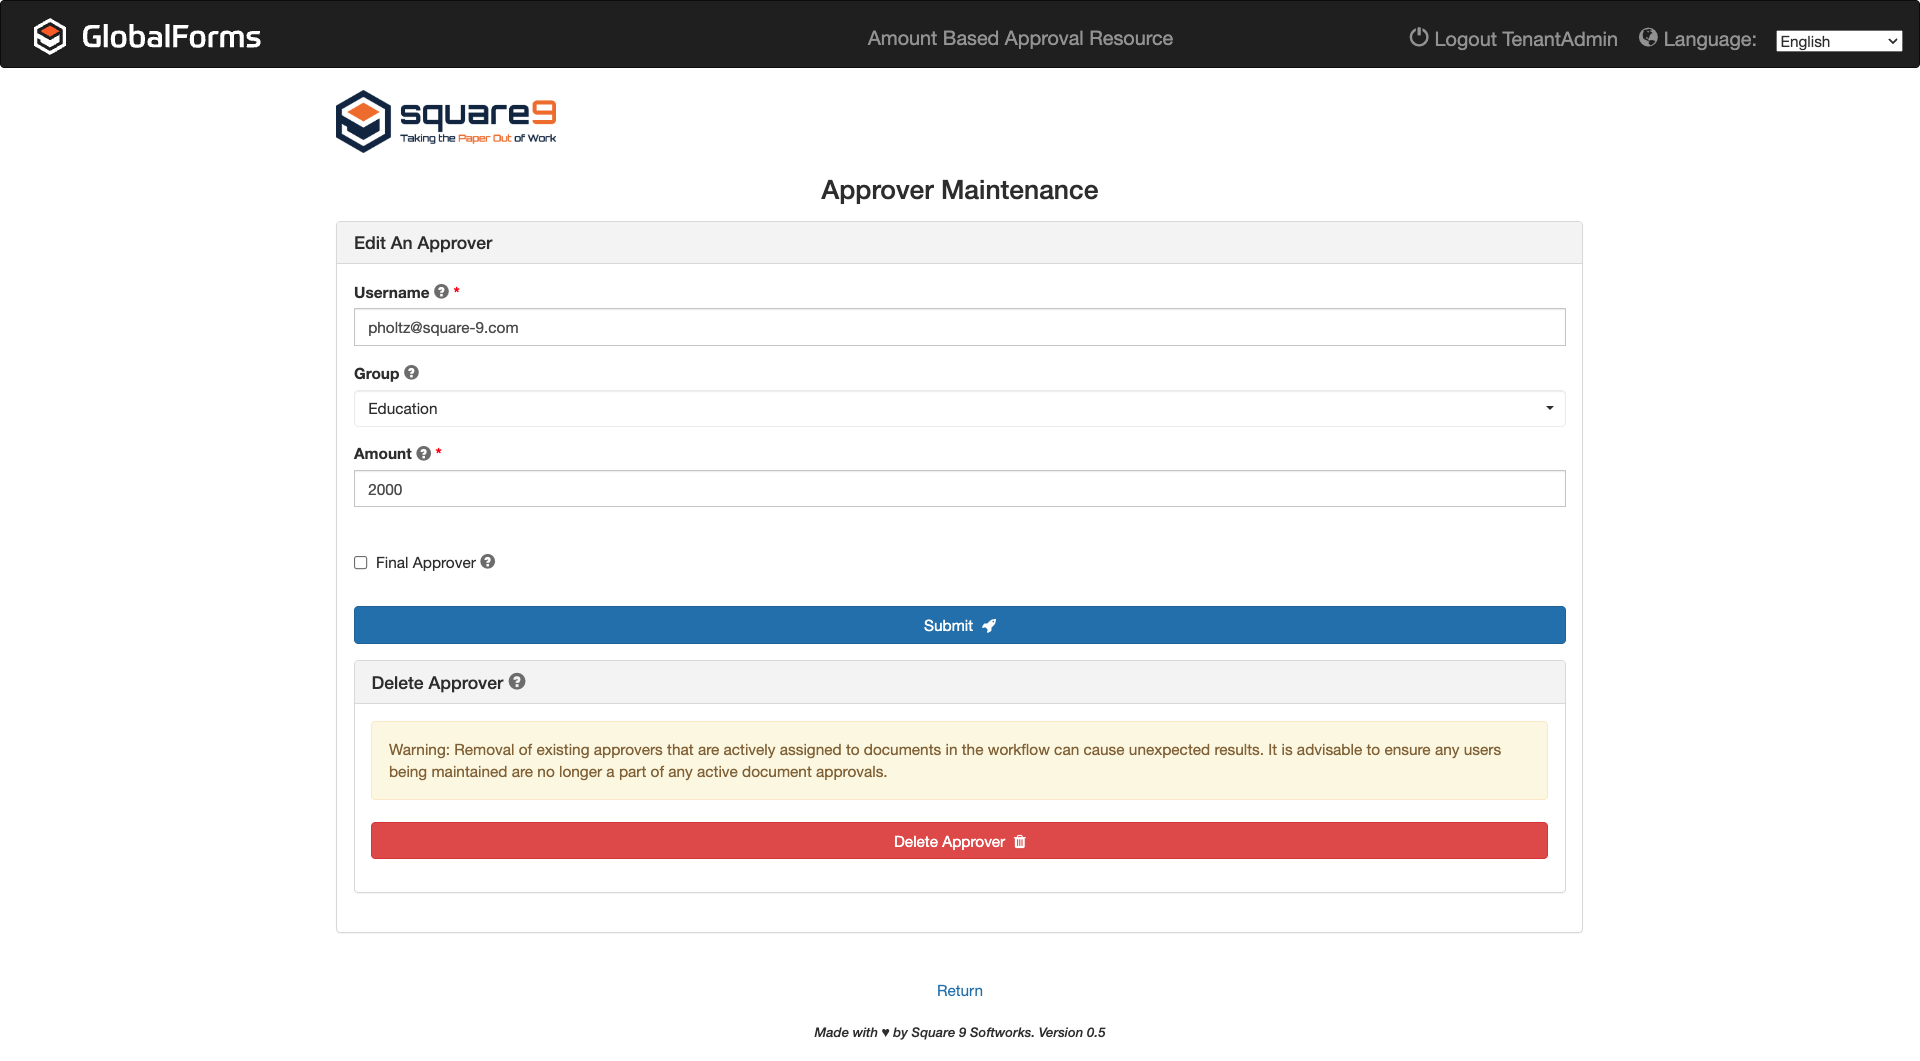
Delete and Approval Rule
Expand the Delete Approver section.
Click Delete Approval.
A popup asking if your are sure appears, select Ok.
When finished click Return to return to the Approver Management dashboard, select Add an Approver to add a new Approver Group, or select Edit or Delete an Approver to modify or remove existing Approver Groups.
Creating the Approval Management Dashboard
Use Tasks Lists to create a list of rules to easily view all rules being applied and modify or delete existing rules.
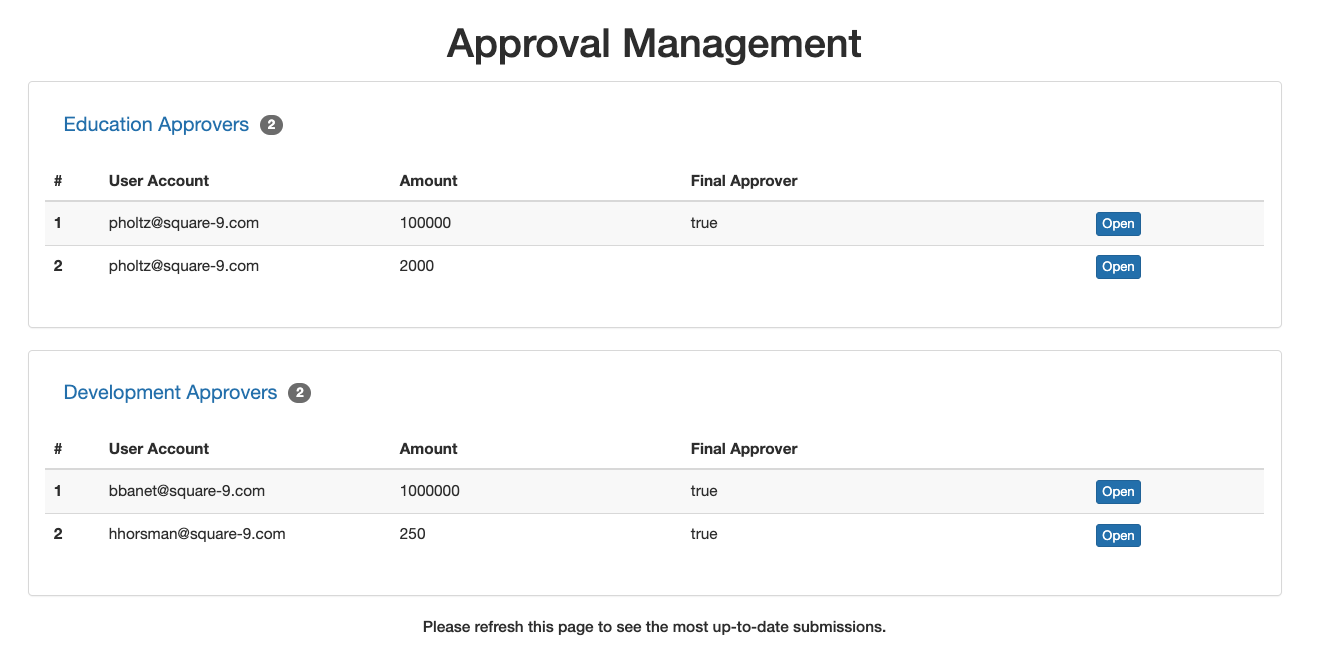
Approval Management Task List for Different Departments
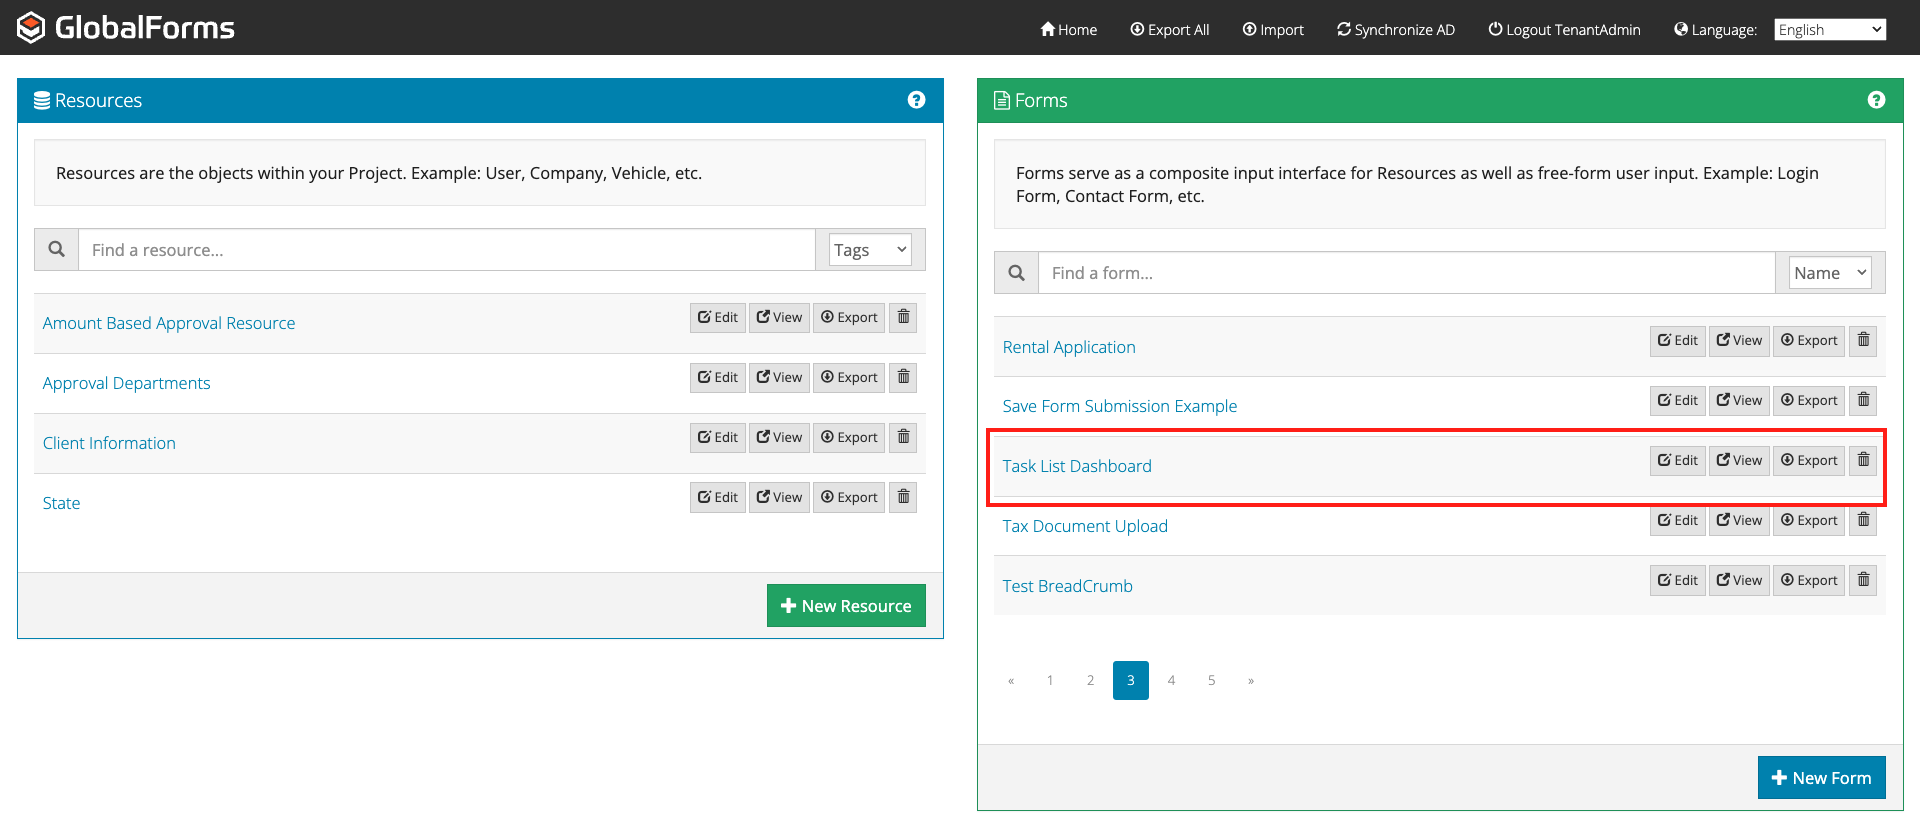
Login to GlobalForms as an Administrator.
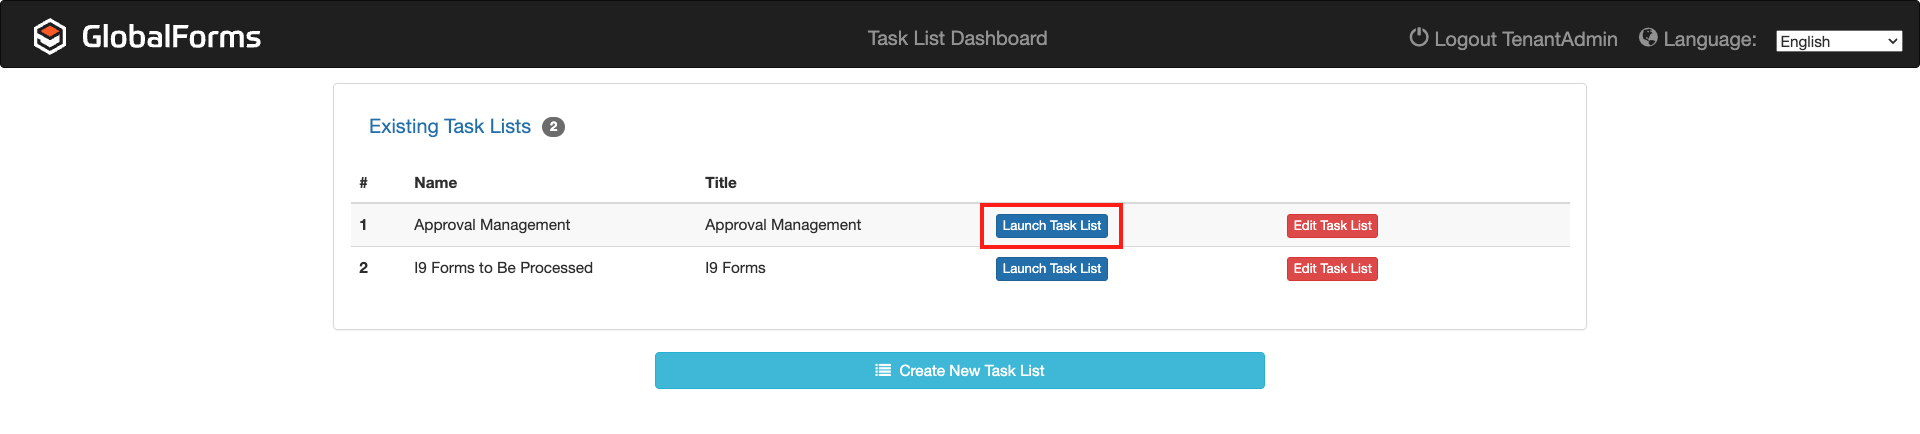
In the Forms pane, find the Task List Dashboard form and click View.
GlobalForms Landing Page
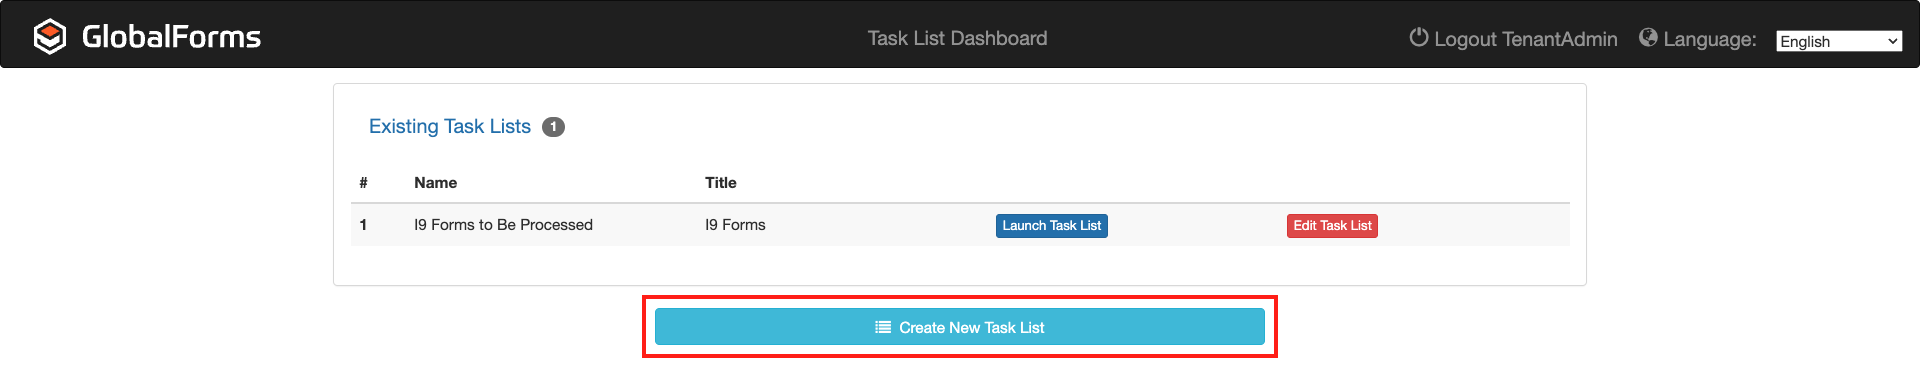
Click Create New Task List.
Current Task List Dashboard
Header Configuration
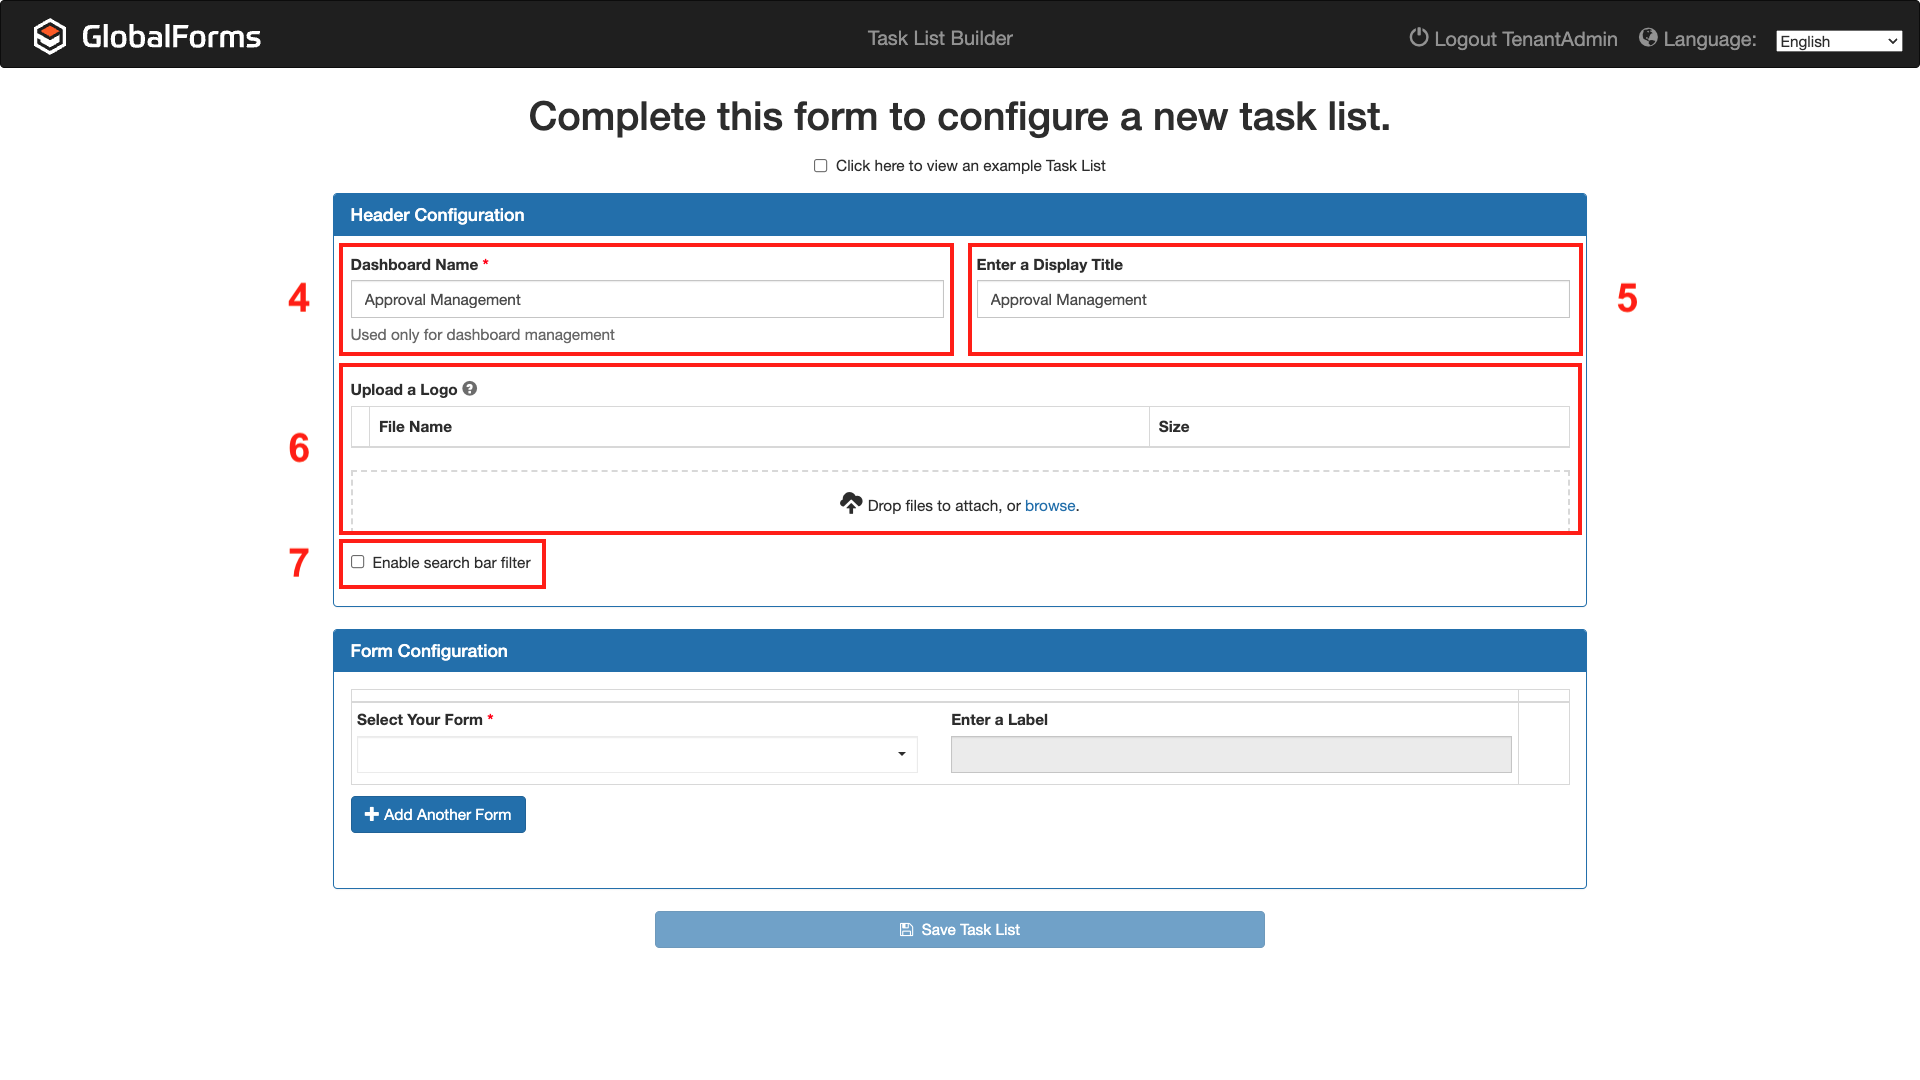
Task List: Header Configuration
Give the dashboard a Name. This name is only visible to the system administrator when managing dashboards.
Enter a Title to display at the top of the dashboard. It does not have to be the same as your Dashboard Name. This title is visible to all users who access the dashboard.
Optionally, Upload an Image to add a logo to your dashboard.
Optionally, enable Enable Search Bar Filter if you would like to add a search bar to search the list of rules for specific values.
Form Configuration
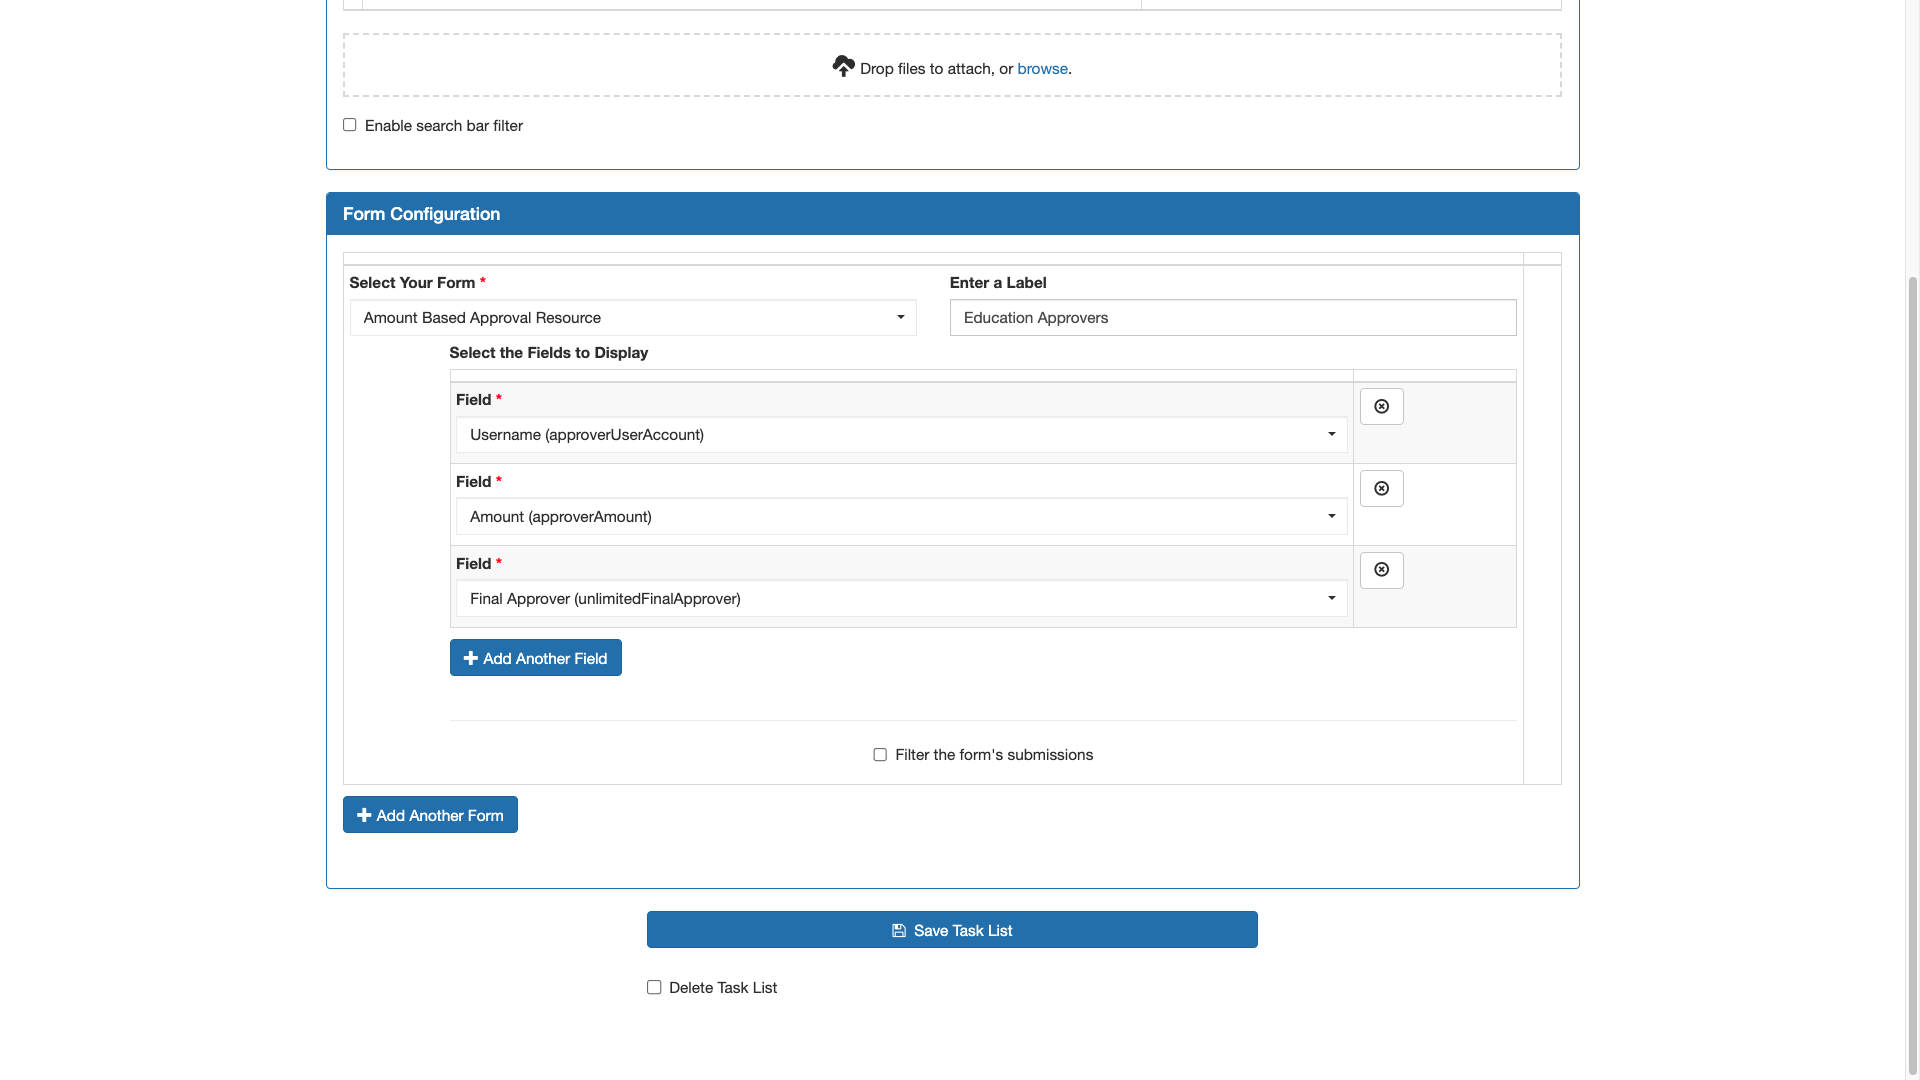
Form Configuration
From the Select Your Form dropdown, select Amount Based Approval Resource.
The Label should be ApproverGroupName Approvers. Insert the name of one of your Approver Groups.
Under Field, add the Username field and click Add Another Field.
Add Fields for Amount and Final Approver.
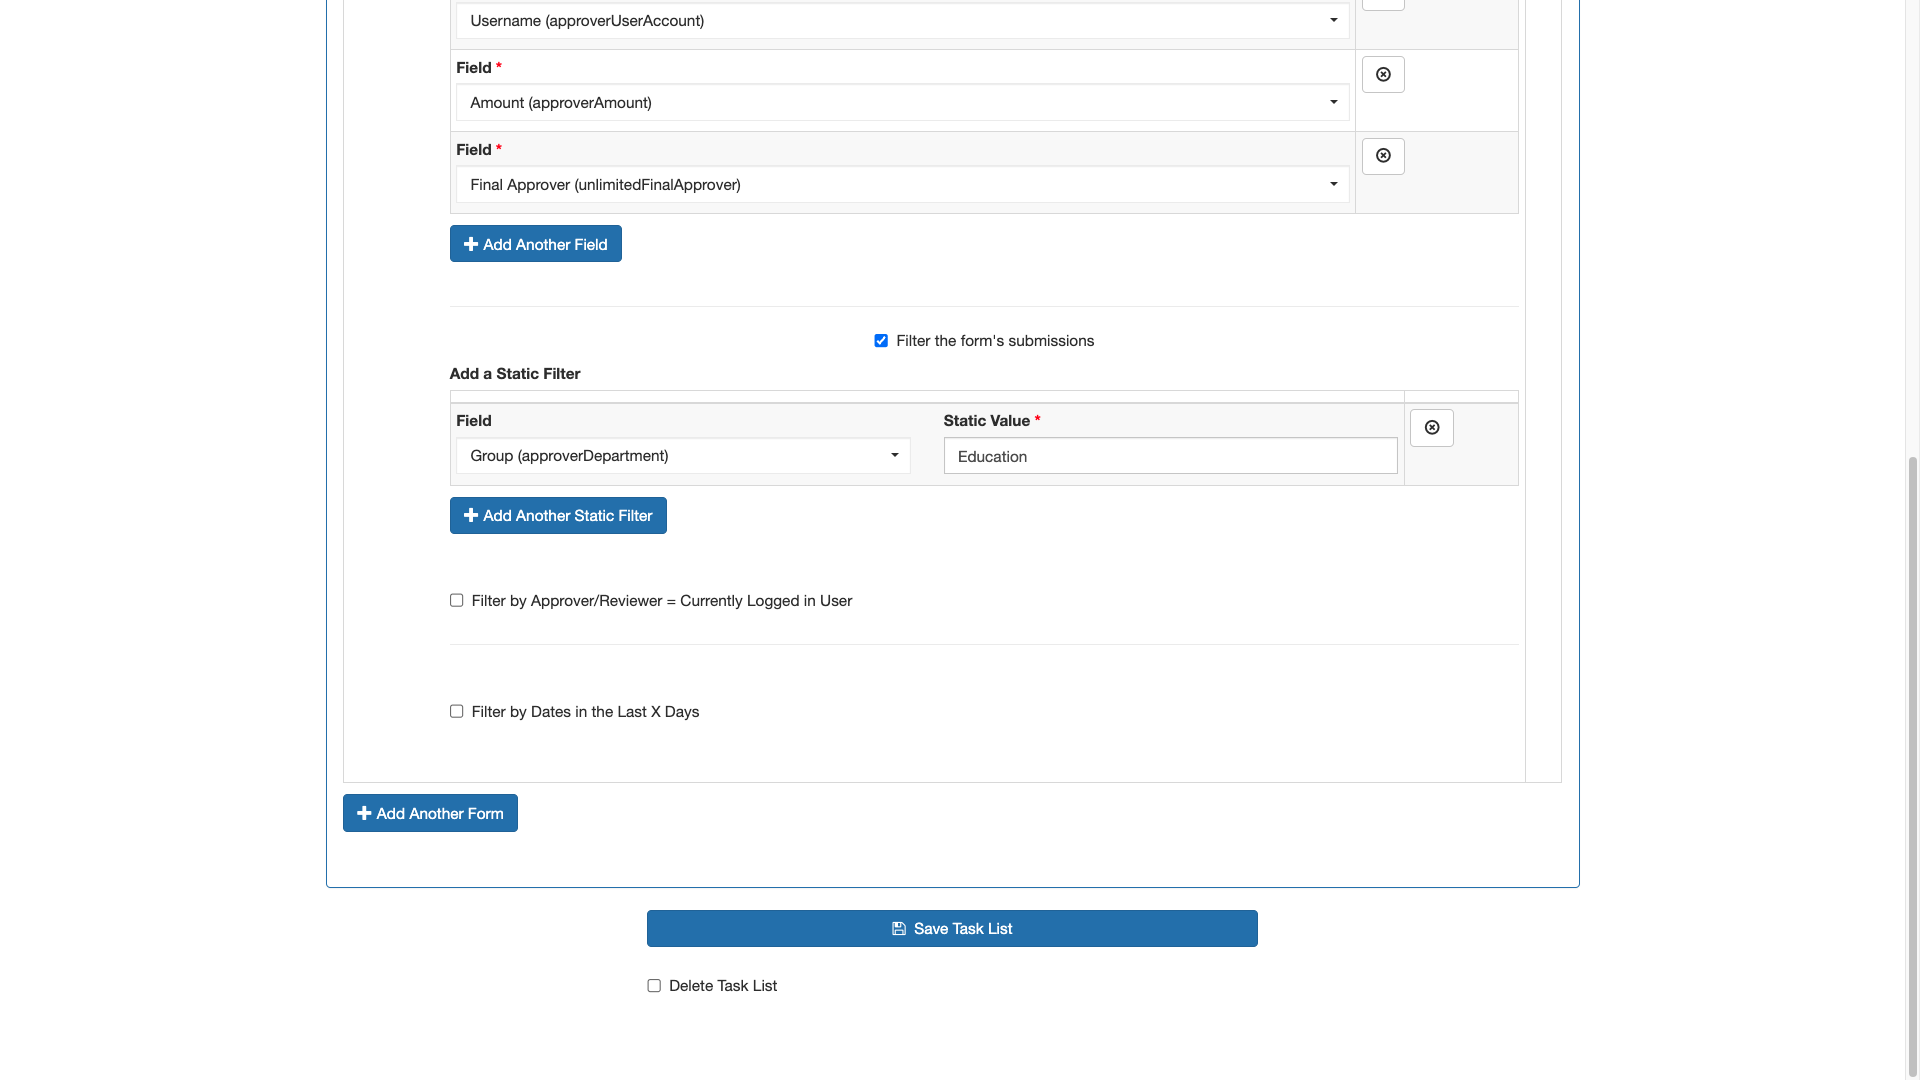
Static Filters Configuration
Enable Filter the Forms Submissions.
In the Add a Static Filter section under Field, select Department.
Under Static Value, enter the DepartmentName you used in the Label field.
Click Add Another Form and repeat Steps 8 - 13 for each Department.
Click Save Task List.
Launch the Task and And Get the Task List URL
Launch the Approval Management task list by clicking Launch Task List.
Task List Dashboard
Copy the URL to your clipboard.
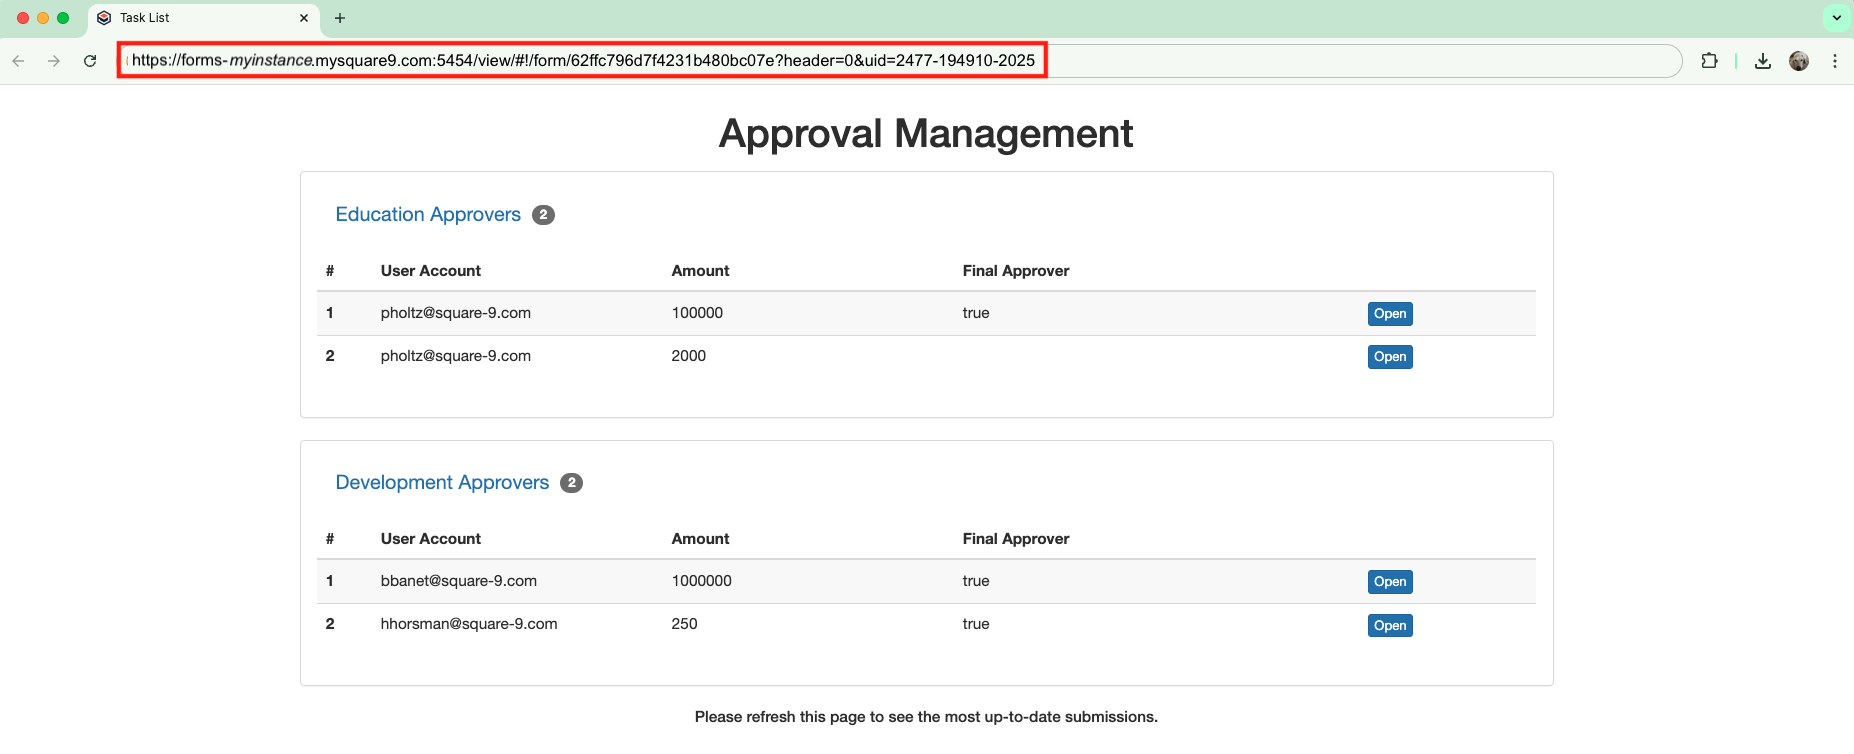
Approval Management Dashboard
Updating the Manager Approvers Link
In the Forms pane, find the Multi Level Approval Dashboard form and click Edit.
GlobalForms Landing Page
Hover over Manage Approvers and select the Edit (
 ) icon.

Form Editor
From the Display tab of the HTML Element Component, scroll to the bottom of the Content text box.
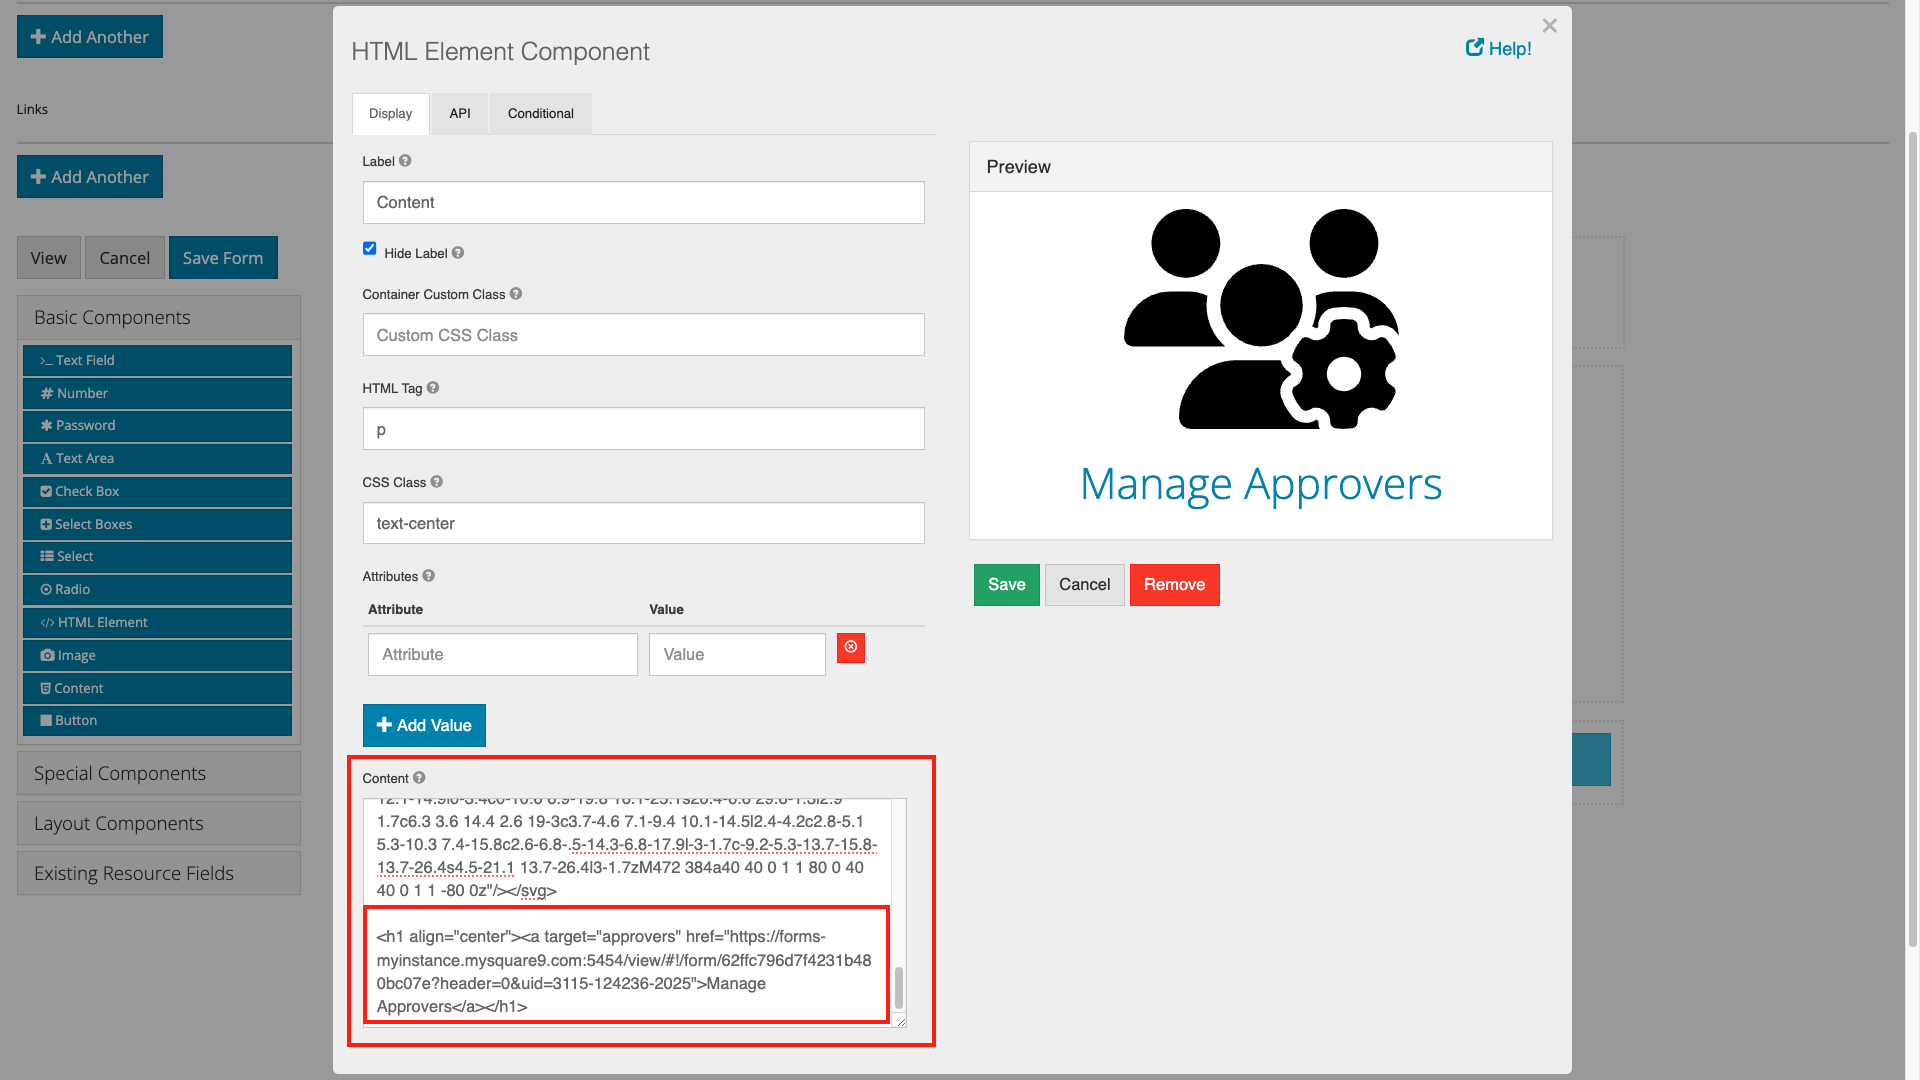
HTML Element Component Display Settings
Paste the following at the end of the text in the Content text box:
<h1 align="center"><a target="approvers" href="PASTE YOUR DASHBOARD URL HERE">Manage Approvers</a></h1>Click Save to close the HTML Element Component popup, saving your changes.
Click Save Form.
Save Form
Viewing Your Approval Rules
Login to Approver Management dashboard and select Approvers Dashboard to view your Approval Management Dashboard.
Approval Management Task List for Different Departments
Step 5: Workflow Construction
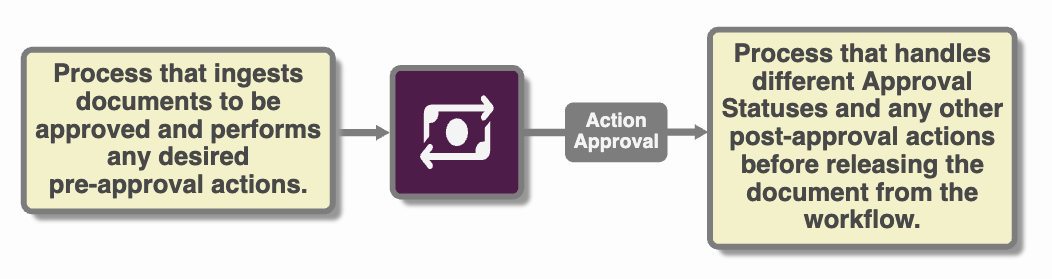
To get the most out of the action approval node, you need to build a process that ingests the correct documents and performs any desired actions before routing to approval. This may be as simple as checking a condition for due date or more complex like performing an automated 3 way match.
Once the document exits the approval process, you will need to handle what happens based on the Approval Status and any other actions you want taken such as moving the document to a different archive or releasing the data to an accounting application.
Primary Workflow Construction
The Calling Workflow
This is the workflow that will initiate the process. Design and construct your pre-approval processes. This is anything would would like to do to the document or its data before going off to the approval process.

Sample Search Configuration
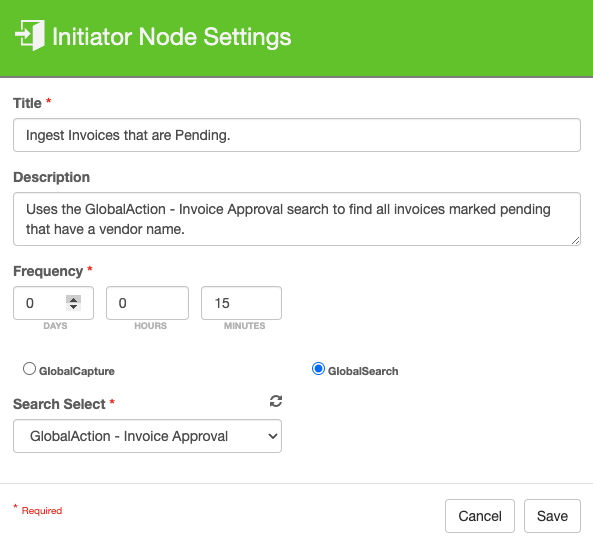
Initiator Node Configuration
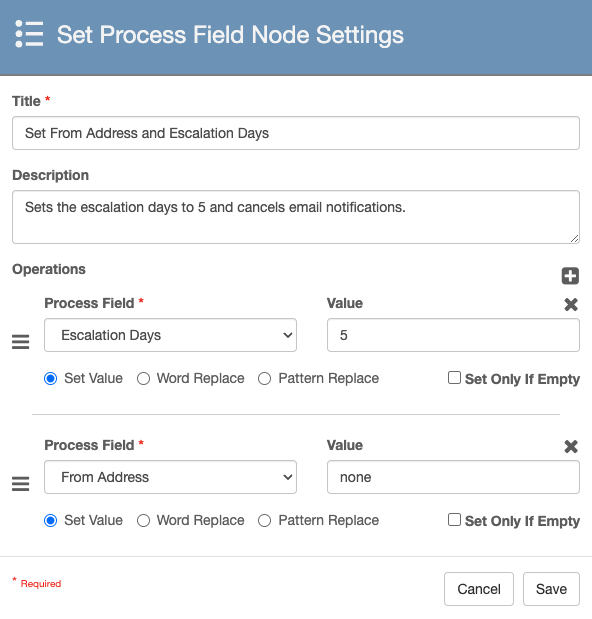
Customize From Address and Disable Email Notifications
Use the preconfigured GlobalAction - Invoice Approval search to ingest all pending vendor invoices or create your own GlobalSearch search that returns documents to enter into the approval process. It is recommended you use a name that indicates the search is designed to be used in this GlobalAction by prefacing your search name with GlobalAction.
Add an Initiator node to your design canvas. Configure the Title, Description, and Frequency. Select GlobalSearch and select the search that returns documents needing approval.
In addition to any Process Fields you need for your workflow, you can add the following fields to your calling workflow to control different aspects of the approval process.
Escalation Days - Change the number of days the document will loop and remind the current approver to take action.
Default Setting - The default setting is 3 days. You do not need to include or set the Escalation Days in your calling workflow to use the default setting.
Custom Escalations - Set the Escalation Days equal to the number of days before escalation should occur. This is done in whole number increments, no partial days.
Disable Escalations - Setting the Escalation Days equal to 0 will disable auto-escalation. No escalations will occur.
From Address - Change the From address in the notification email.
Default Settings - The default address is multilevelapproval_noreply@square-9.com. You do not need to include or set the From Address in your calling workflow to use the default setting.
Custom From Address - To change the From Address to something different, add the From Address to your Process Fields pane and set the value.
It must be in email format: user@domain.com
You can change the User and keep the @square-9.com domain without making any other changes.
If you wish to use your own/custom domain name, you will need to provide your own SMTP mail gateway.
Disable Email Notifications - Adding the From Address to your Process Fields pane and setting it to none will disable email notifications for ALL users.
Add any additional pre-approval process after your Initiator node.
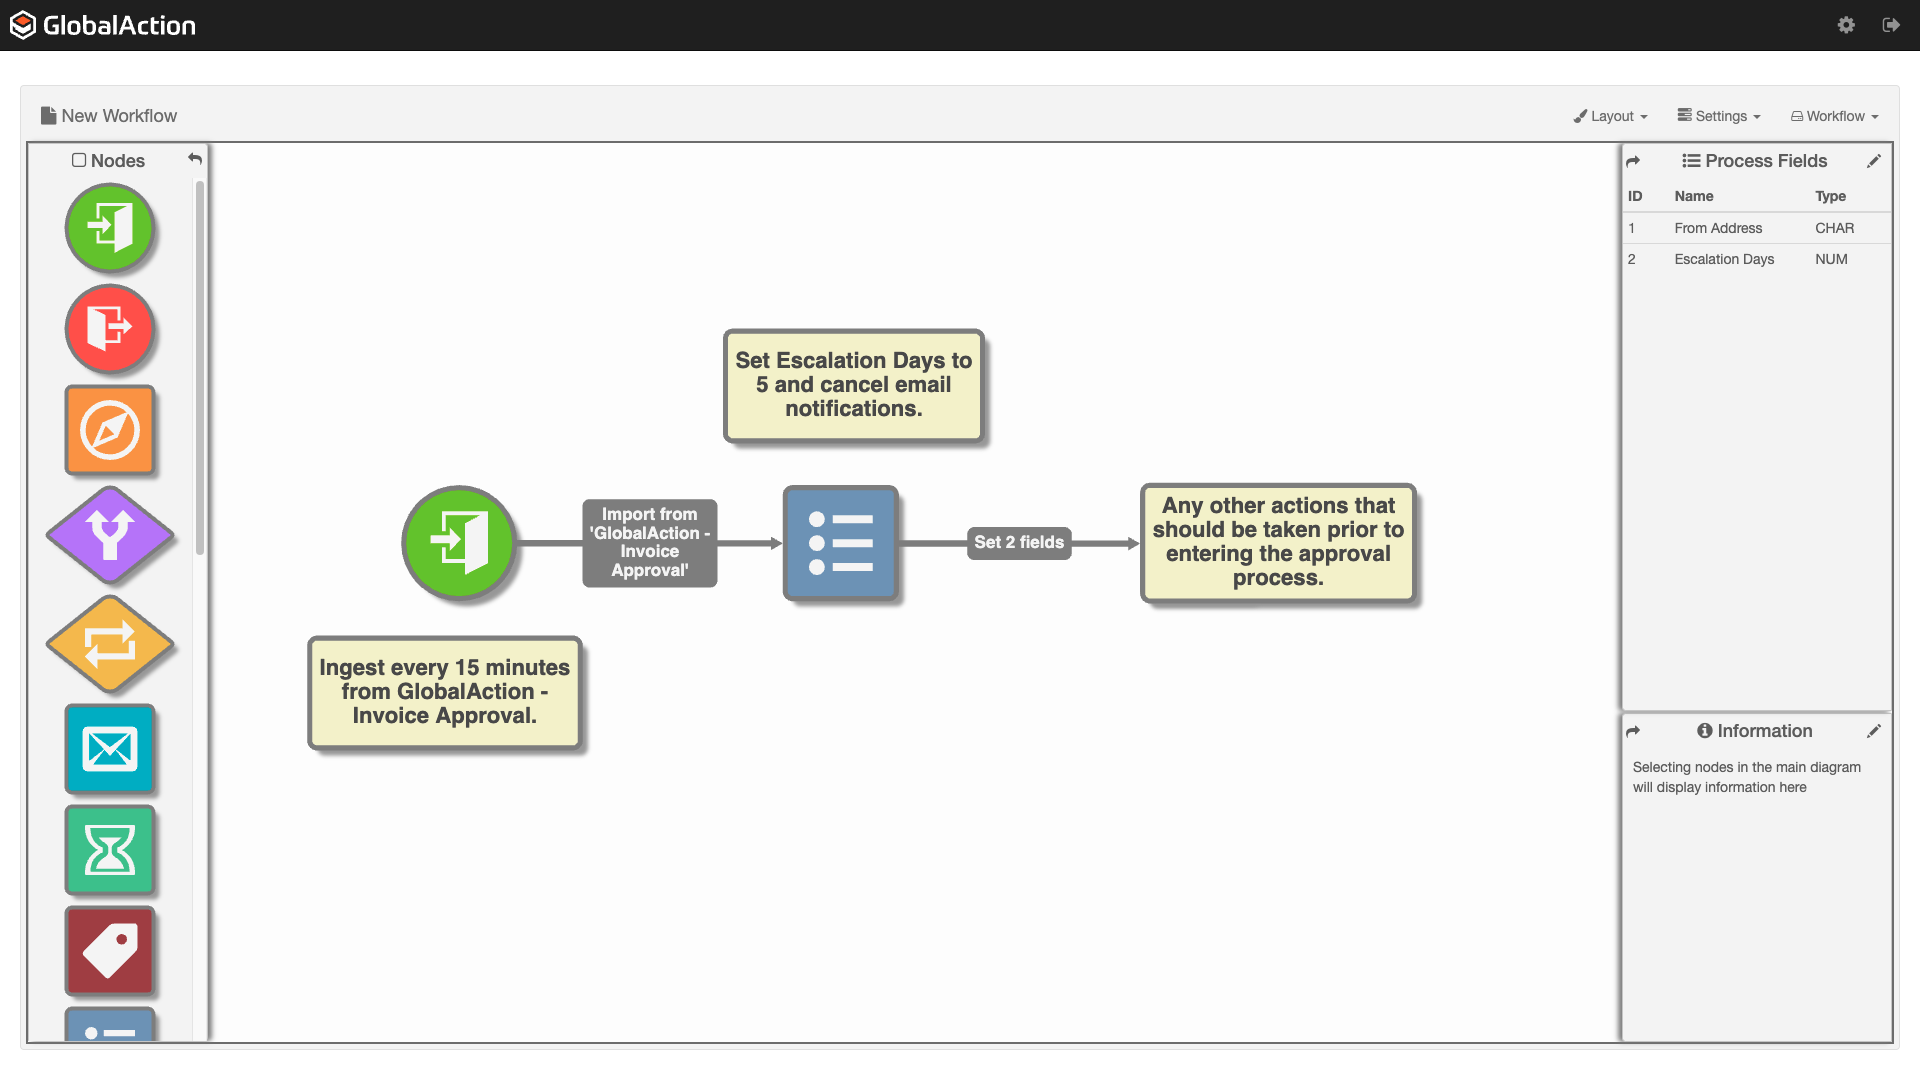
Simple Calling Pre-Approval Process
Adding the Action Approval Node
Use the Action Approval node to send documents through the approval process and return them to your workflow.
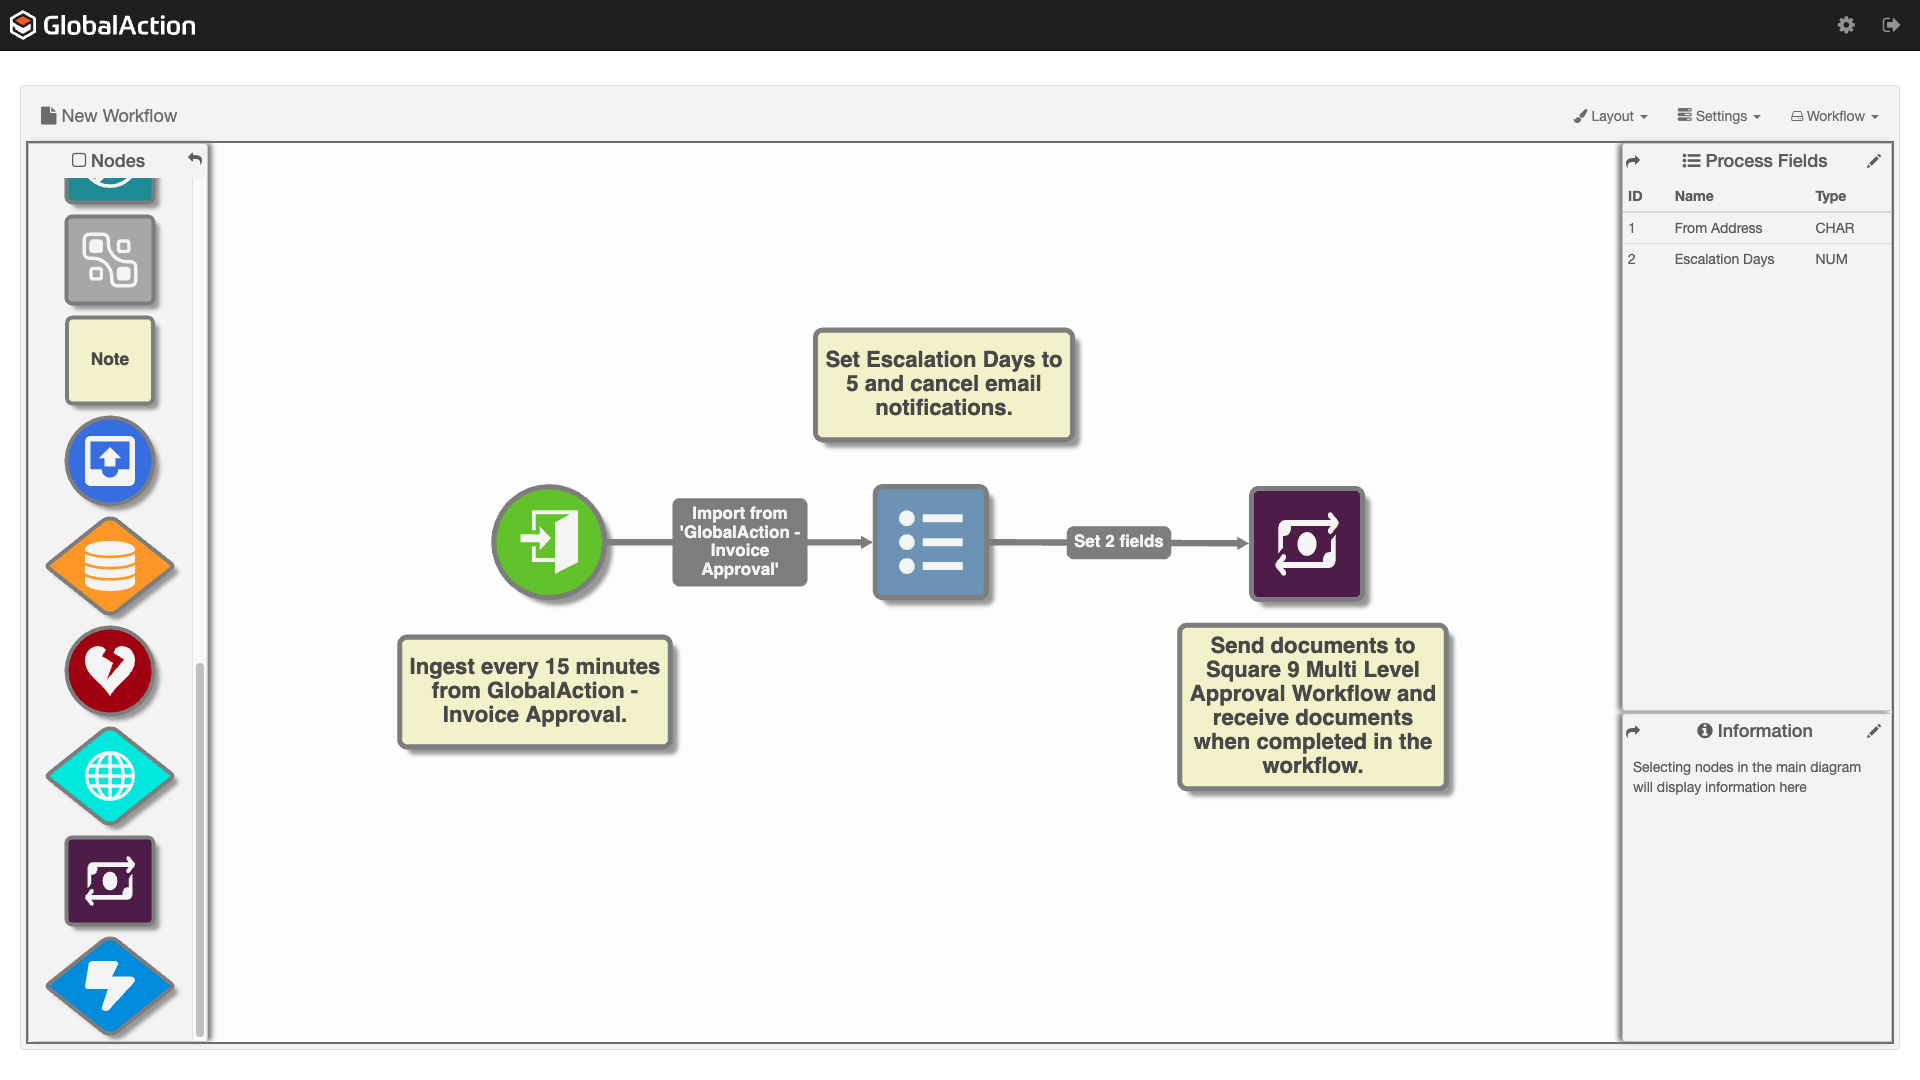
Add Action Approval Node
Add the Action Approval node to the design canvas and connect the pre-approval portion of your workflow to the Action Approval node. The Action Approval node requires no configuration.
Finishing the Workflow
Design and construct any post-approval processes including those to handle Approvals, Rejections, Reassignments, and Errors before ending your workflow.
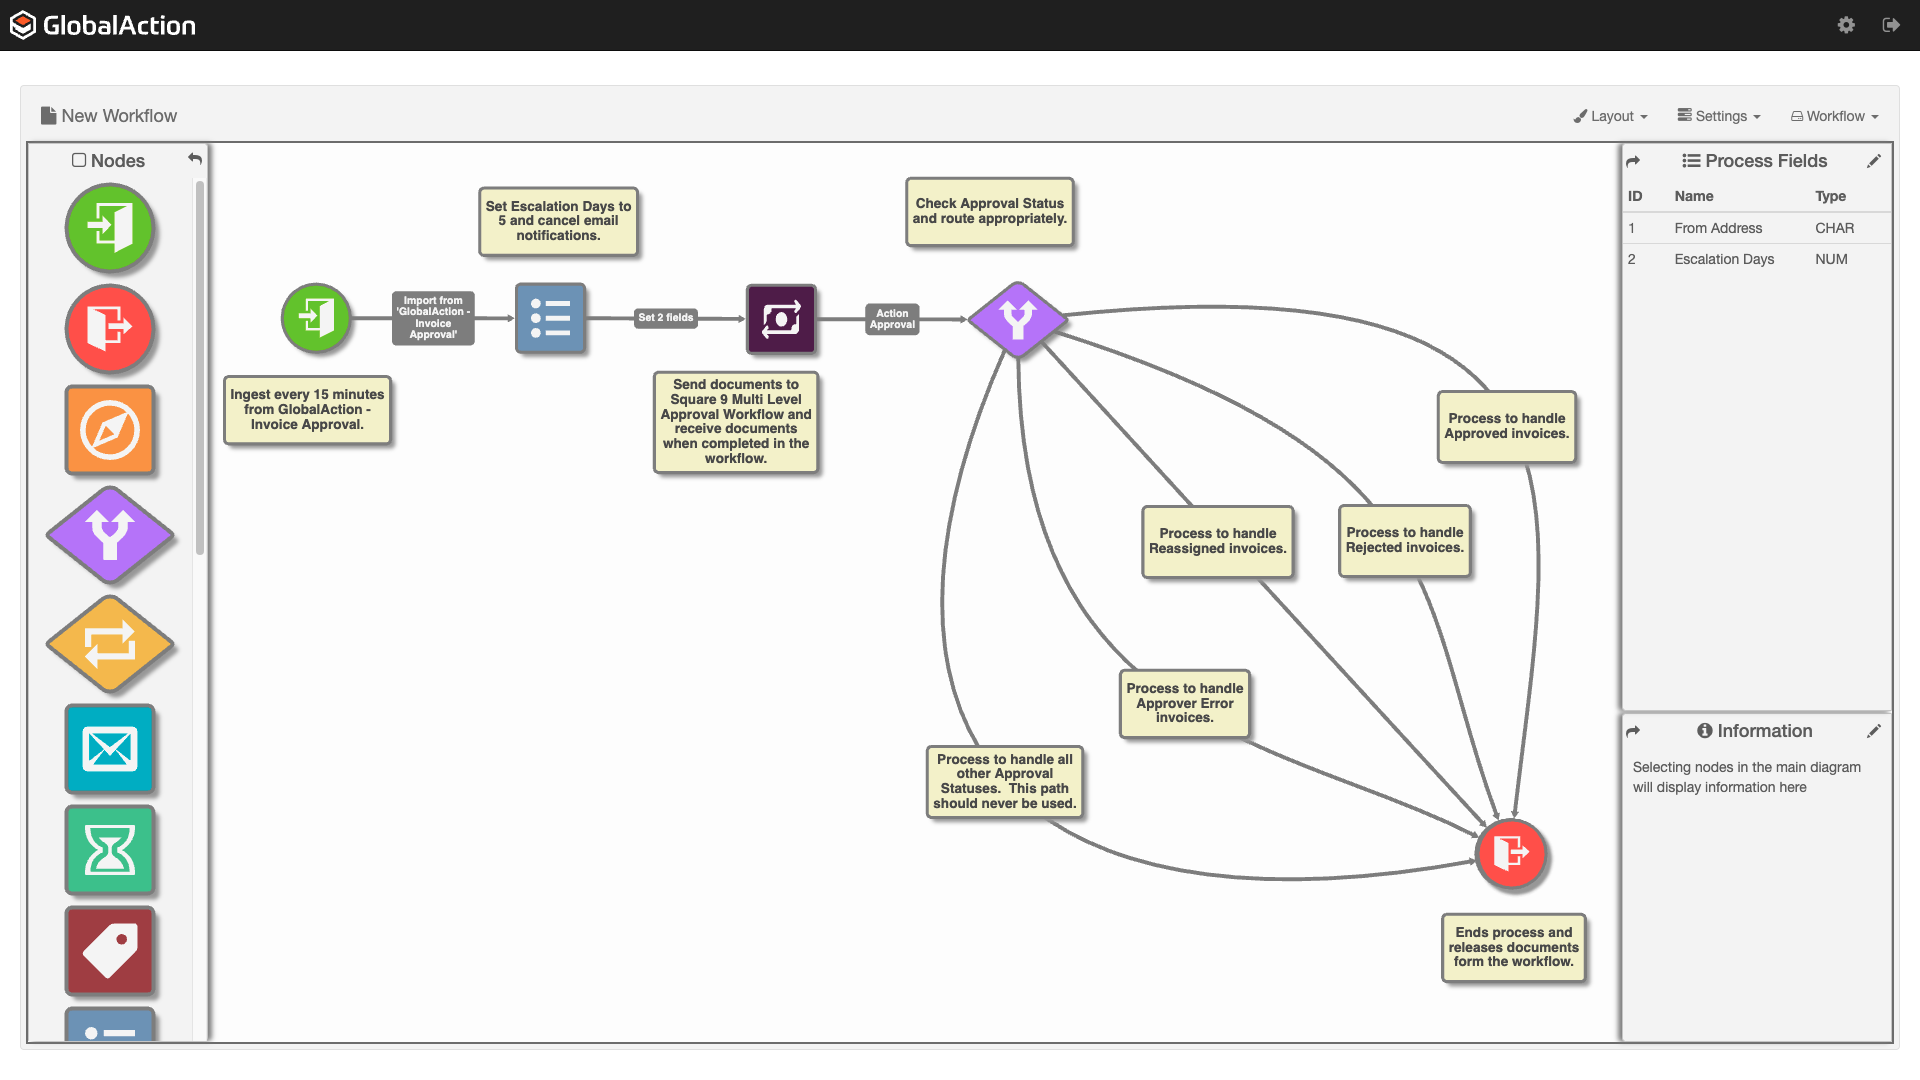
Post Approval Processes
Documents return to your workflow from the Action Approval node can have the following Approval Statuses: Approved, Rejected, Reassigned, or Approver Error. Your post approval workflow process should handle each of these statuses. Some possible processes could be:
Approved - Route to an iPaaS node for release to your accounting solution.
Reassigned - If corrected by the previous approver, route back into the Action Approval node for approval by the correct department. If not corrected, route to a Queue for correction before routing back into an approval process.
Rejected - Send a notification to a person that handles Rejected documents and hold in a Rejected Documents Queue or release the document from the workflow to be handled by a separate workflow for Rejected documents.
Approver Error - Route to a separate Queue for errored approvals where they can be corrected and sent back into the approval process. Combine with this the Batch Manager and a GlobalCapture Search to view the process history of the document to determine the step the error occurred at and make necessary corrections before routing the document back through the approval process.
Add an End node to complete your process.