Import Node (3.0.... and earlier)

Use the Import Node to bring data and documents into the capture process. Files may be brought in directly from a local file system, from a CSV or XML file, or directly from an email mailbox. Data may also be brought in from GlobalForms or Frevvo web forms, if installed. Any POP or IMAP mail gateway is addressable, in addition to a direct connection with Microsoft Exchange® via Exchange Web Services (EWS).
Note that while you can configure more than one unpublished Workflow to a single source location, each published Workflow must have a unique source.
Prior to GlobalCapture version 2.2, all documents (with the exception of e-docs like Word, Excel, etc.) are separated into individual pages. GlobalCapture 2.2 and greater only only separates documents into single page files when a node that performs page level operations is encountered. This includes Separate, Classify, Image Cleanup, Convert, and Delete nodes. This change can have a significant impact on document processing speed for customers in scan and release style workflows, especially workflows where documents may have large page counts.
Usage
- Drag the Import Node from the Nodes Pane to the Design Canvas.
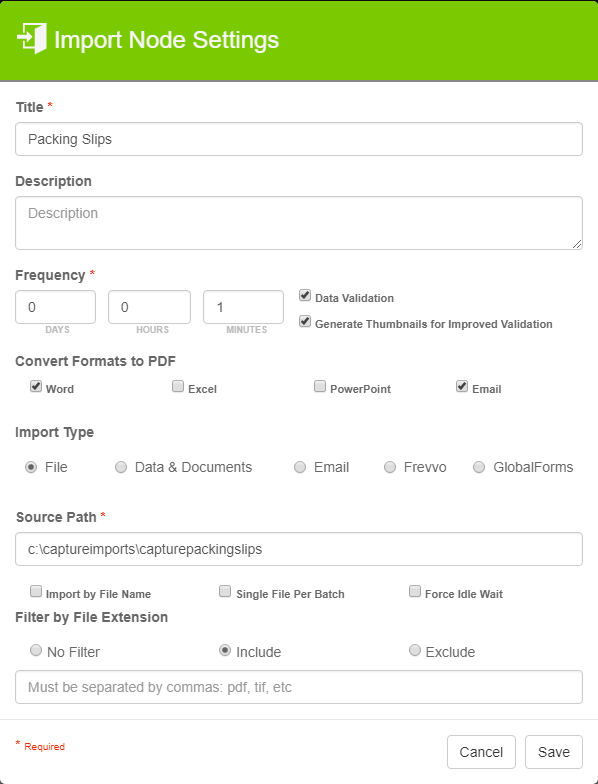
- In the Import Node Settings dialog that appears, enter a unique name and enter a description. For easier maintenance, use a Node’s Description field to include details about its purpose in a Workflow, in case you need to modify it later.
- The Data Validation checkbox is enabled by default to enforce Data Type or Length settings for Fields. When it is unchecked, the batch will error in the Batch Manager, but the Node will still extract data and populate a Field, even if it is of invalid Data Type or Length. Errors will stack for every Field for which there is a data-settings mismatch. For more information, see the Data Validation page.
- Specify how often the Workflow will check for new files by entering days, hours, and/or minutes in the Frequency group.
Time will begin as soon as the Workflow is saved and published. - To create thumbnails of document pages, enable Generate Thumbnails for Improved Validation. Enabled by default, this creates thumbnails of the document pages at time of capture that you can use to view and edit documents. Thumbnails can be generated on demand during the validation process. This process is quick, but in high-volume situations a noticeable processing delay might occur. If the Thumbnails have already been generated at time of capture, it is much faster for the server to simply relay the resulting images. If your workflow process doesn't involve validation, or validation is only performed in error conditions, disabling this option can improve performance.
- Optionally, to convert document at import, in the Convert Formats to PDF group, select a file format:
- Word – Select to convert DOC, DOCX, RTF, HTM, and HTML file formats.
- Excel – Select to convert XLS, XLSX, CSV, and TXT file formats.
- PowerPoint – Select to convert PPT and PPTX file formats.
- Email – Select to convert EML and MSG file formats.
- Word – Select to convert DOC, DOCX, RTF, HTM, and HTML file formats.
Select the type of data and/or documents the Workflow will import. As you select the type, contextual options appear at the bottom of the dialog.
Import Files from a Folder
Use the File Import Type to bring legacy records in bulk into GlobalSearch or other business applications. Use it to capture scanned records directly from a multifunctional device (MFD). When selected, you can also capture data for one or more Index Fields from document file names. For example, a record named 10001_Square 9 Softworks_01012009.PDF could automatically populate data into the Invoice Number, Vendor Name, and Invoice Date Index Fields.
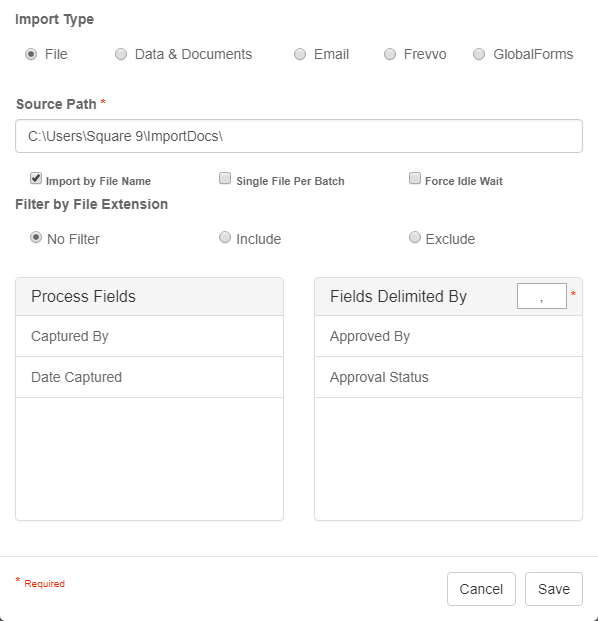
- To import and index files from a watched folder, in the Import Type group, click File. Files are removed from the folder as they are captured.
Enter the location of the import folder in the Source Path text box.
- Optionally, you can use a file's name to provide index data to the workflow process.
- Before configuring the workflow, add one or more Process Fields. Without process fields, this option will be disabled.
- Enable Import by File Name.
- In the settings interface which appears, drag or double-click one or more Fields from the Process Fields list to the Fields Delimited By list. List them in the order that data is presented in the source file names. Drag Fields to reorder them in the list. Drag or double-click a Field again to return it to the Process Fields list.
- If extracting multiple fields from a file name, a separator character (delimiter) must be specified. Enter the field delimiter character (such as an underscore) that is used in the source file names into the text box.
- Before configuring the workflow, add one or more Process Fields. Without process fields, this option will be disabled.
- To ensure every document processed is assigned a unique Batch ID, enable Single File per Batch. Use this option when you want to ensure documents can be uniquely tied back to the source document when processing. For example, if you are performing separation on large numbers of files, it might be useful to make sure every document prior to a separation step has a unique Batch ID. Without this option, all documents imported during a single sweep of an import location will be grouped with the same Batch ID.
- To delay the file import for two minutes before processing, enable Force Idle Wait. When scaning documents from some capture devices, files may be built page by page in the import location. This can result in the Capture Engine importing the file before it has been completed, causing a variety of issues ranging from incomplete to corrupted files. When you enable this option, the process will pause for two minutes after the file has been written to. This ensure that a file is complete before it is imported. In general, it is a good idea to enable this, although it may save some time to turn this off while testing a Workflow.
- To specify the types of files to import, select one of the following from the Filter by File Extension group:
- No Filter – Select to import all types of files (the default).
- Include – Select to import specific file types. Enter one or more file extensions in the text box. Use a comma to delineate between multiple file extensions.
- Exclude – Select to exclude specific file types from import. Enter one or more file extensions in the text box. Use a comma to delineate between multiple file extensions.
- No Filter – Select to import all types of files (the default).
- Click Save.
Import Data and Documents
Select the Data & Documents Import Type to import using either CSV or XML format.
Distributing documents with a CSV or XML file is a common means for file-sharing between line-of-business applications or for receiving records from a conversion services bureau. You can use this to set up a script for automating the import, where a “hot folder” can be monitored for inbound records being delivered via FTP. A valuable tool for bulk imports, users who share data with external sources or rely on outsourced scanning services can now accept and directly import their converted files automatically through FTP rather than upload from a DVD or external hard disk.
When creating a Workflow with this Import Type, it is a good idea to create the necessary Process Fields first and then set the Import Node. Please note that this works with regular Fields, not with Multi-Value Fields.
- To import from CSV or XML data files, In the Import Type group, click Data & Documents.
- To use a CSV data file, do the following:
- In the File Format group, enable CSV.
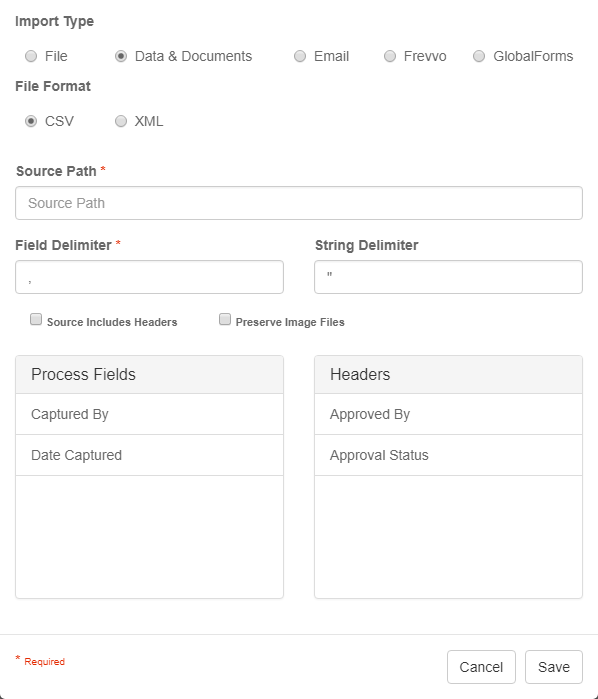
- Enter the path to the directory to be monitored for import in the Source Path text box. The files associated with the data do not need to be in the same path. File paths for each row in the CSV are indicated in the data. The service account running the GlobalCapture Engine will need direct access to the files, wherever they are located.
- Enter the character used to denote a field in the CSV in the Field Delimiter text box. (The default is a comma.)
- Enter the characters used to denote a string in the CSV in the String Delimiter text box. (The default is quotation marks.)
- To include column headers in the CSV data being imported, enable Source File Includes Headers.
If selected, the column headers will be used to map the data within the columns to GlobalCapture Fields and (if installed) GlobalSearch Fields. If not selected, the data columns within the CSV file must be in the same order as the Fields to which you are importing. The string delimiter and field delimiter tell GlobalCapture how the fields and strings are separated within the CSV file. - To preserve the image files specified in the CSV files in their source location, enable Preserve Image Files.
If this option is selected, the original image files referenced in the CSV file will remain in their source directory. If not selected, the Import Node will remove imported image files from their source directory. - Click Save.
- In the File Format group, enable CSV.
- To import XML files, do the following:
- In the File Format group, enable XML.
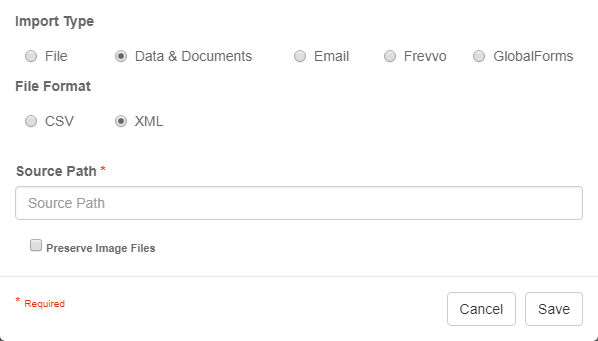
- Enter the path to the Windows directory to be monitored for import in the Source Path text box.
- To preserve the original image files referenced in the XML files in their source location, enable Preserve Image Files.
- Click Save.
- In the File Format group, enable XML.
Import Emails
- Choose the Email Import Type to automatically capture documents and indexing data from a watched email inbox.
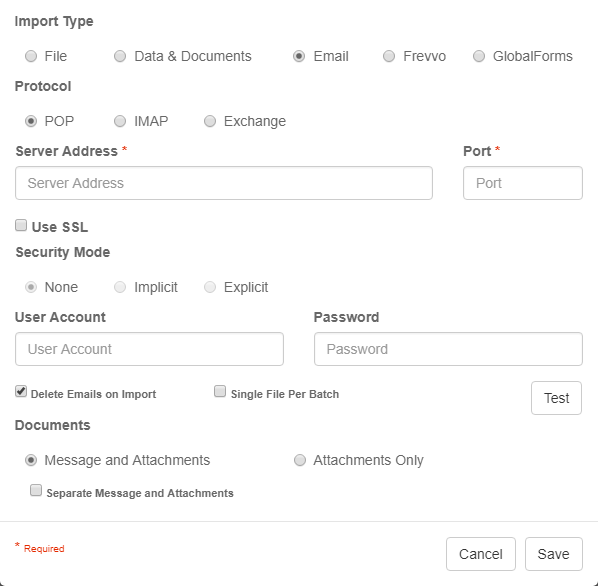
To set the email protocol for the connection to a mail server, in the Protocol group, choose either POP, IMAP, or Exchange. Note that for Exchange mail servers you must use the Exchange connection type. POP or IMAP connections are not reliable when working with some versions of Exchange servers.
- Enter the host server address and the port number. If you are using Exchange the format is like this: https://[yourserver]/ews/exchange.asmx
- Secure Sockets Layers (SSL) encryption may be required by your server, depending upon your installation. To use it, in the Security Mode group, click Use SSL and then select None (the default), Implicit (passive security), or Explicit (active security) as your SSL type.
- Enter the account name and password of the mailbox to import email messages from.
- To remove emails after they are imported, enable Delete Emails on Import. (The setting is on by default.)
- To bring in each file with a unique Batch ID number, enable Single File per Batch.
- Click Test when you want to test the connection to the email server.
- To set whether and how email messages and attached documents are imported, in the Documents group, select one of the following:
Message and Attachments – Select this to import both the email message and its attachments. This is enabled by default. If selected, you can enable Separate Message and Attachments.
Attachments Only – Select this to import only the attached documents, without the email message. If this is selected, you can filter the types of attached files by entering one or more file extensions in the Filter Attachments text box. If you want to filter by more than one type of file, separate the file extensions with semicolons.
This excludes email attachements if you enter in file types such as pdf;xlsx.
Click Save.
Match Email Fields to Workflow Process Fields
If you are releasing to an Archive, and you want to capture email properties such as the subject, sender, date or other information, make sure that the Process Field names that you add into your Workflow exactly match the email properties. For more information, see the Email Fields section in Field Properties.
Import Frevvo Web Forms
If you have Frevvo installed (or any version of GlobalForms prior to version 10), GlobalCapture can import and map form submissions. First configure Frevvo and your web form from the GlobalSearch desktop client Workflow tab.
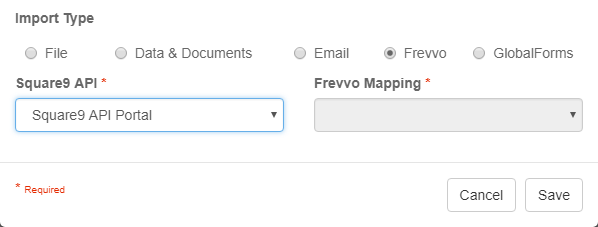
- To monitor a Frevvo web form and automatically capture documents, In the Import Type group, click Frevvo.
- Create Index Fields in GlobalSearch with the exact same name as the Frevvo field labels to map the fields. Add the Fields to the Process Fields Pane.
- To specify which instance of GlobalSearch the web forms will be imported, select from the Square9 API drop-down list.
The default is Square9 API Portal. If you have added GlobalSearch instances in the Portals interface, they will also appear in the list. - Select the form you wish to work with from the Frevvo Mapping drop-down list that appears.
- Click Save.
Import GlobalForms Web Forms
If you have GlobalForms 10 or higher installed, GlobalCapture can import and map form submissions, in addition to managing complex resubmission workflows. Data will be written to a PDF version of the form and imported into GlobalCapture, with index data from the form in GlobalForms. Create a web form using the GlobalForms Designer and create at least one submission. Map the form to create a PDF file with the relevant field data. (Please see Mapping a Form and Process and Release Submissions in the GlobalForms guide for more information.)
- To capture from GlobalForms, create one or more GlobalForms portals in the Portals interface.
- Create Index Fields in GlobalCapture with the exact same name as the GlobalForms field labels to map the fields. Add the Fields to the Process Fields Pane.
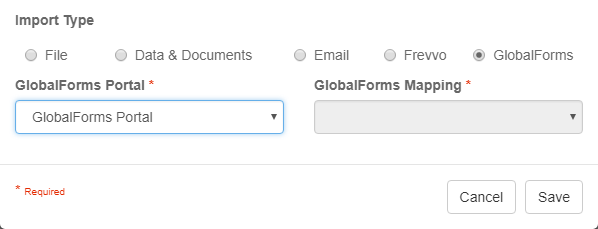
- In the Import Type group, click GlobalForms. In the GlobalForms Portal drop-down list that appears, select an instance of GlobalForms.
- Select a form from the GlobalForms Mapping drop-down list.
- Click Save.