Once you have installed Image XChange, you must designate an active Image XChange Search before you can use it. You can change other default settings as well, but it is not required. Settings are bound to the user logged in to Windows. If this user changes, any settings will change accordingly. Settings will persist across user sessions, so you can change the logged in user without any loss of configuration.
Starting Image XChange
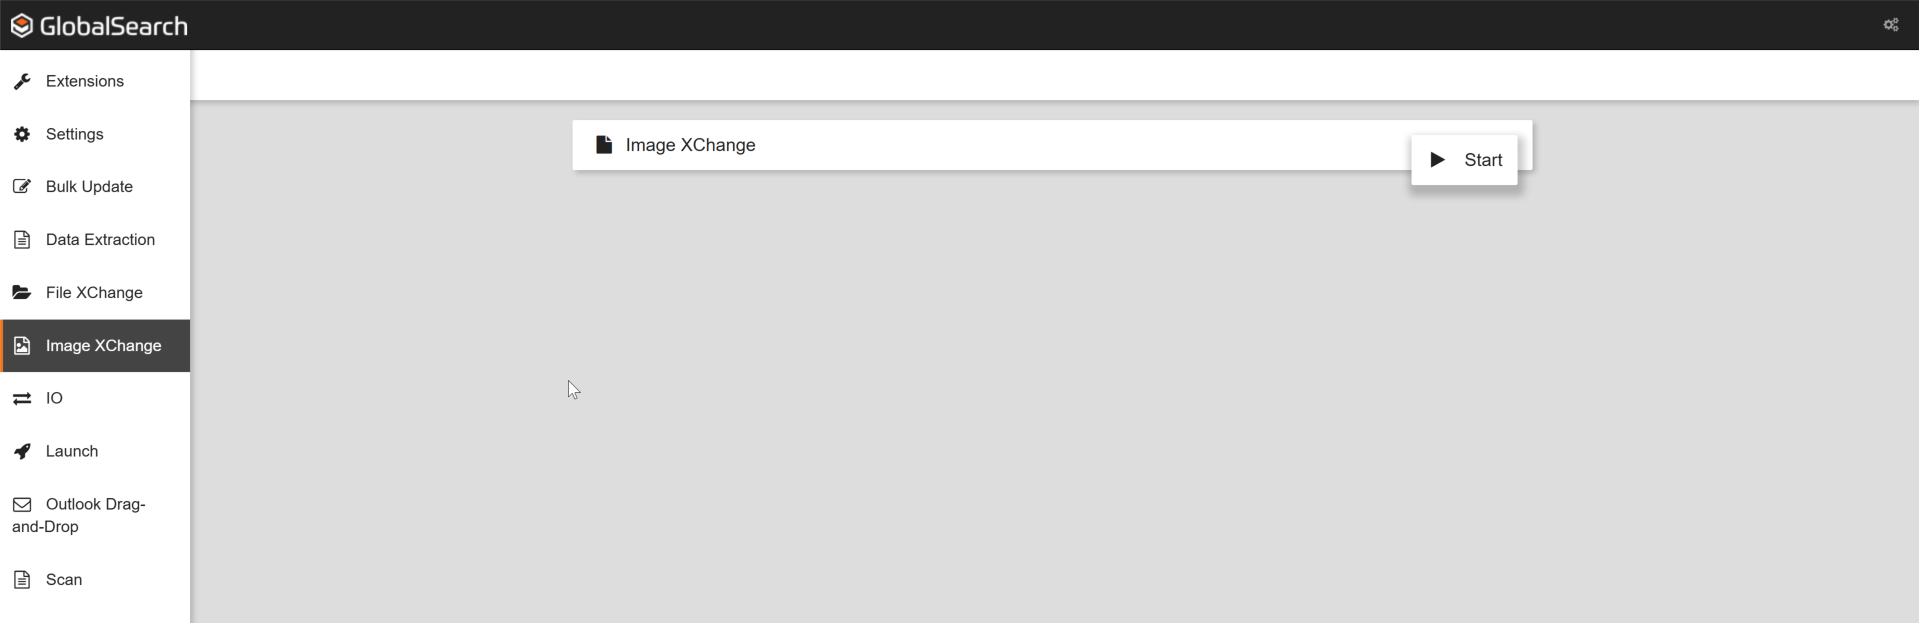
Image XChange must be running to configure and use it. Double-click the Extensions ( ) icon in your Windows system tray to open the Extensions Manager. Select Image XChange, click theMore Options() icon and from there, clickStart.
Open Image XChange Settings
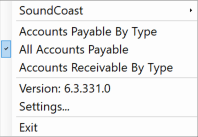
The Image XChange () icon will appear in your Windows® system tray. Right-click the icon to open the context menu and choose Settings or double-click the icon.
When the Settings dialog box opens, a GlobalSearch license is used to gather database, Archive, and Search details, and then is released.
If no license is available, the No License Available button will appear instead of the active database list in the context menu and in the Searches tab in the Settings. Click the button to try again for an available license and then continue with your configuration.
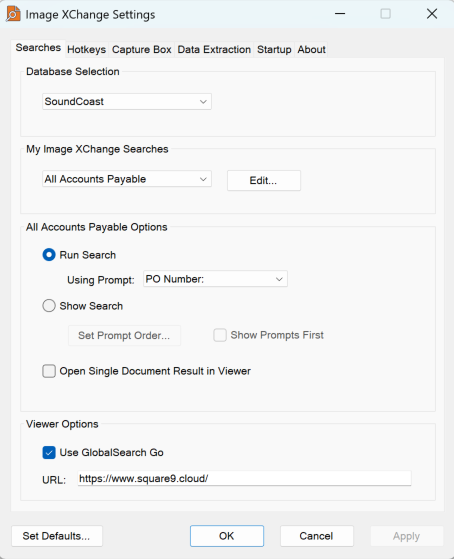
The Searches Tab
Image XChange must be assigned a search to run when exectuted. One or more Searches may be available to Image XChange but only one may be selected at a time. This is the Active Search. If an Active Search is not set, Image XChange will prompt for one at startup. In addition to an Active Search, you can create and edit a list of your Image XChange Searches. Use this list to quickly switch the Active Search from the context menu.
Image XChange Context Menu
From the Searches tab, you can select a database, select Searches from those available for the database, and configure how those Searches will run in Image XChange.
Please note that if a Search's fields are modified by an administrator after you have configured it for Image XChange, those changes may negatively affect Image XChange. Settings will reset to using either the default search prompt order or require you to re-select the target search prompt. You will need to configure your settings again for the modified Search when this happens.
Image XChange Settings - Search Tab
Database Selection
By default, the first available database is selected. If your GlobalSearch instance supports multiple databases, you can change your active database and select any database to which you are secured. Use the drop-down list to select a database and configure the Searches within it.
My Image XChange Searches
When creating Searches for a database, your GlobalSearch administrator can choose to enable the Image XChange option in the Search's settings. Those Searches will appear when you configure Image XChange for the first time. By default, the first one that is available is selected as the Active Search. You can use that Search or choose another from the list that appears when you expand the drop-down list. If there are no Image XChange-enabled Searches available to you, the No Searches Available message will appear instead. In this case, you must select a Search or Searches from the list of available Searches by clicking Edit.
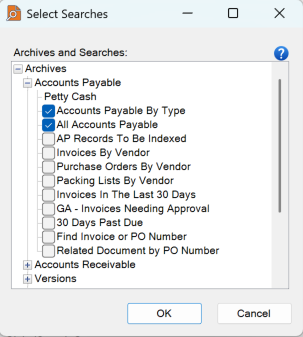
Edit Image XChange Searches
The first time you configure Image XChange, only Searches with the Image XChange option will appear in the My Image XChange Searches list. You can assign or delete from this list any Search available to you in the database. When you change databases, the Search list will change as well.
Click Edit and the Select Searches dialog appears. Navigate to an Archive.
Select or unselect your Searches and click OK.
Search Options
For each Search, you can configure how it will interact with Image XChange. Use the Options settings to control behavior.
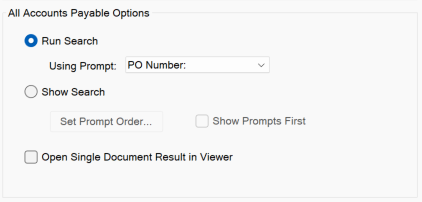
Run Search
With the Run Search option, you point-and-click a word or select a group of consecutive words on screen, see HotKeys Tab below. Those words are automatically provided to GlobalSearch as search criteria. The Search is run, and the results are displayed in a new browser tab.
To enable this behavior, select Run Search. By default, the first prompt in the Search is selected. You can change prompts by selecting another one from the Using Prompt drop-down list. Make sure the data you will be selecting on screen corresponds to the selected search prompt.
Run Search
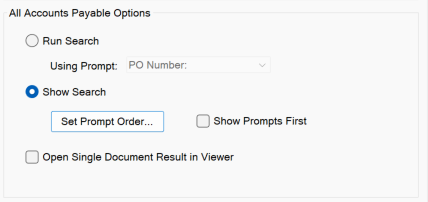
Show Search
Similar to Run Search, the Show Search option allows you to select a word or words on screen, see HotKeys Tab below. A search prompt is displayed with the selected text, and you may enter additional search criteria. Additional search criteria may be:
Selected from a list.
Manually keyed.
Continue using point-and-click to select text elements on screen.
To continue using point-and-click, you must use the hotkey combination before clicking the data to populate the selected field in the search prompt.
When all necessary search criteria has been entered in the prompt, you can run the Search and results are displayed in a new browser tab.
To enable this behavior, select Show Search.
You can change the order that the search prompts appear in Archive Searches for your Active Search. This does not change the Search itself, only the order that you see the prompts when you run the Search using Image XChange. This option allows you to configure your data entry in the way that best suits your workflow.
Enable Show Search and clickSet Prompt Order.
In theEdit Prompt Orderinterface that appears, use the Up and Down (arrows) buttons to set the order in which the prompts appear and then clickOK.
With Show Prompts First, no attempt is made to extract text on screen. This provides a quick-and-easy way to open a search prompt for documents, from anywhere and from any application. Additional search criteria may be:
Selected from a list.
Manually keyed.
Continue using point-and-click to select text elements on screen.
To continue using point-and-click, you must use the hotkey combination before clicking the data to populate the selected field in the search prompt.
When all necessary search criteria has been entered in the prompt, you can run the Search and results are displayed in a new browser tab.
If only a single documents is returned as part of the search, by enabling Open Single Document Results in Viewer, the document will open in the GlobalSearch Document Viewer instead of the Search Results view.
Show Search
Viewer Options
Enable Use GlobalSearch Go to open search results and documents in Globalsearch Go. The URL should be automatically populated.
https://www.square9.cloud/
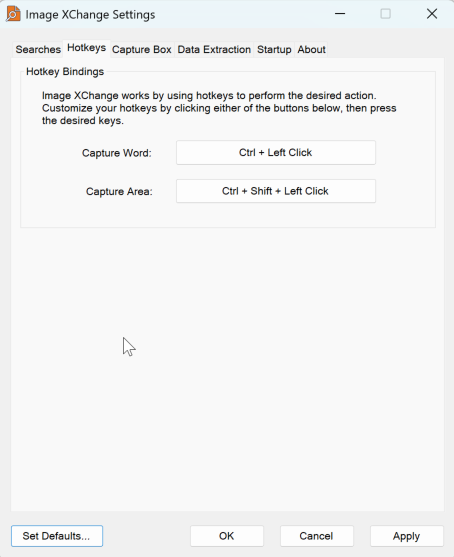
The Hotkeys Tab
Image XChange Searches are initiated when you press a hotkey and select a word or area of text on your screen. The defaults are:
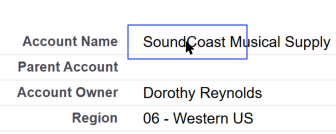
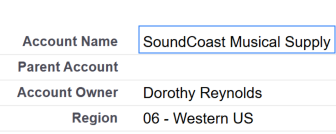
Word Capture hotkey is Ctrl+Left-click. Word Capture will only read the word that is under the cursor and only the parts within the capture box. You can adjust the size of the Capture Box on the Capture Box tab.
Will Read: Soundcoast
Will Read: SoundCo
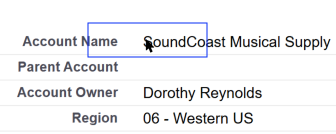
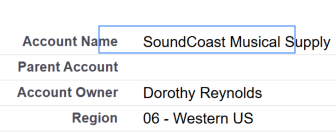
Area Capture is Ctrl+Shift+Left-click. Area Capture allows you to draw a box around the selected data and read all the text within the box.
Will Read: SoundCoast Musical Supply
Will Read: me SoundCoast Musical S
You can customize these settings on the Hotkeys tab. Change the hotkeys to your preferences (to a single F9 or F10 key, for example), but you should avoid assigning a hotkey that is already used by the applications from which you intend to capture text.
For example, it is not a good idea to assign Ctrl+S to an Image XChange hotkey, as it is already used in many applications for the Save command.
Click the button for the hotkey you wish to modify.
Use your keyboard and mouse to enter your hotkey combination, one key at a time. You can use a single key (including function keys such as F1, F2, etc.) or a combination of any modifier key or keys (Shift, Control, Windows, Alt) and then one primary key (any other key or click on your mouse).
Image XChange Settings - Hotkeys Tab
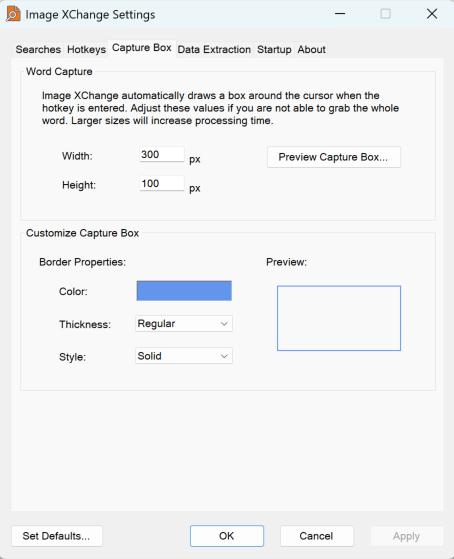
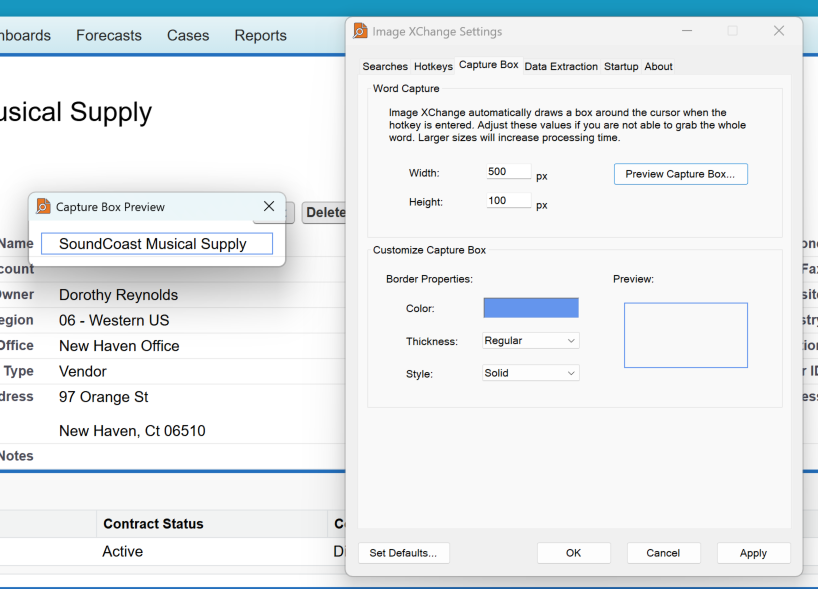
The Capture Box Tab
When you select a word or area on your screen and press the appropriate hotkey, the Capture Box appears to indicate your target data. Only text inside the Capture Box will be read. You can modify the Box dimensions and appearance on the Capture Box tab.
Image XChange Settings - Capture Box Tab
Word Capture
If you select a word and press the Word Capture hotkey, Image XChange draws a Capture Box around where your cursor is placed. You will get the best results from Word Capture by balancing a Capture Box large enough to capture most words, yet small enough to avoid extraneous words or images that might impede the OCR process.
For example, it is common for spreadsheets to have alternate-row shading. If you resize the Capture Box to the height of a row, the extraction engine will process text with a single background color instead multiple colors. Doing so may improve your results.
To adjust the size of the Box, enter dimensions in theWidthandHeight text boxes. The default size for this box is 300 pixels wide by 100 pixels high.
The box must be at least 100 x 20 pixels. The capture area is measured in pixels from the inside edges of the box.
To test the size and appearance of the Capture Box, click Preview Capture Box and drag the transparent preview Box over a document on your screen. Drag to resize the Box as needed.
Customize Capture Box
You can modify the appearance of the Capture Box to suit your personal preference. Do this if you have any problems seeing the Capture Box, such as when its color is too similar to the application background.
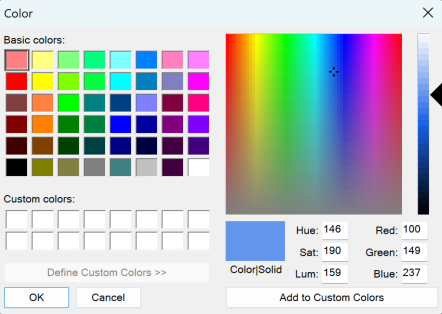
Color – To adjust the color, do one or more of the following:
Click Color and in the color picker dialog box that appears, make your selection. The selected color appears in the Color/Solid box.
Use the Basic Colors palette, the color selector field, color slider, or enter Hex or RGB color codes when selecting.
Click Add to Custom Colors to store color settings in the Custom Colors palette for later use.
Click OK to save your settings and close the color picker.
Thickness – Select from the Thickness drop-down list to adjust the thickness of the line.
Style – To adjust the line style, select from the Style drop-down list.
Color Picker
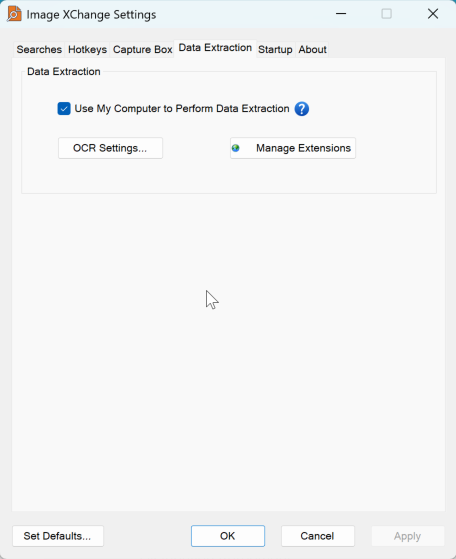
The Data Extraction Tab
Image XChange may leverage OCR technology to capture text on screen; changing OCR Settings can impact results. The default settings work well, but some screens and applications may benefit from customizing your OCR settings.
Image XChange Settings - Data Extraction Tab
Use My Computer to Perform Data Extraction is used to determine whether the analysis of text taken from the screen is performed locally on your client workstation, or on the GlobalSearch server. It is never recommended to change where Data Extraction is running without being directed to do so by your Support team.
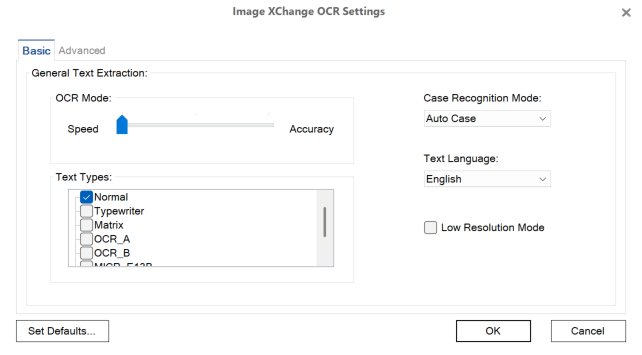
To adjust your OCR settings for optimal results, click OCR Settings and refer to the Image XChange OCR Settings page for details.
Manage Extensions opens the GlobalSearch Extension Manager browser page.
OCR Settings
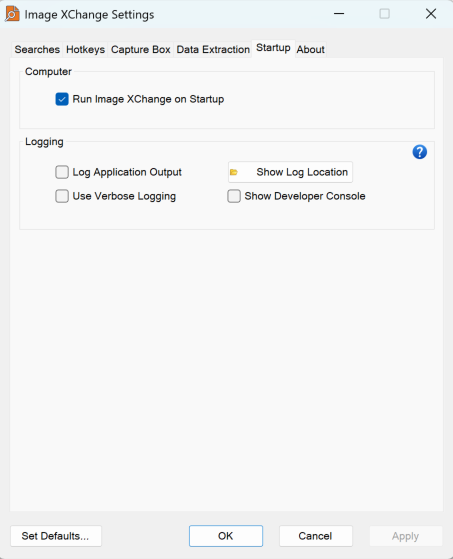
The Startup Tab
Startup and logging settings are found on the Startup tab.
Image XChange Settings - Startup Tab
Computer
Enable Run Image XChange on Startup to include a shortcut to Image XChange in your startup folder. This is enabled by default at installation. Unchecking this setting removes the startup shortcut. Note that unchecking this option will require the application to be manually started any time you wish to use it.
Logging
The Logging options are off by default and should only be used when attempting to diagnose or resolve an issue with Image XChange. Please consult with your GlobalSearch Support team before using these settings. Unlike the other settings, these options require that you restart Image XChange before they take effect.
Log Application Output – When Log Application Output is enabled, Image XChange will log all console and exception details to the C:\Users\<user>\AppData\Local\Square_9_Softworks\ImageXChange\Log\Square9.ImageXChange.log file.
Show Log Location – Click Show Log Location to open the directory where the Image XChange log file is located.
Use Verbose Logging – When Use Verbose Logging is enabled, Image XChange will log more process details than are found in the standard log, which could be useful for more advanced troubleshooting scenarios. Note that Verbose Logging will also save each captured image to a Captures folder in the log directory to help in the troubleshooting process.
Show Developer Console – Select Show Developer Console to open a console window displaying detailed information about Image XChange activities. Use this option if you would like to view real-time console output.
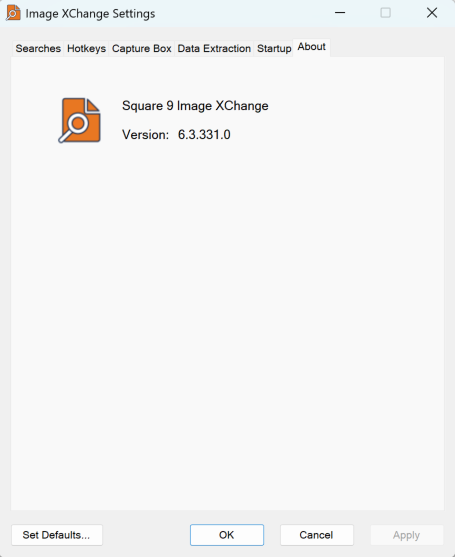
The About Tab
Select the About tab to view your Image XChange version number.
Image XChange Settings - About Tab
JavaScript errors detected
Please note, these errors can depend on your browser setup.
If this problem persists, please contact our support.