Image XChange OCR Settings
While the standard OCR settings are the best setting in most situations, some screens and applications may benefit from customizing your OCR settings.
From the Image XChange Settings, select the Data Extraction tab and click OCR Settings.
Note that Image XChange settings affect only your workstation and only the current logged in user.
To restore the settings to the factory default settings, click Set Defaults and at the OCR Settings – Confirm Reset confirmation question, click Yes.
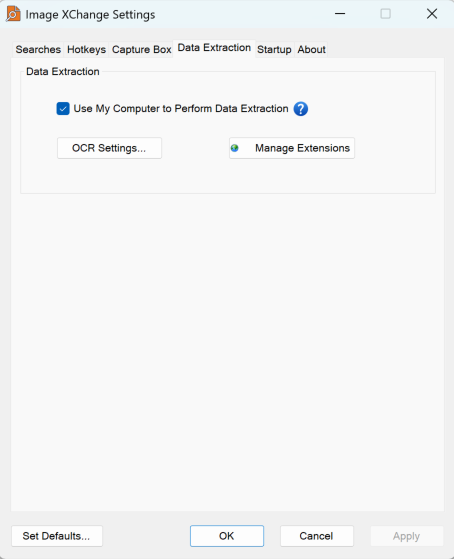
Image XChange Settings - Data Extraction Tab
Image XChange OCR Settings - Basic
In the Image XChange OCR Settings dialog box, select Basic Options and choose from the following settings.
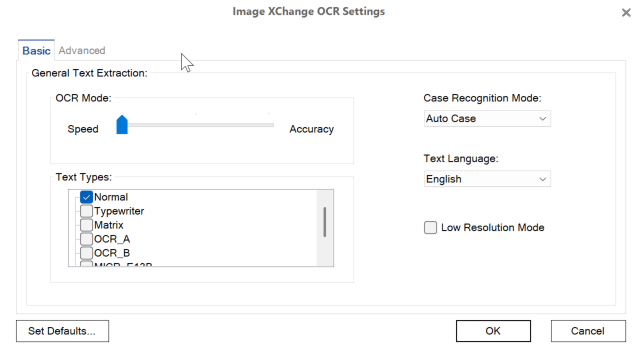
Basic OCR Settings
General Text Extraction
Move the OCR Mode settings slider to the left for faster OCR scanning and to the right for slower but more accurate OCR scanning.
From the Text Types list, select the type of text that will be recognized for OCR. You can select more than one Text Type, but for best results keep the number of types selected to a minimum. Text types include:
Normal – The default selection for most serif or sans-serif text from a modern printer.
Typewriter – For text from a typewriter.
Matrix – For text from a dot-matrix printer.
OCR_A – For text set in OCR A monospaced font designed for OCR.
OCR_B – For text set in OCR B monospaced font designed for OCR.
MICR_E13B – When indexing a check or other banking documents which uses this MICR (Magnetic Ink Character Recognition Code) font, select this option.
MICR_CMC7– When indexing a check or other banking documents that uses this MICR barcode font.
To change the text entered into index fields, select the text letter case you wish to persist from the Case Recognition Mode drop-down list. Select from the following choices:
Auto Case – For text to retain the capitalization seen in the original document.
Small Case – Enter text in lowercase letters in an Index Field.
Capital Case – Enter text in uppercase letters in an Index Field.
To change the target language for OCR conversion, select the language from the Text Language drop-down list.
To specify whether text on an image with low resolution is recognized, enable Low Resolution Mode. This is useful when recognizing documents such as faxes or ones with poor print quality.
Image XChange OCR Settings - Advanced
In the Image XChange OCR Settings dialog, select Advanced Options and choose from the following settings.
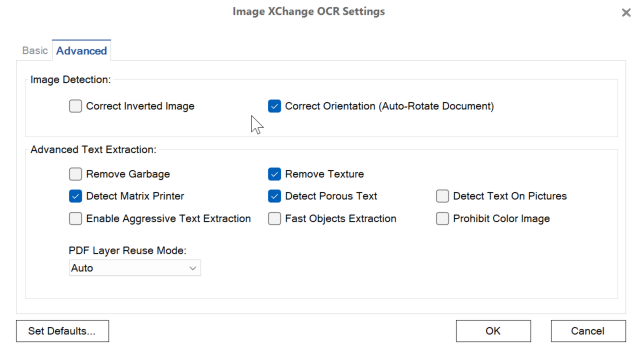
OCR Settings - Advanced
Image XChange OCR Settings - Advanced
Image Detection
Correct Inverted Image – Select this option to invert white text on a black background to the more usual black text on a white background during the OCR process.
Correct Orientation – Use this option if an image has been scanned in an upside-down or sideways position to automatically reposition it.
Advanced Text Extraction
To improve character recognition, select from the following:
Remove Garbage – Removes excess dots that are smaller than a certain size from the image during objects extraction (despeckle).
Remove Texture – Temporarily remove the background noise during OCR which might interfere with text recognition.
Detect Matrix Printer – If the source document was produced on a dot-matrix printer, use this option to interpret the text more accurately.
Detect Porous Text – Detect regions of the document with “porous” text.
Detect Text On Pictures – If the document has text on an image or colored background, use this selection to allow for OCR on the image.
Enable Aggressive Text Extraction – Enables the OCR engine to attempt to extract as much text on the image as possible. This is useful when the image contains some low-quality text, (although it may still require manual correction).
Fast Objects Extraction – When speed is required more than a high level of OCR accuracy, select this setting.
Prohibit Color Image – For the OCR engine to skip text laid over an image or colored background and only scan the black-and-white text.
Specify how to reuse the text and image layers of the source PDF file by selecting from the PDF Layer Reuse Mode drop-down list. Do not use this setting if the source file contains only raster-based data, such as image-only PDF files.
Auto – Have the OCR engine use both text and image layers. This is useful in most cases.
Do Not Reuse – Do not reuse the text layer which exists in the PDF file.
Content Only – Have the OCR engine use only text layers in the PDF file, if they exist.