Configure Cloud Bridge
Cloud Bridge allows for connectivity between Square 9’s cloud and a customer datasource. Cloud Bridge creates a one way connection from the Square 9 cloud to a customer hosted SQL Server. This enables integrations and data accessibility without the need for complex network configuration, or IT involvement. Cloud Bridge works by establishing and AES-256 encrypted tunnel, bridging the gap between cloud and premise.
It is important to understand the tunnel path is one way. So Square 9 cloud applications and resources can read and write to the SQL data source, but client side applications WOULD NOT be able to read or write directly to a Square 9 data source over the tunnel.
Some examples of possible use include:
Loading data from a customer hosted data source into a GlobalForm on load, or at some later form workflow step.
Loading data from a customer hosted data source into GlobalSearch via Data XChange.
Writing data collected in a GlobalAction workflow to a SQL Table hosted by the customer.
Using a customer hosted data source to feed a Data Lookup Zone in a GlobalCapture.
Warning:
Square 9 does not support Cloud Bridge in environments where the customer does not have a static external IP address. While it can and will work, it will cause downstream problems with your environment. Without this step, the connection between Square 9 and the customer can not be relied on as always available. When that happens, failures are expected and Square 9’s cloud support team would need to retarget the connection to an updated IP address. This is likely to cause breaks in any processes leveraging the connection. If you have questions or concerns about static IP addresses, please contact support.
Overview
Existing cloud customers looking to leverage data sharing capabilities may request Cloud Bridge Enablement through a request to the Square 9 Software Support team. Navigate to your admin dashboard (https://yourinstancename.mysquare9.com/cloud-dashboard/configuration) and complete the CloudBridge Client Configuration Request. New customers may indicate a need for Cloud Bridge functionality on their fulfillment request and the feature will be enabled, or Square 9’s Professional Services team may request it on your behalf.
Customers who are using Cloud Bridge will need the client, installed locally in the premise environment. Be on the lookout for an email from Square 9’s Fulfillment Team with the download link for the client app.
Ensure you have a Windows Desktop or Server available to install the client app. It is recommend that Cloud Bridge be installed on a server or workstation that is “always on” and remains permanently in the physical location of installation.
Ensure .Net 5 is installed. We recommend the .Net 5.x Desktop Runtime package, found here.
*Please note, the below section is outdated, and should not be used without express permission from the cloud team. To install the Cloudbridge Client, please reach out to the cloud team to schedule a time were they can connect and install for you
Installation Instructions
The Cloud Bridge client needs to be present and functional for communications to work. Square 9 highly recommends deploying Cloud Bridge to a server that remains always on in the environment.
Note: .Net 6.x is not backwards compatible with .Net 5.x, and can not be substituted.
Download the installation media on the computer you are deploying to and ensure the .Net 5.x prerequisite is installed before proceeding.
Extract the installation media to a local folder and run the msi file in the CloudBridgeClient.Installer folder.
Click next through the installation prompts to deploy the software. When finished, you will find the Cloud Bridge application files in “C:\Program Files\Square 9 Softworks\CloudBridge”.
Configure Cloud Bridge
Creating New Service Mappings
From the Cloud Bridge application folder (C:\Program Files\Square 9 Softworks\CloudBridge), run the Cloud Bridge client (CloudBridgeClientUI.exe).
The first time you access cloud bridge, you will need to provide configuration details. Specifically, the fully qualified domain name for your GlobalSearch instance and the Cloud Bridge access password provided during the fulfillment process.
 If you cancel the server configuration, or need to change the configuration, click the black Server icon to the right of the Square 9 logo to open the server configuration.
Provide the FQDN in the Server text box of the configuration form. Do not include “https://”. So the Server entry should resemble: myinstance.mysquare9.com
If your are a user of Square 9’s Workflow or Capture products, your URL will resemble:
capture-myinstance.mysquare9.com
Customers looking to add Cloud Bridge to their environment will require a password provided by Square 9’s cloud fulfillment team. Provide that value in the Password text box.
With connection details provided, The Cloud Bridge Client interface will display:
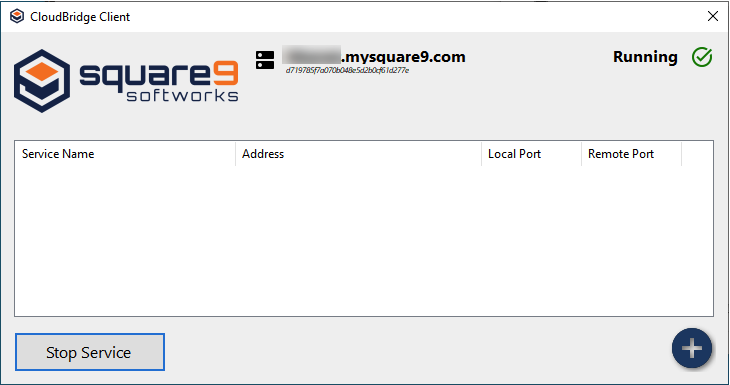
The configured URL will display to the right of the black Server icon, to the right of the Square 9 logo. If the URL is empty or incorrect, click the server icon to display the configuration panel and update it.
If the service is running, the Running status is indicated in the upper right of the interface, along with a green check. If the connection is broken, the service is configured to stop and restart itself to reestablish the connection. If the service is not running for any reason, it will be noted as stopped in this area.
If the Cloud Bridge client has been able to successfully broker a connection to your Square 9 Cloud environment, you will notice a security token displayed below the URL, to the right of the black server icon.
Click the blue Plus fab icon in the bottom right corner to configure a connection.
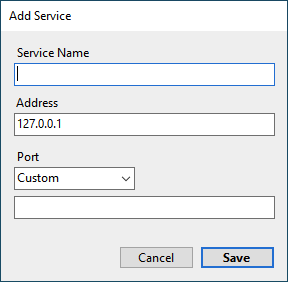
Provide all details for your service connection:
Service Name is just used for display purposes. It’s an indicator for those configuring the client what a specific service is intended to be used for.
Address is used to specify the network address of the service that will be exposed through Cloud Bridge. In most cases, Cloud Bridge will be installed on the same server as the service in question. In this example, we will be specifying a connection to a local SQL Server instance, so the default local address of 127.0.0.1 is acceptable.
If you wish to specify your own port, leave the Port selection on Custom, and provide the port number in the text box below. Alternately, Cloud Bridge is bundle with common ports / applications. You can select an application from the Port drop down list and the port number will be provided for you.
Clicking save will provision the connection details. Your local service will now be available to Square 9’s cloud

Local service: CloudBridge Service

Creating New Service Mappings
If you need to remove a configured service, simply right click the Service Name of interest and choose the Delete option.

Configure Cloud Bridge to Connect to SQL Server
Configure the SQL Server to use TCP/IP
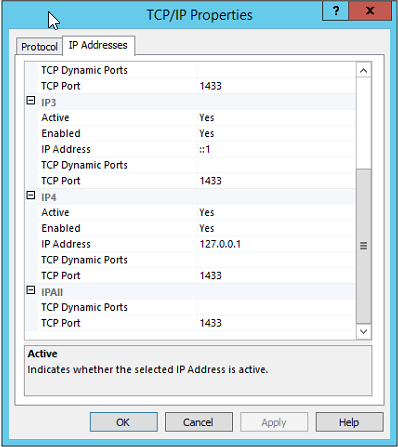
In order to access a on-premise SQL Server, the SQL Server must have TCP/IP enabled and a static port defined on the address you are binding CloudBridge to. For example, if you mapping CloudBridge to the IP Address 127.0.0.1, it must have 1433 statically defined on that IP in the TCP/IP properties. To configure this, do the following:
Open SQL Server Configuration Manager
Navigate to SQL Server Network Configuration > Protocols for YourInstanceName
If TCP/IP is not enabled, right click it and select Enable.
Right click TCP/IP and select Properties
Select IP Addresses
Locate the IP address you are binding to, and set “Enabled” to “Yes”.
Click OK
Restart the SQL Server Instance
Configure a SQL Server User and Password
Any connections from your Cloud Server to your on-premise SQL server will use SQL Authentication. To configure SQL Authentication, do the following:
Open SQL Server Management Studio and login to your SQL Instance
Right click the SQL instance name and select Properties
Click on Security on the left
Ensure SQL Server and Windows Authentication Mode is enabled under Server Authentication.
Click OK.
On the navigation pane, scroll down and right click Security.
Select New > Login
Enter a login name, select SQL Server authentication and define a password.
Note: Leaving password expiration on will require periodic changes of any connections from your SQL instance and is not recommended.
Under Server Roles and User Mapping, define any permissions your user needs and click OK.
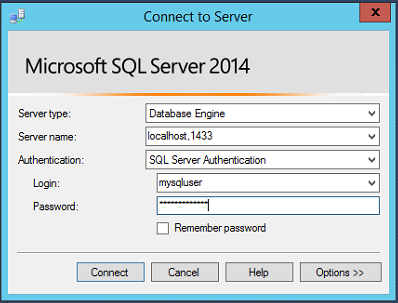
Testing Your Configuration
If you have performed the steps above, you should be able to connect to your SQL instance as shown in the screenshot below:
Connecting to Your Server Over CloudBridge
When connecting to your on-premise SQL instance from your cloud server, use the following connection string as a reference.
Server=IPProvidedBySquare9,PortInCloudBridgeClient;Database=DatabaseName;UID=User;PWD=Password;