CTS DirectConnect Node
The CTS DirectConnect node is available in GlobalCapture only.
This node is added when CTS DirectConnect is installed.
The CTS DirectConnect node is used to import files or import data and documents.
This node could be used for: watching a “hot folder” for new scanned documents, or importing data and documents that were exported from another application, such as QuickBooks.
While designed to allow for imports from local file locations for Capture in the Cloud, this will work with both Cloud and On Premise solutions.

CTS DirectConnect Node
Node Properties
Title
Add a title for this node. Your title should be brief but descriptive about what is being picked up. Titles are useful when reading the history in the history of a workflow for easier understanding of the overall process.
Description
Provide a synopsis of what this node is doing, or make note of any important details. This is useful for providing additional information such as workflow details, pick up Inbox, destination Archive, use case information, etc. A good description is helpful when returning to modify the workflow in the future.
Frequency
Includes settings for Days, Hours and Minutes. By default, this is set to 15 minutes. Setting the frequency is important for how often you’d like for this to execute. For example, if there is a nightly upload we’d want this to run once every 24 hours and can set the frequency to do so.
The workflow will run with the scheduled frequency each time the workflow is saved. Ex. If you set the frequency to 1 hour and save the workflow at 2:42 pm, it will run immediately on save and then again at 3:42 pm and so one. If you were to modify the workflow at 3:15 pm and save, it would run immediately and then again at 4:15.
Data Validation
The Data Validation checkbox is enabled by default to enforce Data Types or Length settings for Fields. When enabled, if data does not meet the type or length settings for the field, the process will error on this node.
Import Types
Import Type: File

Use File to monitor a “hot” folder for document. Any document placed in this folder will be ingested into the workflow. This is useful when scanning documents from an MFP device.
Import Settings
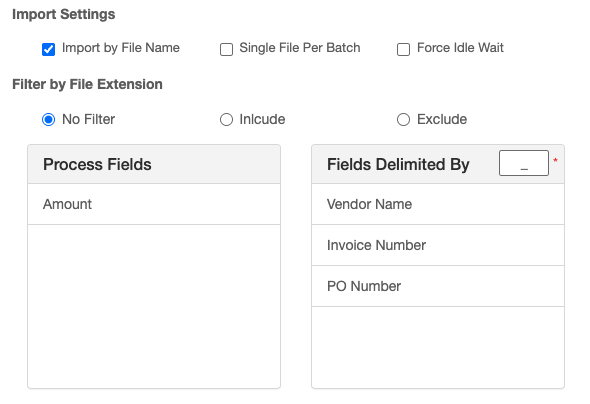
Import by File Name
Allows you to use data in the file name in index fields. When enabled, move fields from the Process Fields column to the Fields Delimited by column, and enter the delimiter. The data in the name will populate the fields in the order they are listed.
Ex. If a file were named SoundCoast_253699_PO74525, the file name would be parsed into the fields as show:
Vendor Name = SoundCoast
Invoice Number = 253699
PO Number = PO74525
Single File Per Batch
If a single import ingests multiple files at the same time, each file is given a unique Process ID but they share the same Batch ID. This allows the administrator to group all the files that were ingested at the same time. Enabling Single Field Per Batch assigns a unique batch id to each imported file, even if ingested at the same time.
Force Idle Wait
Delays the import of a document in a folder until 2 minutes after it has last been written to. This ensures the file is complete when ingested.
Filter by File Extension

Allows you to include or exclude specific types of files. To enter multiple types of files, separate each file type with a comma.
To ingest only pdf, tif, and jpeg fields you would enable Include and enter: pdf, tif, jpeg in the input box.
No Filter - ALL files in the pickup location will be ingested.
Include - Only the types of files INCLUDED in the list in the input box will be ingested, all others will be ignored.
Exclude - All files will be ingested EXCEPT those with extensions listed in the input box.
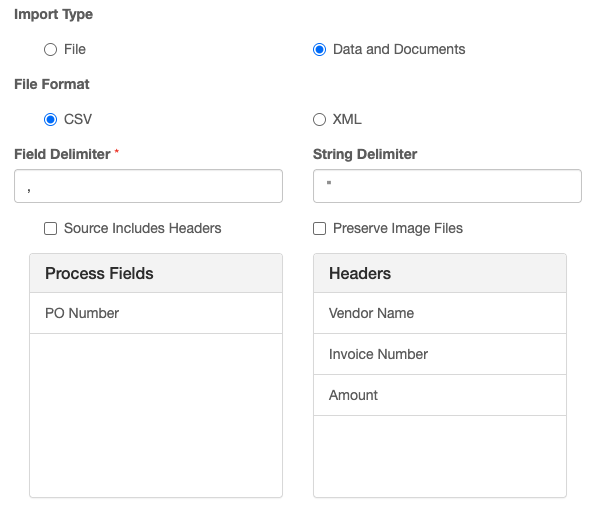
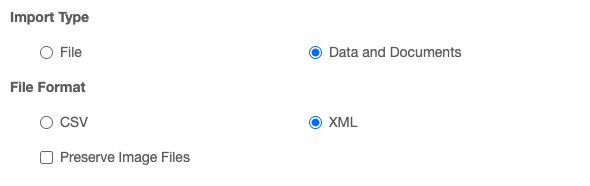
Import Type: Data and Documents
Use Import Data and Documents when you have many documents to import and a CSV or XML file that contains relevant index field data and file paths. This is most commonly used for file-sharing between line of business applications or receiving records from a service bureau.
File Format CSV
Field Delimiter
The character used in the CSV file to separate the fields.
String Delimiter
The character used to denote a string in the CSV file.
Source File Includes Headers
If the file includes headers, the data will be automatically mapped to the GlobalCapture field with the same name.
This CSV uses a comma ( , ) as a field delimiter, a ( “ ) as a string delimiter, and contains headers. If GlobalCapture fields for Vendor Name, Invoice Number, PO Number, and/or Amount exist, the data will automatically be added to those fields.
"Vendor Name","Invoice Number","PO Number","Amount"
"Acme Corp","INV-1001","PO-9001","1250.00"
"Global Supplies","INV-1002","PO-9002","478.50"
"Tech Solutions","INV-1003","PO-9003","3200.00"
"Fresh Farms","INV-1004","PO-9004","875.75"
"Northwind Traders","INV-1005","PO-9005","1620.00"
If no headers are present, you must add the GlobalCapture fields in the order of the data in the file by moving them from the Process Fields column to the Header column.
Preserve Image Files
When enabled, the original files will remain in their source location. If disabled, they will be removed.
File Format CSV
Preserve Image Files
When enabled, the original files will remain in their source location. If disabled, they will be removed.
Use Case
Using the CTS DirectConnect node to import document from a file folder
Here we have configured the CTS DirectConnect node to import documents scanned to a local folder from an MFP device.
Refer to CTS DirectConnect documentation to learn how to configure the pickup location in the CTS DirectConnect desktop application.

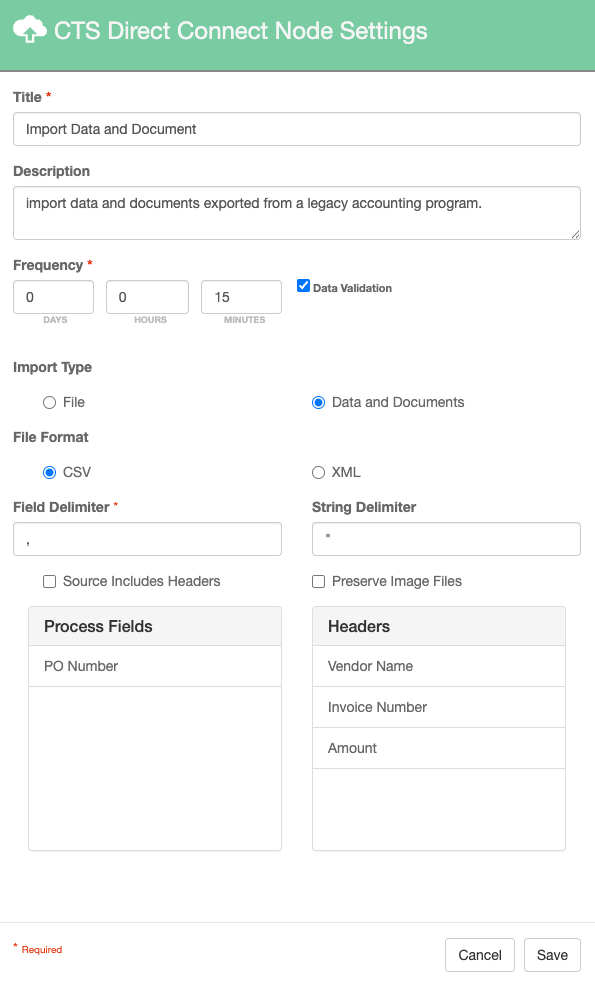
Using CTS DirectConnect to Import Data and Documents
In this example, The node is configured to import data and documents. The CSV file does not contain headers, the field delimiter is a comma and the string delimiter is a pair of quotation marks. The CSV contains Vendor Name, Invoice Number, and Amount in that order. This process will run every 15 minutes.