Configure Marker Zones
The Marker Zone is the most basic Zone type, where the Template basis document validation by looking in a designated location on the page for a match to a particular word or phrase. If your Validate Node needs to process only structured forms, one or more Marker Zones may be all you need for a simple Template. The Marker Zone and Positional Zone are the Structured Data Extraction Zones types that are core to any GlobalCapture installation. Note OCR options might be unavailable for bundled versions of GlobalCapture, but licensing may always be added to any installation type.
You can use Marker Zones to detect any shifts in the image position and automatically registers the Template to the proper location. You can also use Marker Zones to classify a document’s layout. By using an exact string match of characters, you can introduces a high level of accuracy, which allows you to draw tighter Zones for text-heavy documents. Some things to keep in mind about the Marker Zone search string:
The search string is not case sensitive.
It is a good idea for a Marker to be unique in the region of the page it is searching.
You can specify part of a word, one word, or more than word. Use part of a word for “contains” matching. For example, specify “appl” to return both “application” and “applied.”
You can specify more than one search string to perform an OR-based search in multiple values in the Zone. The results will be the first search string in the list which is found on the document, unless multiple occurrences of a search string or no occurrence of a search string are found. In either case, the Marker Zone will move on to the next search string in the list to look for a unique match. If no matches were found among the search strings, the “Marker not found” message will appear. Adjust your Search String entries to achieve successful results.
Choosing Between Marker and Pattern Match Zones
When choosing between a Marker Zone and a Pattern Match Zone, consider these factors:
Case – Pattern Match Zones are case sensitive (but can be controlled with
(?i)at the beginning to ignore case). Marker Zones are not case sensitive.RegEx Search Strings – Pattern Match Zones support the use of Regular Expressions to define search strings. Marker Zones do not.
Licensing - Pattern Match Zones require an Unstructured Data Extraction license.
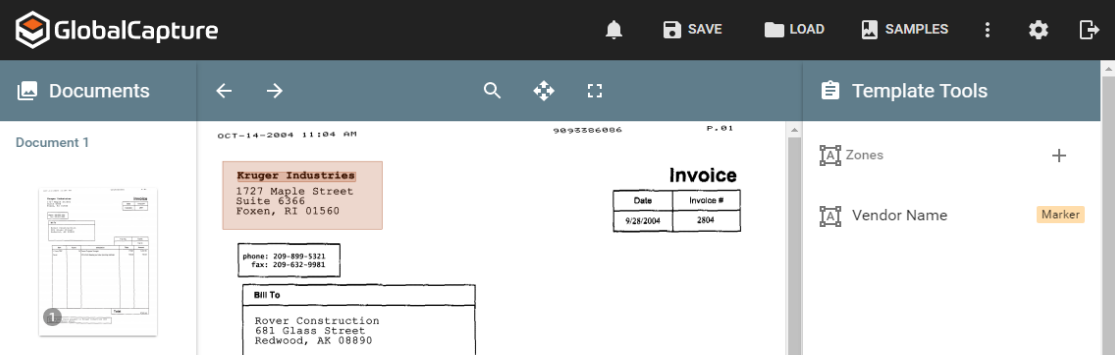
Configure Zone
In the Properties Pane, enter a name for the new Zone.
From the Type drop-down list, select Marker (the default Zone).
To select the text used to register the image position, enter the part of a word, word, or phrase in the Search String text box. Press Enter again to add more search strings.
To designate an area of the page to search for a match, click the Locator icon, and then use your mouse to drag a box over the area to be searched to create the Search Region.
Optionally, additional Zone properties can be configured.
Click the Apply icon. The Zone will be added to the Zones Pane and the matching text will be indicated by a salmon-colored box on the document image around the extracted search string.
Additional Zone Properties
Parent Zone Property
To establish a hierarchy of two or more Zones, select a parent Zone from the Parent drop-down list. Once selected, you can constrain the child Zone to extract on the same page as its parent Zone using the Parent button in the Pages section. Note that Directional Zones are set relative to parent Zones using the From Parent Edge setting in the Limits group.
Field Zone Properties
You can map data extracted from Zones to indexing fields using the Field settings. This may be configured for any Zone type.
Note that with the Line Item OCR Extraction license, you can extract Table Field data from a single page (such as invoice line items) or across multiple pages. The repeating Zone can be set per document, per page, or per document region. Use this option in Directional Zones.
Field or Table Field – Choose a Field or Table Field in the Field group to map a Zone to. If you select a Table Field, you can assign a Table Field to the parent/header Zone of a table. As you cannot assign a Table Field and a Field simultaneously, your Header Zone should not be used for extracting data that feeds a Field.
Select a portal in GlobalCapture or GlobalSearch (if available).
Select a database in the portal.
Select either a Field or a Table Field in the database.
Replacement – After mapping a Field or a Table Field to a Zone, the Replacement group appears. Use the Replacement settings to clean up extracted text. For example, if your OCR engine often interprets a zero as an O on a particular document, you can replace the letter O with the number 0. You could also use this to remove the dollar sign or comma from a number by replacing them with nothing.
Click Add Replacement.
Enter the text to be matched. You can use a string or a RegEx. This text box cannot be empty.
Enter the replacement text. You can use a string or you can leave Replacement empty to strip out text, such as removing commas from a number.
Select either Word to configure a text match or Pattern to configure a regular expression.
To configure additional replacements, click Add Replacement again. To delete a replacement, click the Delete (X) icon next to the selected replacement settings.
General Zone Properties
Required – To ensure that the Zone contains data before the template is used for extraction, enable Required. This may be assigned to any Zone type, but it must be assigned for document classification. All required Zones in a Template must occur on a page for a document to be classified. A document will always classify with the first Template that matches all required Zones or the first Template that has no required Zones, whichever comes first. (Note that in some situations, enabling a Zone as a header or a footer may in fact make that Zone required. This primarily happens when one of these Zone types is a separator.)
Required Zones should not be used if GlobalCapture is not licensed for Classification.
Separator – Advanced document separation can be performed with a Template. On one or more Zones, enable Separator and either Header or Footer to burst documents, when appropriate data is found. If Separator and Header are enabled, the Template will identify the first page of a document. If Separator and Footer are enabled, the Template will identify the last page. When either combination is enabled, the Group property becomes available. When Separator and Header are enabled, the Separate on Change property appears.
Note that If there are any non-header/footer Zones also defined in the Template, any required Zones must also be found in order for classification and separation to occur.
Separate on Change – If identifying data appears on all pages and the documents should be burst when data in a Zone changes, also enable the contextual Separate on Change checkbox for that Zone.
Group – You can group together Zones so that the Template must match all of the Zones in the Group and be found on the same page. This makes it possible to add “OR” logic to separation when using Header or Footer groups. Assign a Zone to a group by number. Then, if there is more than one group of Zones configured for separation, the data extracted from the Zones belonging to the group that has the highest numerical value in the Group setting will be evaluated first. If all Zones in that group match a page, that Header or Footer group is used to separate the document on that page. If all Zones in the group do not match, the group with the second-highest Group numerical value is evaluated, and so on until a matching header or footer group is found. If none of the defined Header or Footer groups matches a page, the document will not be separated on that page.
Confidence – When OCR engines extract data there can be a margin of error in the interpretation. You can set the minimum accuracy for data extracted using the Confidence slider. Move it to the right to increase the threshold and to the left to decrease it. By default, it is set to 0%, which allows all results, including no data at all.
Data will only extract if the average confidence for the words within the extracted data are above the set confidence threshold. The ideal level will be high enough to allow for acceptable accuracy in your Workflow automation while not being so high as to cause a lot of batch errors that users will have to correct manually. Around 80% to 85% is usually a good threshold to start with, unless it is likely that there will be no data in the Zone to extract, then leave it at 0%.
Priority – In some situations, two or more Zones could extract data for the same Field. To resolve extraction conflicts, enter a number in the Priority text box that appears if Separator is not enabled. The data extracted from the Zone which has the largest Priority numerical value will be retained. If the Zones have the same Priority setting, then the data extracted with the higher Confidence setting will be retained. This can be optionally configured for any Zone type.
Header – Enable the Header checkbox to assign the Zone as a header for a repeating or separator Zone. This can be assigned to go across multiple pages, from the same location on each page. Use headers to indicate the start of a document, thus allowing for separation on the start of a new document. Headers may also be used to trigger the start of a table of data, and are particularly relevant when attempting to extract tables of data across multiple pages. Note that if no header Zones are defined for a repeating Zone, then searching will continue at the edge of the following pages.
Footer – Enable the Footer checkbox to assign the Zone as a footer for a repeating or separator Zone. This can be assigned to go across multiple pages. Use a footer to indicate the last page of a document when separating, or to indicate the stopping point for table extraction when using repeating Zones.
Position Zone Properties
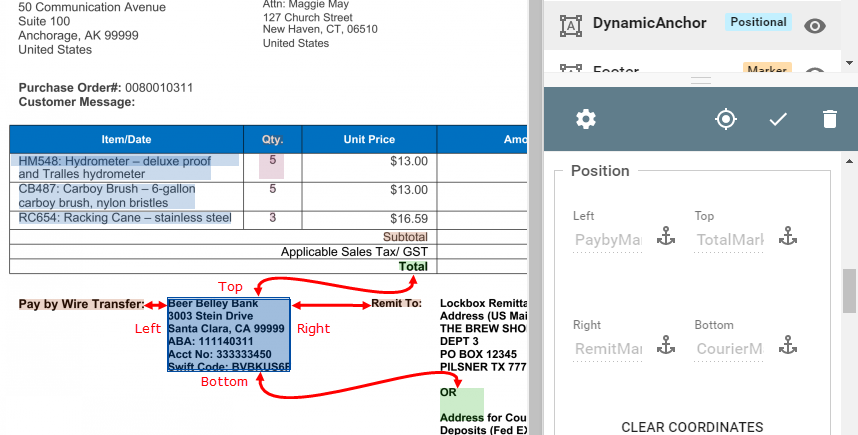
Use the Position settings to define the Search Region of a Zone. These settings can be configured for all Zone types and they are required for Positional or Directional Zones. The location and dimensions of the Search Region can be specified by document page, by coordinates on the document page, the distance from the edge of another Zone (Zone Anchoring), or a combination of coordinates and Zone Anchoring.
With Zone Anchoring, the coordinates are relative to up to four other Zones. Instead of using coordinates to define the Search Region to extract data, you can create completely dynamic Regions. Additionally, one Anchor can be chained to another. With multiple Anchors, extraction areas will adjust even more dynamically. Note that you cannot anchor a parent Zone to its child Zones.
Position properties are measured from the top-left corner of the page or parent Zone’s Search Region. Left and Right coordinate settings are the number of pixels over from the left edge of the page or Search Region. Top and Bottom are measured from the top edge. Configure these settings by entering a number, using the scroll arrows, or by drawing the Region using the Locator icon on the Zone’s menu bar. You can use the Measure tool on the toolbar to determine how many pixels to enter.
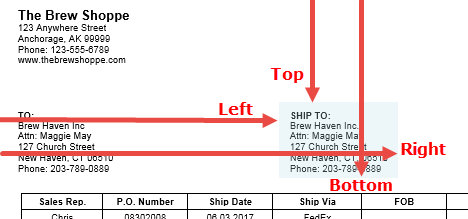
Coordinates – Use the Coordinates and Zone Anchor settings to set the dimensions and position of Search Regions. The starting point for measuring the edges of a Search Region depends upon how a Zone is configured:
Zones with No Parent Zone – Coordinates are measured in pixels from the top-left corner of the document page. For Zones where Position settings are optional, If no coordinates are set the entire page is searched for data. If an individual position is not set, the page is searched to the edge of the page in that direction.
Child Zones – Coordinates are measured in pixels from the top-left corner of the parent’s found data, except for Directional Zones. Coordinates for Directional Zones (which are always child Zones) depend on the direction of search. When configuring Zones, it is recommended that you set the parent Zone’s properties first, and then the child Zone’s properties.
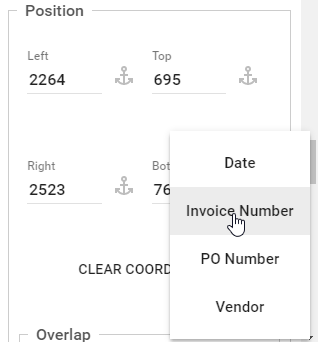
Zone Anchors – Click the Anchor icon next to one or more of the Left, Top, Right, or Bottom text boxes and in the Anchor menu which appears, select a Zone from the list. The input box will then show the name of the anchored Zone in the text box. Any sides of the Search Region which are not defined by anchoring should be defined by coordinates. Note that if you set coordinates first and then select Anchors, you can revert to the coordinates by clicking Anchor again.
Consider Atypical Documents When Configuring Zone Properties
Since the dimensions and position of a Zone Search Region can affect the extraction outcome, consider how to configure a “fallback position” if your Template encounters a document with non-standard content or formatting. For example, Zone Anchors are very dynamic, but if anchor text is not found, the drawn coordinates of the Zone is respected. If there are no drawn coordinates, the Zone checks the entire page. This may be the result that you want, but if you prefer that the Search Region is more specific for those times when the anchor text is not found, first set coordinates (either by drawing the Search Region or by entering coordinates) and then select the anchoring Zone or Zones.
Overlap – Sometimes text is only partially in a Search Region. If those cases, you can use Overlap if you want to ensure that it is also picked up for the Zone. To set the directions outside of the drawn Zone Search Region to look for data to extract, in the Overlap subgroup, enable one or more of the Left, Top, Right, Bottom checkboxes. All four are enabled by default. All text must reside at least a pixel within the Search Region for the overlap to pick it up, regardless of the direction. A setting of 0 disables overlap in any direction, while a setting of 15 enables overlap in all directions.
Orientation – Use the Orientation slider to set the direction in which data is read for extraction. Move the slider from the default of 0° (no rotation) to the right to set the orientation to 90°, 180°, or 270°.
Pages – Use Pages to specify which page to search for data to extract. (Note that settings are unavailable for Separator Zones.) In the Page subgroup, select one of the following:
In the Page subgroup, choose the First, Last, or All pages.
Or, if there is a designated Parent Zone, to ensure that a child Zone’s data is extracted from the intended location in a multi-page document, you can specify that it must be found on the same page as the parent Zone’s data was found. For repeating Zones, note that the Search Region for their child Zones will be on the same page as the one where the repetition was found, irregardless of their Pages setting, with one exception. If child Zones that are footer Zones are found whose Pages is specified as Last, the repetition will be stopped for the current and any subsequent pages.
Specific – To extract from specified pages of the document, enter one or more page numbers in the Specific text box. For more than one page, use a comma to delimit the page numbers (1,3,5) or use a hyphen to indicate a range of pages (3-5).
Limits Zone Properties
Use the Limits settings to specify parameters for data to extract. If a Zone on the current page does not meet the parameters (such as not enough digits for a Social Security Number), then the Template will search any subsequent specified pages for data that does. Data in the Search Region must contain at least the minimum specified elements or it will be not be validated. Results will truncated for any characters, words, or lines past the maximum specified.
Note that the Min settings for the Characters limit is enforced per line read within the entire Zone, while for the Min settings for the Words limit is enforced for the entire Zone. Also note that the Lines settings value must be either zero (meaning no limit) or a number greater than one, in order to configure Word Spacing in Marker and Pattern Match Zones.
Elements include:
Characters – In the Characters subgroup, enter a number for the minimum and/or the maximum number of characters required for data extracted from the Zone.
Words – In the Words subgroup, enter a number for the minimum and/or the maximum number of words required.
Lines – In the Lines subgroup, enter a number for the minimum and/or the maximum number of lines of text required and for variable-height line extraction.
Word Spacing – Sometimes “loose” regular expressions can return false-positive extraction results when used across documents with variable text-value lengths that include gaps between consecutive words or lines of text. You can adjust those results using the Word Spacing settings.
When you set your Zone to extract from different blocks of text, you can control what should be considered for the Zone and what should not, using the Word Spacing setting. This appears when the Lines Max setting is zero or greater than one. You can configure your multi-line pattern matching to specify the vertical and horizontal distances allowed between lines in one long, searchable string. When you specify the size of gaps, you can set two paragraphs to be extracted together, for example, or words in a full justified paragraph, where the space between words may be larger than normal.
Setting either Vertical or Horizontal spacing to zero will bridge gaps of any size. Both settings at zero will combine all available words into a single searchable string. You can use the Measure feature to help determine the gap settings. To measure the distance, click the Measure (

) icon in the Template Designer toolbar and then drag your mouse pointer on the Design Canvas from one point to another to create a line. The Measurement dialog will appear to display the line’s X and Y coordinates.
To specify limits to the spaces between consecutive words and lines, in the Word Spacing subgroup that appears, select Vertical ro specify the maximum number of pixels high and Horizontal to specify the maximum number of pixels wide the space between valid words or lines to extract.
Control Extraction by Controlling Gaps
The OCR engine treats a group of words as a “line,” although the words may not necessarily all be on the same horizontal plane, as one might think of a line of text.
Use the Word Spacing settings to control your extraction results, based on the empty spaces between words.
Use Field Limits and Zone Limits Together
If you set an Index Field for an invoice description using the default maximum of 50 characters and then set a Search Region of 75 characters for a Zone, only the first 50 characters will be extracted. (This is true for all the repeating Zones that follow the first one as well.) So, either set your Index Field to a maximum number of characters high enough to encompass most scenarios or use it knowingly to eliminate some invoice descriptions that you do not want to capture.
Barcode Zone Property
To specify a Zone for BCR (Barcode Character Recognition) in the Barcode group, enable Barcode and then select:
Enhance – Enable Enhance to improve extraction results by temporarily enhancing the barcode image.
Orientation – To set the direction in which the barcode will be read, enable East (left to right), South (top to bottom), North (bottom to top), or West (right to left).
Symbology – In the Symbology group, select one or more types of barcodes.
Scan Sensitivity – To set the scanning intervals, enter a number in the text box or use the scrollbar arrows to adjust the number. A greater interval value means faster performance, but a lower recognition confidence level, and vice versa. The default setting is 5.
Plan and Test Marker Zones
Choose and Test Marker Text Carefully. When selecting text for your Marker, choose text which is most likely to return accurate OCR results. For example, while the Marker text is not case sensitive, the text you select should be clear and without attributes. If possible, try to avoid characters that can be suspect during OCR, such as L/1, O/0, B/8, S/5, Z/2, and so on.
Use Distinct Markers. It is a good idea to give all your Templates distinct Marker Zones. Use more than one if your Workflow as Templates that are similar but need to classify documents differently.
Use Required Zones for classification. If you are using a Zone in Templates which will be used to selected the correct template for a document, be sure that at least one Zone is configured as “Required.” If all required Zones are not found on a document, then that Template will not be a match for classifying that document. The first template found that matches, or the first template found with no required zones, will be the active template.