Using Image XChange
Starting the Application
Once installed, Image XChange should start automatically when you log into your computer. If you do need to start it, double-click the Extensions icon in your Windows system tray to open the Extensions Manager.
Icon
(
Select Image XChange, click the More Options (
When Image XChange first starts, it will momentarily log into GlobalSearch to gather details on databases, Archives, and Searches. If you are not already logged into GlobalSearch and a license is not available, the No License Available button appears in the context menu or the Image XChange Settings. At any time, you can click the button to try again.
Application Usage
Once running, the Image XChange icon will appear in your Windows® system tray.
Icon
(
Right-click the icon to open the context menu. This is where you can select which Search you would like to run and, if any additional configuration is required, where you can access the Image XChange Settings.
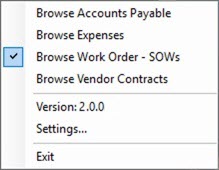
Image XChange Context Menu
One or more Searches may be available to be used with Image XChange. The active Search (the one with a check mark next to it) is the one that will be used any time the application is initiated. You may quickly change the active Search from the context menu at any time. Simply select the Search you wish to set from the menu to make it the active Search.
GlobalSearch Searches do not cross databases, but Image XChange allows you to set the active Search to any Search available to you. When you have permissions to multiple databases, the first option in the context menu will be the current database.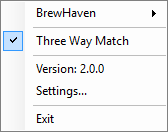
Click the current Database and a menu will pull right with the other database options available. Select any database in this list to change the Searches in the menu to those in the other database.
With the appropriate Search selected, Image XChange is ready to serve your requests for documents. All requests begin by using the hotkey combination for your desired method of selecting on-screen text. For selecting words (Word Capture), the default combination is Control+Left-click. For selecting a block of text (Area Capture), the default is Control+Shift+Left-click. Depending on how the Search is configured to interact with Image XChange, the Run Search, Show Search, or Prompt Only scenarios will present search options or results accordingly.
Note that data captured through Image XChange must match the data requirements for the Index Field(s) being searched. For example, you could not select a customer name and use that in a search prompt for PO Date. Likewise, lists are also enforced. If you clicked on a customer name and the GlobalSearch Field is a list of customers, the selected customer must be present in the list or you will be prompted to correct the error.
Once the Search has run, any documents that meet your search criteria appear in the GlobalSearch Search Results Document List, in a new browser tab. If you are not already logged into GlobalSearch, you will be prompted to log in at this time. From this point, use the search results as you would normally in GlobalSearch.
Application Configuration
Use the Image XChange Settings interface to customize search options for your specific needs. You can select the Searches from those available for the database(s), and configure how those Searches will run in Image XChange. Use the Settings to create a list of Image XChange Searches so that you can quickly switch your active Search from the list in your context menu.
Exiting the Application
Image XChange is designed to run in the background, ready for use. It only consumes a license when it's actively being used to search for documents. If you need to close the application for any reason, click Exit in the context menu.