Modifying Values within the Document Type List in Accounts Receivable
In this section we are going to walk you through how to change or add a value for the picklist being used in the Accounts Payable practice area for Document Type. This process however will be the same for modifying values in the Accounts Receivable and Contract areas as well. For the Human Resources practice area it is a similar process however there are some added step for managing the Dynamic Picklist found in that area which we will cover in the Managing Human Resources Document Categories section of this documentation.
Finding the Correct Pick List to Edit
To locate your picklists or make any system level changes, you will first need to be logged in as a System Administrator
As a System Administrator you will see a Lock icon on the top left of the main toolbar Click the lock icon and select Administration from the list of options
On the left side of the page you will see the different areas that can be modified. Select the Field Catalog area
Across the top of the screen you will see three options; Fields, Table Fields and Lists. Select the Lists option on the right side.
From the list of available lists to manage the locate the AR Records Type list.
Click the ellipsis on the right side of the AR Records Type selection and select Edit.

The List Editing Screen
Modifying Picklists Values in the List Editor
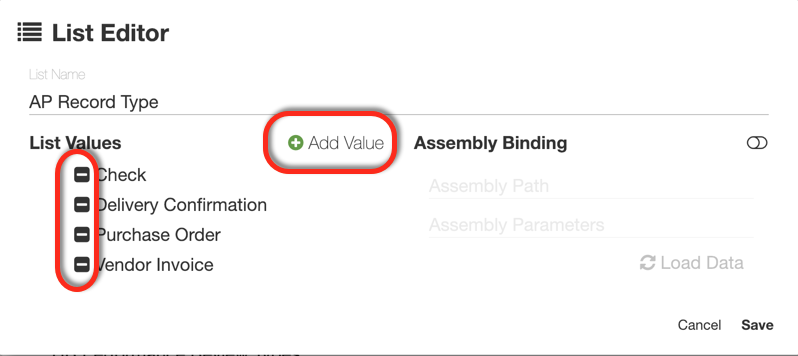
With the list editor open new picklist values can be easily added or deleted
To Delete A Value - simply select the minus sign next to the value and the value will be removed
To Add a Value - Select Add Value and a value named New Item will be added to the list.
Click on New Value to change the value to the desired name such as "Backup Documentation"
Click Save and any new values will be added or removed values deleted the next time this list is accessed.

Editing List Values
Creating a New Picklist
Creating a New Picklist is an easy process using the same principles described above;
With Lists selected in the Field Catalog Page click the orange plus sign in the lower right hand corner.
The List Editor will Open.
Label the picklist with a descriptive name
Begin adding the picklist values
Click Save to complete the process.
