Table Fields
The Tabular Data feature supports multi-column, multi-row, spreadsheet-style indexing as a separate field control in the Validation Station. Each row is an individual line of data where you can enter information manually, through dragging or through KeyFree Indexing. Dynamic Pick Lists can be included in the Table Field data, which is very useful for accounts payable invoice processing. Table Field data can be entered by opening the Validation Station and manually entering the data, using KeyFree Indexing, via OCR data extraction, using GlobalForms, or by a combination of methods.
Create Table Fields
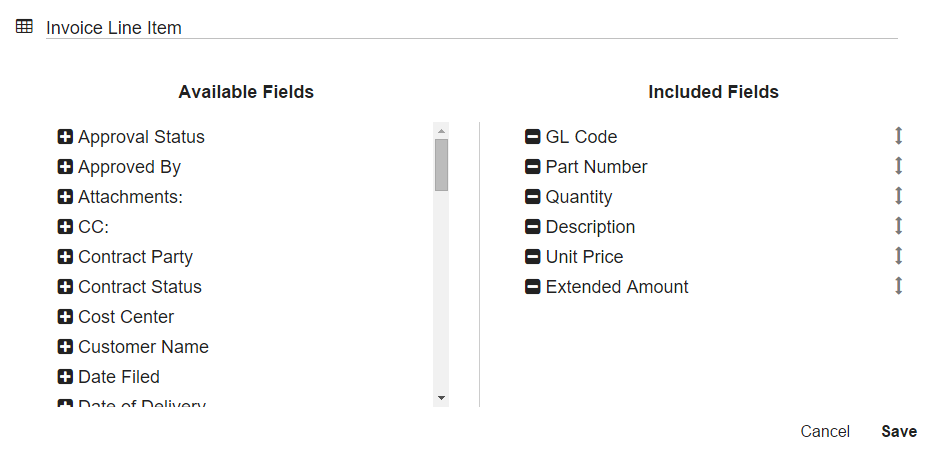
Think of a Table Field as just a grouping of regular Index Fields in GlobalCapture. Create the component Index Fields first, then create the Table Field by selecting from the list of available Index Fields. Fields can be added to or removed from Table Fields as needed.
Note that while you can create Table Fields in the Field Catalog, you must have the Line Item Data Extraction option to extract data to those Table Fields through an OCR step.

- To create the table, on the Field Catalog toolbar, click Table Fields.
- Click the Add () button to add a new Table Field.
- Enter a name for the Table Field in the TableField Name box.
- Click the Add button to the left of the Index Fields in the Available Fields list to add them to the Included Fields list.
- Repeat step 4 to add additional Fields.
- Click Save. The Table Field will be added to the Field Catalog.

Edit Table Fields
- To edit a Table Field, on the Field Catalog toolbar, click Table Fields.
- Click the More Options () icon in the selected Table Field box and click Edit.
- Make changes in the Table Field editor and click Save.
Delete Table Fields
Possible Data Loss
Deleting a Table Field from the Field Catalog removes it permanently and will result in a loss of any data in that Field.
- To delete a Table Field or Fields, on the Field Catalog toolbar, click Table Fields.
- Click the More Options icon in the selected Table Field box and click Delete.
- Because this will permanently delete the Table Field, enter the displayed text in the Confirm Action prompt.


