Best Practices for Bulk Importing Documents into GlobalSearch
Introduction
In cases where there is a need to import documents into GlobalSearch, for example documents that have been scanned and indexed by a third party, a migration from another system, or other situations that require it, there are a number of best practices that should be followed to ensure a smooth document import. These best practices apply to both the GlobalSearch Web Client and Desktop Client.
Understand What You’re Importing
Field Order
Before you import any documents into GlobalSearch, it’s important that your database and archives are ready to support the data you’re importing. The fields in your import file must have corresponding fields in GlobalSearch to import into; if you’re importing using the Desktop Client, the fields must be ordered to match your import file, otherwise, field order does not matter.
For example, if your file has 6 fields:
Vendor Name
Invoice Number
Invoice Date
Invoice Amount
PO Number
FilePath
Your archive would need fields 1 through 5, ideally in the order presented. If a field does not exist, you can create it.
Field Length
When importing documents into GlobalSearch, it’s important to understand the potential length of a field. In the case where you have field data that exceeds the length of a field (50 by default), the import for that document will fail. This typically only applies to character fields, but when importing documents with potentially long data strings, you should increase the length of the fields if you suspect you have data that exceeds the length of a field to the maximum length of the column in question.
If you are unsure of the maximum field length that would exist in a particular column of your import file, you can open the file in Excel and use a function such as LEN() to understand the length of a field column. Documentation of the LEN function is available on Microsoft’s website, located here.
Data Types
When importing into fields such as Date/Time, Numeric, Decimal, the data that will be imported into those fields must match those fields’ data types, each data type may have specific format constraints.
Character - Supports any characters except unicode.
Numeric - Supports only numbers, leading zeros are dropped.
Date/Time - Supports only date and date and time values, for example:
1/23/2021
01/23/2021 12:00:00 PM
Decimal - Supports amounts with precision, such as dollars, but not necessarily money ie:
123.45
123.456789
1,234,567.00
Failure to match the needed format of a field’s data type will cause the import to fail for that record.
Filepath
It’s typically recommended that the filepath be the last column. The file must be accessible from that path and paths are relative to where the import is being run, for example if the import file references the C:\MyImport folder, the local C: drive will be queried and a folder called MyImport. If this import is being run on a client’s desktop, their C: drive will be referenced, if run from the server, the server’s C: drive will be queried, etc. If the filepath is not correct, you may need to change it by doing a find and replace.
Delimiters and Qualifiers
Import files are expected to be character delimited and qualifiers used where applicable.
In the example below, data strings containing the delimiter are properly qualified using quotes, in this case, the Vendor Name contained the delimiter and is qualified by having quotes wrapped around the value telling the importer that it is all one value and not to break on the comma, used as a delimiter here.
Both examples are supported:
Vendor Name, Invoice Number, Invoice Date, Invoice Amount, PO Number, Filepath

“Square 9 Softworks, Co”,INV12345,12/25/2020,100.00,PO45678,C:\MyImport\MyFile.pdf
Vendor Name, Invoice Number, Invoice Date, Invoice Amount, PO Number, Filepath

“Square 9 Softworks, Co”,”INV12345”,”12/25/2020”,”100.00”,”PO45678”,”C:\MyImport\MyFile.pdf”
Unique ID Column
If you are importing a large amount of documents into GlobalSearch, it is a good idea to include a unique ID for each one of your records you’re importing, for example row number.
In the example presented above this would look like this.
Example Import File
ID, Vendor Name, Invoice Number, Invoice Date, Invoice Amount, PO Number, Filepath

1, “Square 9 Softworks, Co”,”INV12345”,”12/25/2020”,”100.00”,”PO45678”,”C:\MyImport\MyFile.pdf”

2, “Square 9 Softworks, Co”,”INV55555”,”12/27/2020”,”609.21”,”PO45622”,”C:\MyImport\MyFile2.pdf”

3, “SoundCoast”,”ABC33252”,”11/27/2020”,”856.33”,”PO22622”,”C:\MyImport\MyFile3.pdf”
This would allow you to uniquely identify each row, enabling you to balance the documents imported against the file on the database level, identify missing files or identify duplicate files. A field to store your unique ID field should exist.
Importing Your Data
The process to import documents into GlobalSearch may vary depending on the client you use. It is recommended that imports be done using the GlobalSearch Web Client because:
Better error handling - Any records which error will be produced in a new file containing the data for the records that have errored, so you can quickly import them.
Field Mapping - One of the big advantages to the web client is the ability to map fields from the import file, to the fields within GlobalSearch.
Note - Importing documents into GlobalSearch Web requires GlobalSearch Extensions with the IO extension enabled.
Performing the Import
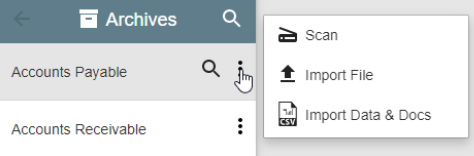
Open the GlobalSearch Web Client
Locate the archive you’d like to import documents into.
Expand the menu by selecting the dots to the right of the name.
Select “Import Data & Docs”
5. Map your import file as below.
CSV File - The path to your CSV File.
Field Delimiter - The delimiter used to separate field data in the import file.
String Delimiter - The qualifier for data fields used containing data, this is by default double quotes, “.
Field Mapping - Listed on the left are the fields in the archive and fields from the file are on the right.
Error File: The path to the generated error file.
CSV Contains Column Header - Skips the first row on import.
Overwrite System Fields - If the target archive contains system fields, the data will be overwritten by the data in the file.

6. Click Import
Error Files
After your import is complete, you will find two additional files created:
A file listing any errors that occurred and the corresponding row number at which they occured.
A file containing data for any rows. You can reimport this file as needed.