
Using Data XChange, indexing data created in another location (like an accounting or other line-of-business application) can be pulled into GlobalSearch records. This can save a lot of redundant data entry time when users import data from source records into editable Fields. For example, after a purchase order has been scanned and indexed into GlobalSearch the invoice for services rendered arrives. It can be captured with just the P.O. number; all other indexing data could be pulled in automatically.
Before users can access Data XChange in the web client, you must map an external source (or sources) for an Archive. Data XChange can be configured to look up data from any ODBC- or OLEDB-compliant data source. Alternately, Data XChange can be configured to leverage the current or a different GlobalSearch database to pull data from. This feature is commonly used for allowing users to consistently index documents with common data points, by pulling from records that already have been indexed. For example, if an invoice was indexed already with vendor name and po number, a Data XChange lookup might be used to pull in those values on a check.
Once configured, users can open a document in the Document Viewer or index a new document, select a source, and the data lookups for the document will pull indexing data from the configured source. If there is a similar document matching the indexing information being used, Data XChange will fill in as many Fields as possible in the current document with data from the matching data record. If more than one matching data record is found, users will be prompted to select the correct one.
Beginning with GlobalSearch version 6.3, Data XChange can be configured to run automatically at the time of indexing a new document, or at the time of updating an existing one. Enable the On Add or On Update toggles in the Data XChange interface to configure automatic data updates. Users can still manually trigger any Data XChange source that is configured to run On Add or On Update.
Note that if Data XChange is configured to run automatically, indexing records with NO data will result in the document being indexed with the first record available from the configured source. Make sure your indexing process and the source configuration accounts for this behavior.
Create Links to Data XChange Sources
-
To set Data XChange sources, on the GlobalSearch toolbar, in the Administration menu, select Administration.
-
In the vertical Administration menu, select Archives. A list of Archives will appear.
-
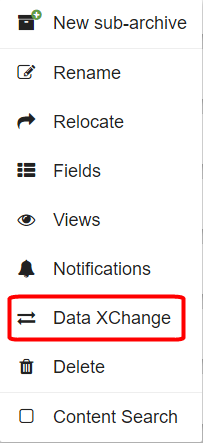
Click the More Options (:threedots: ) icon for the selected Archive and select Data XChange.
-
Click New.
-
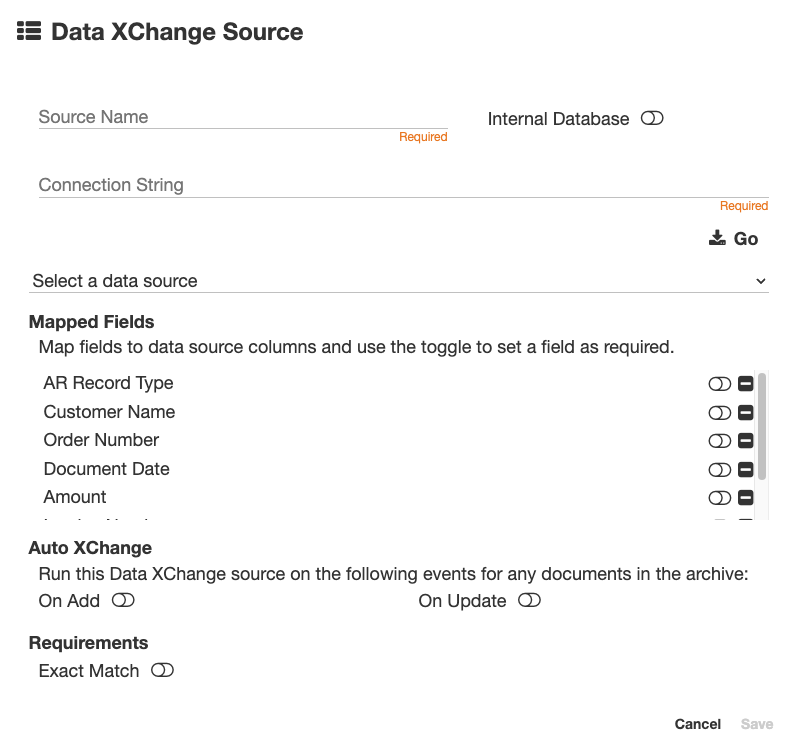
In the Data XChange Source dialog that appears, enter the name of the source in the Source Name text box. Use a short but descriptive name to indicate to users what Data XChange source is being used for updating.
External Data XChange
-
Enter the connection string in the Connection String text box. The data source can be in a file format where a connection string can be created, such as CSV file, a SQL table, or an Access database. Click Go.
-
Select the Data Source from the list.
Internal Data XChange
-
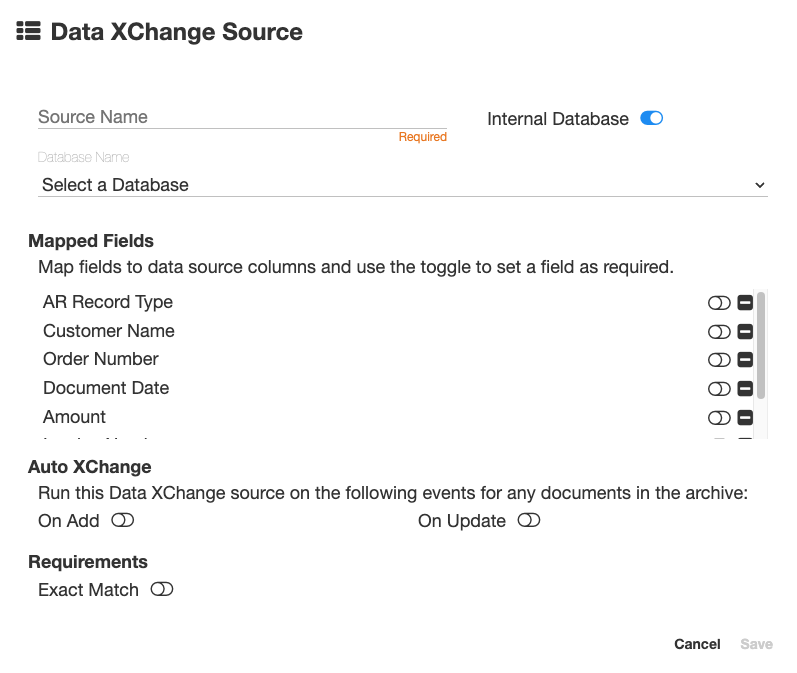
Toggle Internal Database on.
-
Select the GlobalSearch Database from the list.
-
In the Mapped Fields group, select one or more of the Archive Index Fields to map to from the list of available Fields.
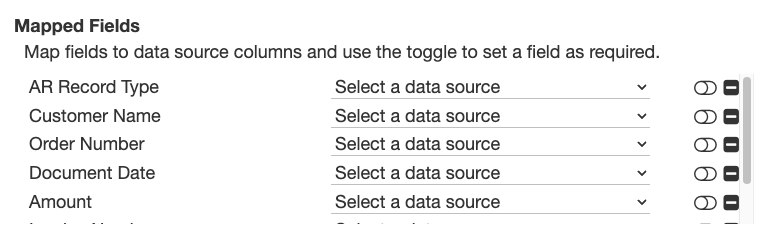
The column on the left is the list of index field in the archive, the column on the right is the source data in the table. The name of the data source field does not need to match the index field name.
-
Click Save.
-
Click Close to close Data XChange Sources.
-
Any index field that is not mapped to a data source field will not be part of the Data XChange. Data in the GlobalSearch index field will not be used in the lookup and any data in the source will not be returned to that field.
Optional Configuration Options
The following options can be toggled on to enhance the users Data XChange experience but are not required.
Required Field

The toggle next to each index field in the Mapped Fields area determines if a particular field is required for the Data XChange. When a toggle is enabled next to a mapped field, that field must have data for the Data XChange to return results.
-
If required field(s) are left blank, then no data will be returned even if other fields have data and match.
-
If all required field(s) have data and other, non required fields, have data, the data in the non required fields will still be applied, so all entered data fields must match an entry in the data source to return values.
Auto XChange

On Add - When enabled, data exchange On Add runs when the document is added to an archive for the first time and save is clicked. The data that is added to the document is that of the first item in the list that matches the criteria of any of the fields populated. If no fields are populated, it takes the first item in the list. If multiple fields are populated, it takes the first item that matches all of the populated fields. If no matches are found then no data is populated.
On Update - When enabled, each time the document is saved after the initial save, the data is updated. The rules followed are the same as the On Add to determine the data that is used.
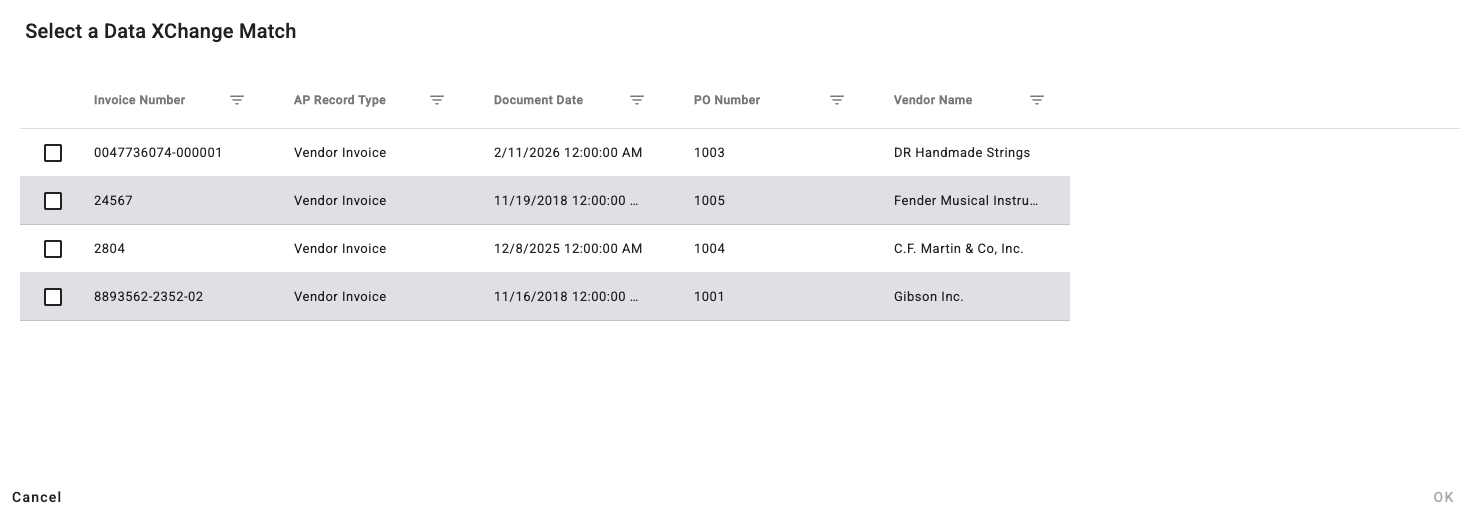
When multiple results are returned by a Data XChange, a pop-up displays a list of the index fields that are mapped in the data exchange source. This is the first value in the list and the value that is chosen when On Add or On Update is selected. See Return Data Organization.
Requirements

Exact Match - When exact match is enabled, data is only returned when there is a single match. If multiple data sets match the entered data, no results are returned.
If a PO number appears on multiple archive records, the query returns no data because it would produce multiple results. If the same PO number is entered with another field populated so the search yields a single result, the system automatically populates the data.
Modify Data XChange Sources Settings
-
To modify links to Data XChange sources, select Administration > Administration > Archives.
-
From the list of Archives, click the Options icon (three dots on the top right of the card) for the selected Archive and select Data XChange.
-
In the Data XChange Source dialog, select the source and click the Edit (pencil) icon and make changes to the settings.
-
Click Save to save changes and then Close.
Delete Links to Data XChange Sources
-
To delete links to Data XChange sources, select Administration > Administration > Archives.
-
Click the Options icon for the selected Archive and select Data XChange.
-
In the Data XChange Source dialog, select the source and click the Delete icon.
-
Click Close.
Returned Data Organization
Columns
When multiple results are returned, the columns are ordered based on the field number with the lowest field number.
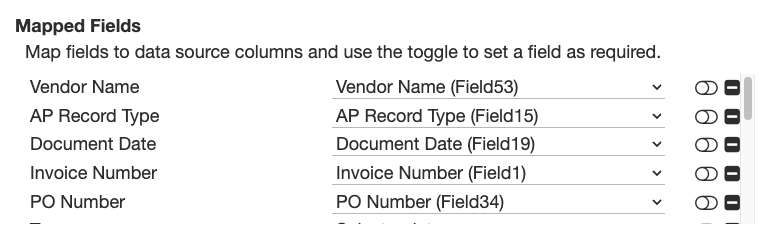
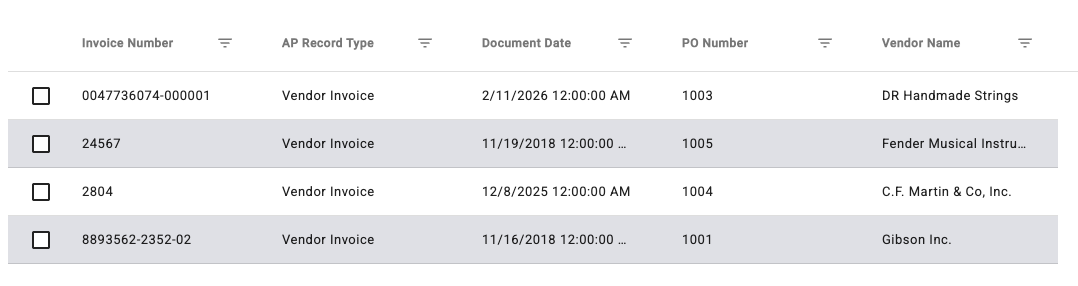
Since the lowest field number is the Invoice Number (Field 1), that is the first column in the results. Next is AP Record Type (Field 15), followed by the remainder of the fields.
Rows
The data returned is in ascending order, initially based on the lowest field number. For identical data in a column, the order is then determined by the next lowest field number.
Example: Data XChange Connection String for SQL
Provider=sqloledb;Server=sqlservername\instancename;Database=databasename;Trusted_Connection=Yes;
Example: Data XChange Connection String for CSV files
The Connection String provides instructions on how the GlobalSearch server talks to the external data source. In this example, you need the connection string to link to a CSV file on drive C of the GlobalSearch server and the CSV file has column headers. The connection string should look similar to the examples below:
The Data Source= value is pointing to a directory not a file, this is very important, make sure you point your connection string correctly
Access (GlobalSearch 4.5.2 and below) :
Provider=Microsoft.Jet.OLEDB.4.0;Data Source=c:\data\updatefiles;Extended Properties="text;HDR=Yes;";Persist Security Info=False
With GlobalSearch 5.0.0 the above connection string is defunct because GlobalSearch has switched to be completely 64 bit and the above provider, Microsoft.Jet.OLEDB.4.0 is a 32 bit driver. Instead you need to install and use the 64 bit Microsoft.Ace.OLEDB.12.0, you can download the installer from; https://www.microsoft.com/en-us/download/details.aspx?id=54920 . Be sure to select the _x64 version of the installer when you start your download.
Once that is installed you can use the following connection string;
GlobalSearch 5.0+:
Provider=Microsoft.Ace.OLEDB.12.0;Data Source=c:\CSVData;Extended Properties="Text;HDR=Yes;FORMAT=Delimited";