SQL Query Form Actions
On a per form basis, you can write SQL transactions that run on submission. Use this functionality create unique ID's that can be bound to the transaction (Requsition ID, Expense Report ID, etc.), or to save data from the submission to a SQL Data source. You will need to configure GlobalForms to support SQL connections if you haven't already done so.
Navigate to the GlobalForms installation directory in Windows Explorer and open the config folder. Open the file default.json in a text editor and find the mssql section. It will looks similar to this:
MSSQL Configuration
      "mssql": {
        "host": "Square9SQL\\GETSMART",
        "port": "1433",
        "database": "FormsControl",
        "user": "node",
        "password": "node"
      }
Modify the settings in this configuration section for your specific environment. Remember, your SQL Server instance must be setup to listen on the TCP/IP protocol. Make the changes and restart the GlobalForms service for the changes to take effect.
In this example, you will enter a First Name and Last Name to be inserted into an Employees table. The table must include an auto-incrementing Identity column that will be used as an employee ID. The script to create that table is below for reference:
Employees Table Create Script
SET ANSI_NULLS ON
GO

SET QUOTED_IDENTIFIER ON
GO

CREATE TABLE [dbo].[Employees](
	[ID] [int] IDENTITY(10001,1) NOT NULL,
	[FirstName] [varchar](150) NULL,
	[LastName] [varchar](150) NULL,
 CONSTRAINT [PK_Employees] PRIMARY KEY CLUSTERED
(
	[ID] ASC
)WITH (PAD_INDEX = OFF, STATISTICS_NORECOMPUTE = OFF, IGNORE_DUP_KEY = OFF, ALLOW_ROW_LOCKS = ON, ALLOW_PAGE_LOCKS = ON) ON [PRIMARY]
) ON [PRIMARY]
GO
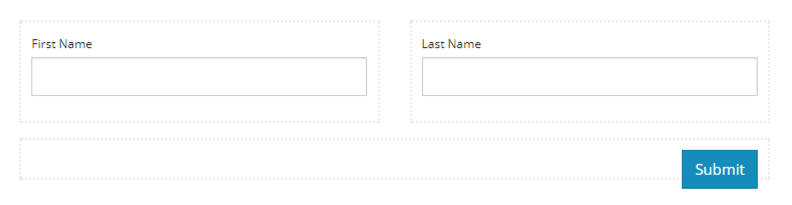
Create a web form that captures any data of interest. In this example, inputs for First Name and Last Name on an Employee Resource are laid out in the form designer. Be sure to make note of the API Property Name for each Form Component. In this example, the component names are simply firstName and lastName.
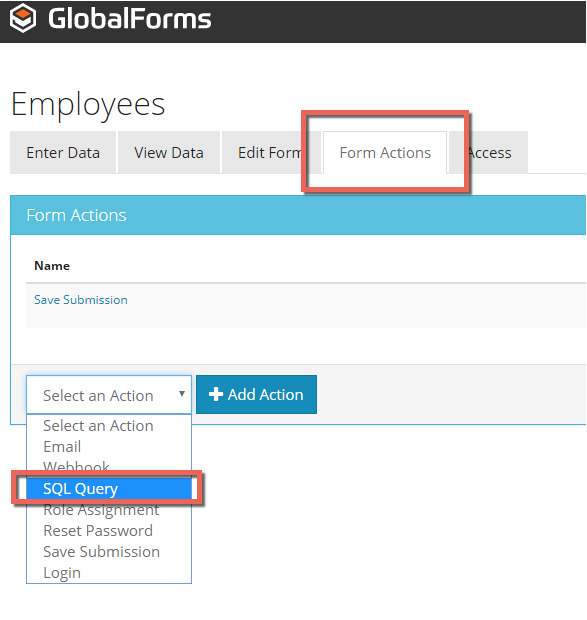
With the form created, click the Form Actions tab and choose SQL Query from the Select an Action drop down. Click the Add Action button to configure the Action.
Give the Action a descriptive Title. If you have multiple Actions, it is helpful to be able to easily identify them for maintenance and support. In the SQL Server Type drop down, choose Microsoft SQL Server. In the Query box, you can type a SQL statement to execute. Using the table defined above, you can insert into the table with the following script:
SQL Insert
insert into Employees (FirstName, LastName) VALUES ('{{ data.firstName }}','{{ data.lastName }}');Alter the Handler setting if required, the Handler controls when the action is fired, either before or after the submission is created, updated, etc.
Select the Method that Applies to you:
You can fire your Form Action on a few events including:
- Create - Fires your event on the creation of a submission. In this example, we use a Create Method.
- Update - Fires your action on update of a submission, you should use this if you need to fire your event if a document is getting updated, for example by a user in GlobalCapture via the Batch Manager.
In addition, other Methods exist, including:
- Delete
- Read
- Index
A few things to note about the insert into Employees:
- You do not need to insert data into the ID column. This column is an Identity column and any insert will automatically calculate the value of this column.
- The value inserted into the identify column is mappable in the GlobalForms mapping utility. This allows you to leverage this data in a GlobalCapture workflow if desired. For example, in a PO example, you may wish to send an email to the form submitter notifying them of the PO for their request.
- Data from the form is accessible in the SQL Statement and is accessed using the data variable, as is the case in most rules in the GlobalForms application. Wrapping the variables in Handlebars {{ }} allows GlobalForms to discern between a literal string you are looking to insert and data entered into the form.
Click the Save Action button to save the changes. Test the insert by submitting the form. You should see the submitted data inserted into the SQL Table.
This link is the Employees Resource used in this example. Import it into your own GlobalForms instance to experiment with the form and review its configuration.