Portal Management
Portals are connection points to other systems that may require unique addressing and authentication. Originally implemented as a way to internally control access to process data, Portals include but now extend beyond processes. Portals are used for managing access to documents that are in process or have been processed by GlobalCapture?Action. Portals are also leveraged to define external endpoints like GlobalForms and GlobalSearch.
Portal types include:
Square9 API Portal – If GlobalCapture is installed with GlobalSearch, a default Square9 API Portal may be created. If you have multiple instances of GlobalSearch, create multiple Square9 API Portals. A single GlobalCapture instance can release to multiple GlobalSearch systems in this way. The GlobalSearch user configured to a Portal should include rights to any potential Archive, or should be configured as an Administrator in GlobalSearch, to ensure the proper functioning of this Portal.
GlobalForms Portal – If using GlobalForms, this Portal type is necessary to allow GlobalCapture to import from a GlobalForms instance and update GlobalForms submissions with relevant system data.
Mongo System Portal - New as of version 3.0, the System Portal allows GlobalCapture to target the base Mongo environment for an installation. For systems being migrated from server to server, the System Portal allows for tooling to update the targeted MongoDB in addition to the credentials for connecting to it. For 3.0 and greater environments that might be targeting multiple MongoDB servers, the System Portal will always reference the primary server (the server hosting the WorkflowEngine AND ServiceEngine system databases). All GlobalCapture systems have one and only one System Portal, and the targeted MongoDB instance must have both system databases.
Mongo Processes - New as of version 3.0, Process Portals allow for movement and control of workflow specific process and completed processes. All environments include at least one process portal by default, which is configured to use the collection “processes” in the WorkflowEngine database. Administrators may define multiple Processes Portals that might exist on multiple MongoDB Servers. Note that ALL configured Process Portals must be accessible to GlobalCapture at start time or Engines will not start properly. Process portals may be specifically targeted when new workflows are saved, and by End Nodes in existing workflows (used for moving completed processes out of the master database collection). Users may be granted permissions to a Portal to interact with document batches at an administrative level. User-level permissions are managed in Workflow Validation Nodes, or for GlobalCapture 3.0 and greater, Searches. When Portals are created, no security is set by default.
SMTP Portal - New with version 3.0, SMTP Portals offer a centralized means for SMTP settings to be stored and managed in GlobalCapture and GlobalAction.
Create Portals
For a typical installation, the default Portal configuration will be enough to manage the system. If you wish to grant administrator access to Batches from specific Workflows, or you wish to physically segregate Batches in the administrative view, create additional Portals as needed and secure them accordingly.
To create a new Portal, click the Manage button from the GlobalCapture home page or the Manage icon in the toolbar to access the GlobalSearch Administration page.
In Administration, click Portals. The configured Portals will appear in the interface.
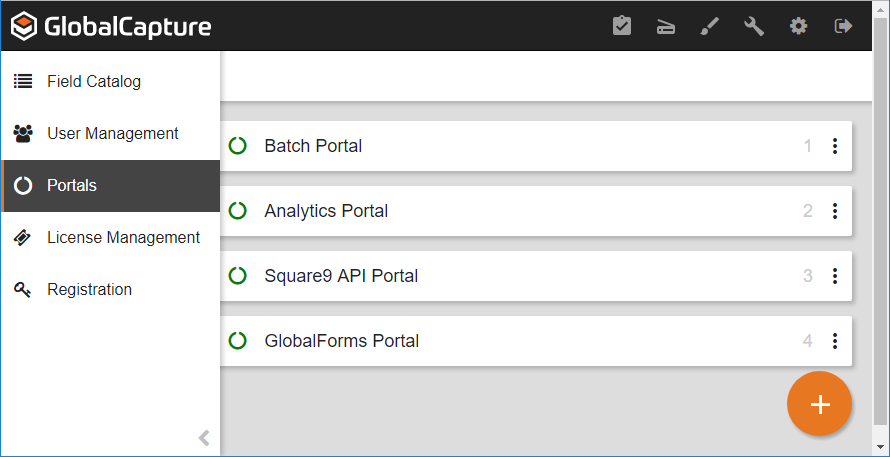
Click the Add FAB icon (orange +) found in the bottom right corner of the screen. A new Portal configuration screen is displayed.
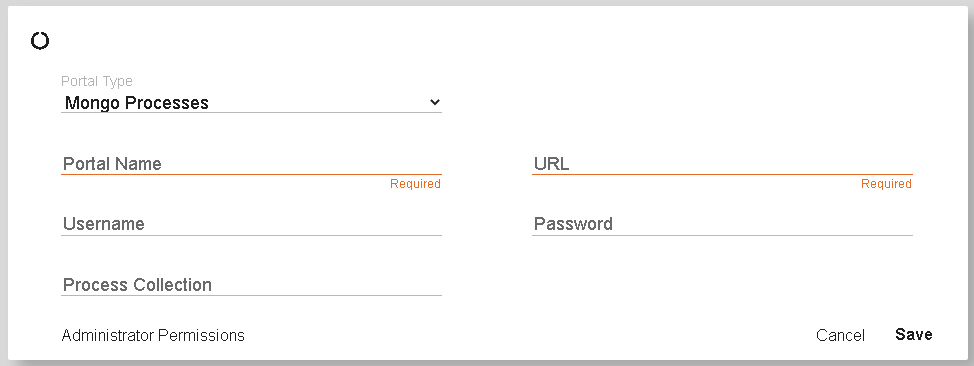
Select the Portal Type
Enter a name for the new Portal.
Specify the URL of the target server. Note, URL is leveraged by both Mongo portal types, GlobalSearch portals, and GlobalForms portals. Use the same URL as the Default Portal unless you have installed separate services, in which case enter the URL for whichever server will host the new Portal.
For environments prior to version 3.0, the URL is based on the application server and the port used by the
ssBatchPortalservice, which defaults to 6457.Customers using 3.0 or greater, specify the MongoDB server connection string to your target environment. For all in one and demo setups, this is generally “mongogb://127.0.0.1:27017”.
The default port for the GlobalForms Portal is 3001, or 5454 for SSL secured environments.
When creating additional portals, it can be helpful to review settings of an existing Portal as the URL parameter will likely be the same.
Enter your administrator username and password. Note that for a GlobalForms Portal, the user must be the administrator of the GlobalForms instance that was created during the GlobalForms installation, or at a minimum is a user that has permissions to update all submissions for a particular form.
If configuring a new Process Portal, provide a name in the Process Collection field.
Click Save. The new Portal will appear at the bottom of the list of Portals. Portals appear in the order in which they were created.
Click the Test Connection icon (the Power icon in the upper left corner of the card) to test the Portal link. Clicking this icon will change its color, depending on the connections status:
Green – Indicates a connection.
Yellow – Indicates a connection is in progress.
Red – Indicates a failed connection. See the Troubleshooting Batch Portal page in the Square 9 Support knowledge base if you have a Portal in this state.
Default Batch Portal and Workflow Security (Prior to version 3.0)
New Workflows are automatically managed by the Default Batch Portal unless you edit the Secured Workflow list.
Once the list is altered, new Workflows are no longer automatically added to the Secured Workflow list, but are instead added to the Available Workflow list. You must now use the Batch Portal settings to manually add the Workflows to the Secured list.
You can add or remove Workflows from a Portal, but there must be at least one Workflow in the Secured Workflow list for each Portal.
When you create a new Batch Portal, all Workflows that are published and saved will end up in the new Batch Portal’s Secured Workflow list. New Workflows are automatically added to this new Batch Portal until you start to manually manage the Secured Workflow list.
The Default Batch Portal is created at installation and by default the SSAdmin group is granted access to this Portal. Other users can be granted access to the Default Portal as well by adding them to the Portal’s Secured Users & Groups list. Note that if you manually create a Portal, no users or groups will have permissions.
You must manually grant users access, including the SSAdmin group, to new Batch Portals by adding them to the new Batch Portals’ Secured Users & Groups list.
Configure Portals
Secure Users and Groups
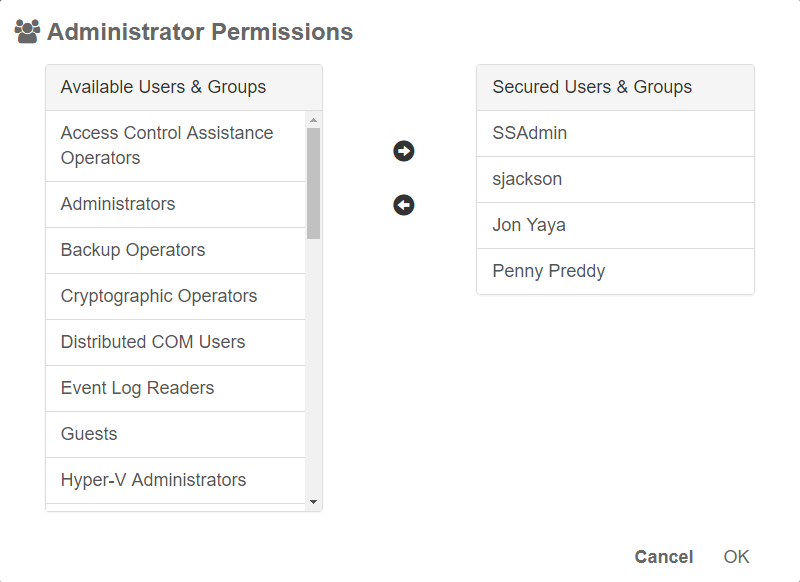
To configure which user has permissions to Batch Portals (and therefore the documents in the Portals), click Administrator Permissions. Note that Portal permissions takes precedence over Validate Node security. Only administrator-level users are secured to a Portal here.
On the Users & Groups Security tab, from the Available Users & Groups list, select users who will have access to the Portal.
Click the Move Right (right arrow) button to move the selected users to the Secured Users & Groups list.
To rescind permissions, select users from the Secured Users & Groups list and click the Remove (left-arrow) button to return them to the Available Users & Groups list.
Click OK to save the settings and close the dialog, then click Save.
Secure Workflows
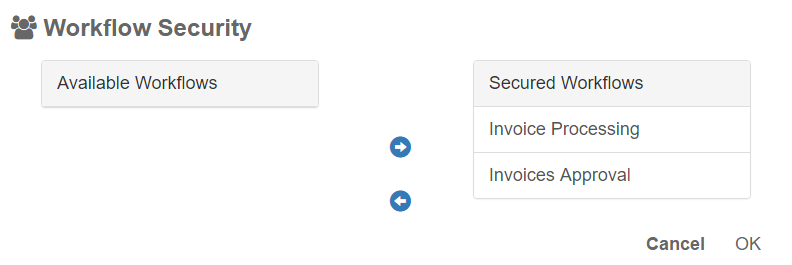
To configure security on Workflows in Batch Portals, in the Portal interface, click Workflow Security.
In the Workflow Security dialog, select Workflows from the Available Workflows list and click the Move Right (right-arrow) button to add them to the Secured Workflows list.
To rescind permissions, select users and/or groups from the Secured Workflows list and click the Move Left (left-arrow) button to return them to the Available Workflows list.
Click OK to save the settings and close the dialog, then click Save.